The step-by-step guide on this page will show you how to setup local apt repository server on Ubuntu 22.04 with apt-mirror command.
One of the reasons why you may consider setting up a local apt repository server is to minimize the bandwidth required if you have multiple instances of Ubuntu to update. Take for instance a situation where you have 20 or so servers that all need to be updated twice a week. You could save a great deal of bandwidth because all you need to do is to updates all your systems over a LAN from your local repository server.
Prerequisites
- Pre Installed Ubuntu 22.04
- Apache Web Server
- Regular User with sudo rights
- Minimum of 240 GB free disk space on /var/spool file system
- A reliable internet connection to download packages
1) Install Apache Web Server
First off, log in to your Ubuntu 22.04 system and set up the Apache web server as shown.
$ sudo apt install -y apache2
Enable Apache2 service so that it will be persistent across the reboot . Run following command
$ sudo systemctl enable apache2
Apache’s default document root directory is located in the /var/www/html path. We are later going to create a repository directory in this path that will contain the required packages needed.
2) Create Package Repository Directory
Next, we will create a local repository directory called ubuntu in the /var/www/html path.
$ sudo mkdir -p /var/www/html/ubuntu
Set the required permissions on above created directory.
$ sudo chown www-data:www-data /var/www/html/ubuntu
3) Install Apt-Mirror Utility
The next step is to install apt-mirror package, after installing this package we will get apt-mirror utility which will download and sync the remote Debian packages to our local repository on our server. So for its installation, run
$ sudo apt update
$ sudo apt install -y apt-mirror
4) Configure Apt-Mirror
Once apt-mirror is installed then its configuration file ‘/etc/apt/mirrror.list’ is created automatically. This file contains list of repositories that will be downloaded or sync on the local folder of our Ubuntu server. In our case local folder is ‘/var/www/html/ubuntu/’. Before making changes to this file let’s backup first using cp command.
$ sudo cp /etc/apt/mirror.list /etc/apt/mirror.list-bak
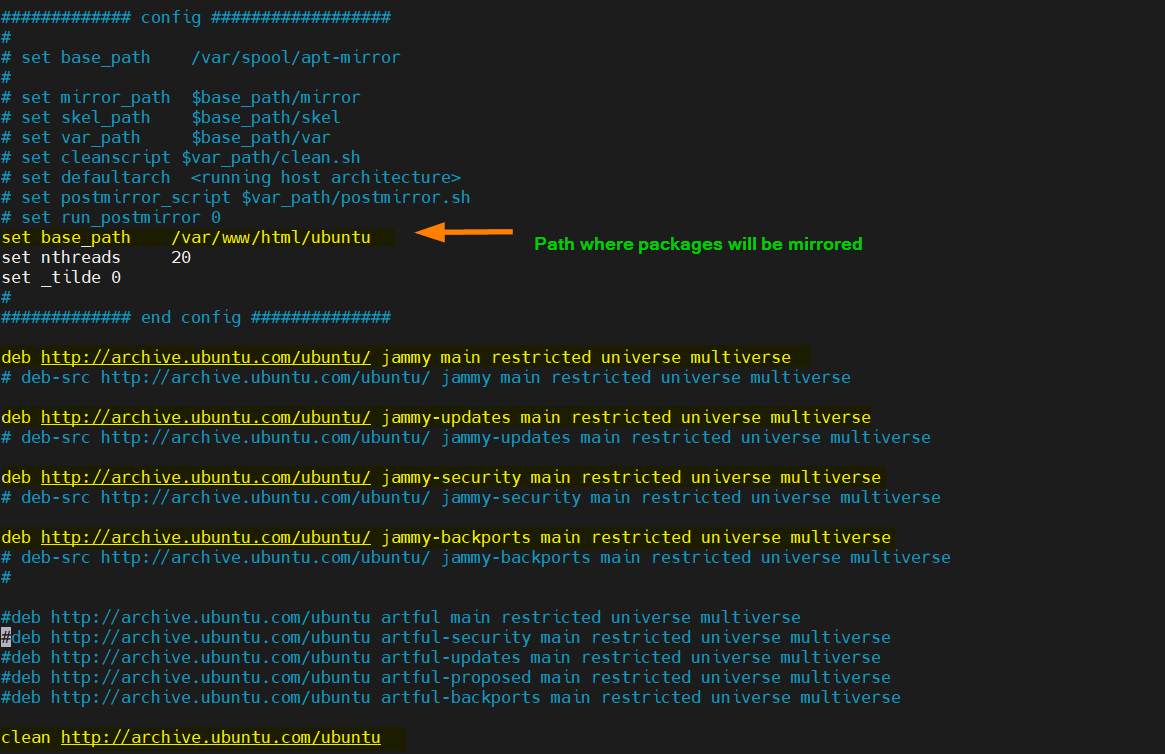
Now edit the file using vi editor and update base_path and repositories as shown below.
$ sudo vi /etc/apt/mirror.list

############# config ###################
set base_path    /var/www/html/ubuntu
set nthreads     20
set _tilde 0
############# end config ##############
deb http://archive.ubuntu.com/ubuntu/ jammy main restricted universe multiverse
# deb-src http://archive.ubuntu.com/ubuntu/ jammy main restricted universe multiverse

deb http://archive.ubuntu.com/ubuntu/ jammy-updates main restricted universe multiverse
# deb-src http://archive.ubuntu.com/ubuntu/ jammy-updates main restricted universe multiverse

deb http://archive.ubuntu.com/ubuntu/ jammy-security main restricted universe multiverse
# deb-src http://archive.ubuntu.com/ubuntu/ jammy-security main restricted universe multiverse

deb http://archive.ubuntu.com/ubuntu/ jammy-backports main restricted universe multiverse
# deb-src http://archive.ubuntu.com/ubuntu/ jammy-backports main restricted universe multiverse

clean http://archive.ubuntu.com/ubuntu
Save and exit the file.
In case you might have noticed that I have used Ubuntu 22.04 package repositories and have comment out the src package repositories as I don’t have enough space on my system. If you wish to download or sync src packages too then uncomment the lines which starts with ‘deb-src’.
If you want to mirror Ubuntu 20.04 packages as well then add the following lines in mirror.list file.
deb http://archive.ubuntu.com/ubuntu/ focal main restricted universe multiverse
#deb-src http://archive.ubuntu.com/ubuntu/ focal main restricted universe multiverse

deb http://archive.ubuntu.com/ubuntu/ focal-updates main restricted universe multiverse
#deb-src http://archive.ubuntu.com/ubuntu/ focal-updates main restricted universe multiverse

deb http://archive.ubuntu.com/ubuntu/ focal-security main restricted universe multiverse
#deb-src http://archive.ubuntu.com/ubuntu/ focal-security main restricted universe multiverse

deb http://archive.ubuntu.com/ubuntu/ focal-backports main restricted universe multiverse
#deb-src http://archive.ubuntu.com/ubuntu/ focal-backports main restricted universe multiverse
5) Start Mirroring Repositories to Local Folder
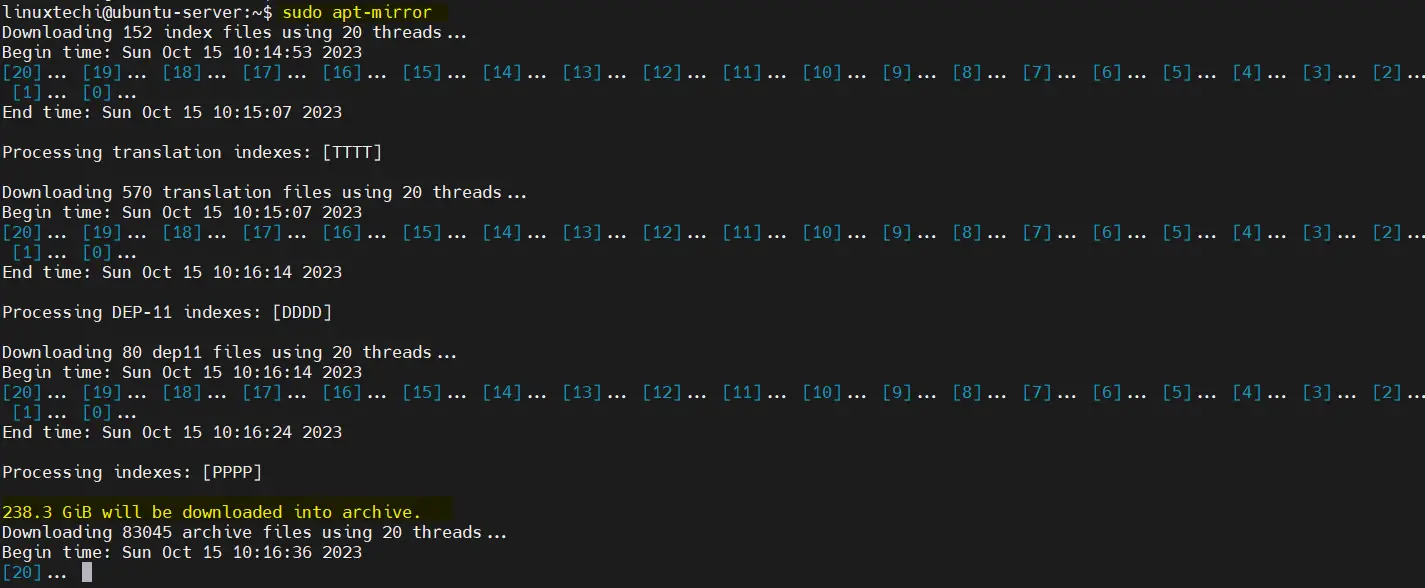
Now, you can run apt-mirror command to start the mirroring process. This will download the packages from the specified repositories and store them in the designated local folder (base_path).
$ sudo apt-mirror
The mirroring process may take some time even couple of hours, depending on your internet speed and the size of the repositories.
Above command can also be started in the background using below nohup command,
$ nohup sudo apt-mirror &
To monitor the mirroring progress use below,
$ tail nohup.out
Great, output above confirms that the mirroring is completed.
In Ubuntu 22.04, there are some issue noticed with apt-mirror command like it does not mirror CNF folder, icon tar files and binary-i386, so to fix these issues, create a script with following content and execute it.
$ vi fix-errors.sh
#!/bin/bash

cd /var/www/html/ubuntu/archive.ubuntu.com/ubuntu/dists

for dist in jammy jammy-updates jammy-security jammy-backports; do
  for comp in main multiverse universe; do
    for size in 48 64 128; do
    wget http://archive.ubuntu.com/ubuntu/dists/$dist/$comp/dep11/icons-${size}x${size}@2.tar.gz -O $dist/$comp/dep11/icons-${size}x${size}@2.tar.gz;
   done
 done
done

cd /var/tmp
for p in "${1:-jammy}"{,-{security,updates,backports}}\
/{main,restricted,universe,multiverse};do >&2 echo "${p}"
wget -q -c -r -np -R "index.html*"\
"http://archive.ubuntu.com/ubuntu/dists/${p}/cnf/Commands-amd64.xz"
wget -q -c -r -np -R "index.html*"\
"http://archive.ubuntu.com/ubuntu/dists/${p}/cnf/Commands-i386.xz"
wget -q -c -r -np -R "index.html*" \
"http://archive.ubuntu.com/ubuntu/dists/${p}/binary-i386/"
done

sudo cp -av archive.ubuntu.com/ubuntu/ /var/www/html/ubuntu/archive.ubuntu.com
save and close the file.
$ sudo chmod +x fix-errors.sh
$ sudo bash fix-errors.sh
Note: We need to execute the above script only once.
Next create the following symbolic link so that we can access repository over the browser as well.
$ sudo ln -s /var/spool/apt-mirror/mirror/archive.ubuntu.com /var/www/html/ubuntu
6) Scheduling Mirroring using Cronjob
Configure a cronjob to automatically update our local apt repositories. It is recommended to setup this cron job in the night daily.
Run crontab command and add following command to be executed daily at 1:00 AM in the night.
$ sudo crontab -e

00  01  *  *  *  /usr/bin/apt-mirror
Save and close.
7) Access Local APT Repository Using Web browser
In case Firewall is running on your Ubuntu system then allow port 80 using following command
$ sudo ufw allow 80
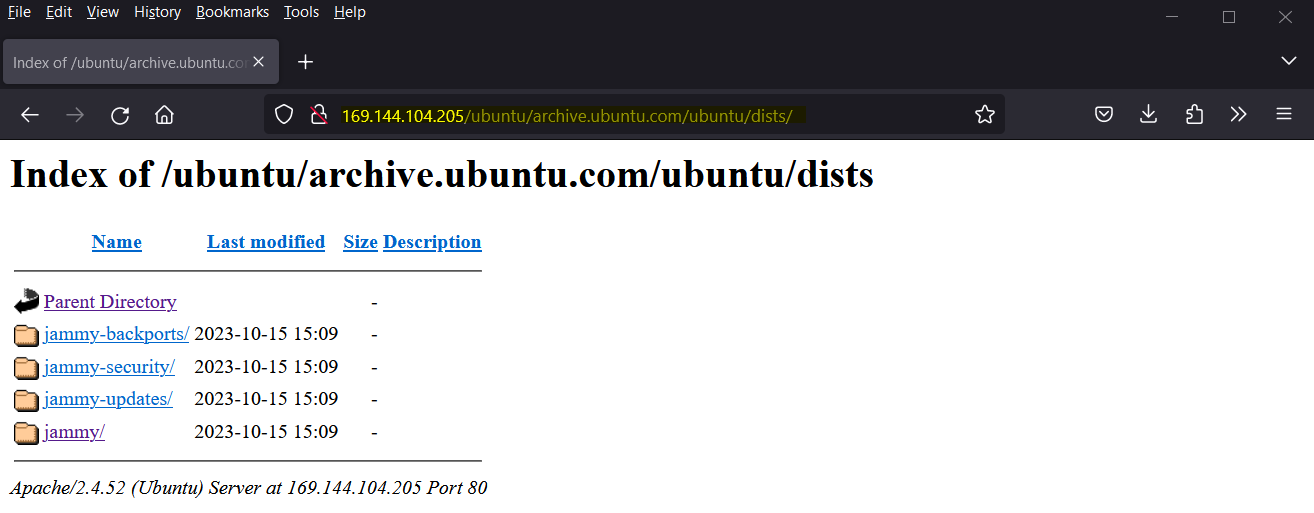
Now, try to access locally configured apt repository using web browser, type the following URL:
http://<Server-IP>/ubuntu/archive.ubuntu.com/ubuntu/dists/
8) Configure Client to Use Local Apt Repository Server
To test and verify whether our apt repository server is working fine or not, I have another Ubuntu 22.04 system where I will update /etc/apt/sources.list file so that apt command points to local repositories instead of remote.
So, login to the system, change the following in the sources.list
http://archive.ubuntu.com/ubuntu
to
http://169.144.104.205/ubuntu/archive.ubuntu.com/ubuntu
Here ‘169.144.104.205’ is the IP Address of my apt repository server, replace this ip address that suits to your environment.
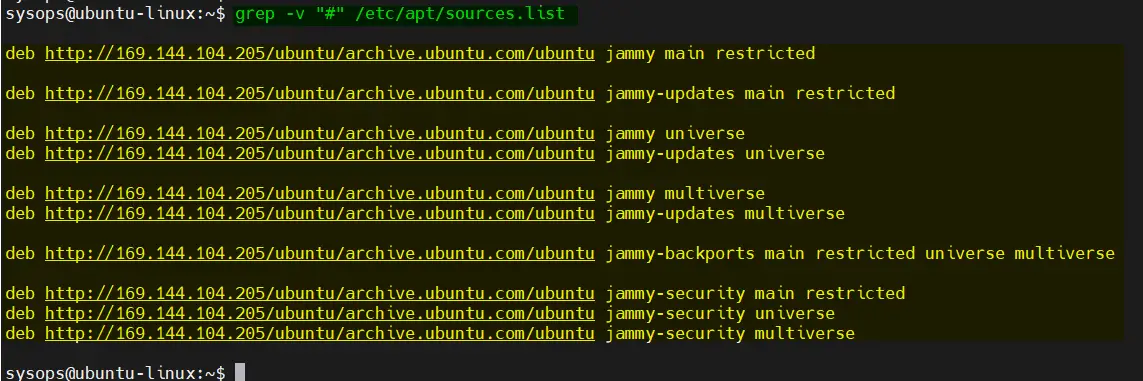
Also make sure comment out all other repositories which are not mirrored on our apt repository server. So, after making the changes in sources.list file, it would look like below:
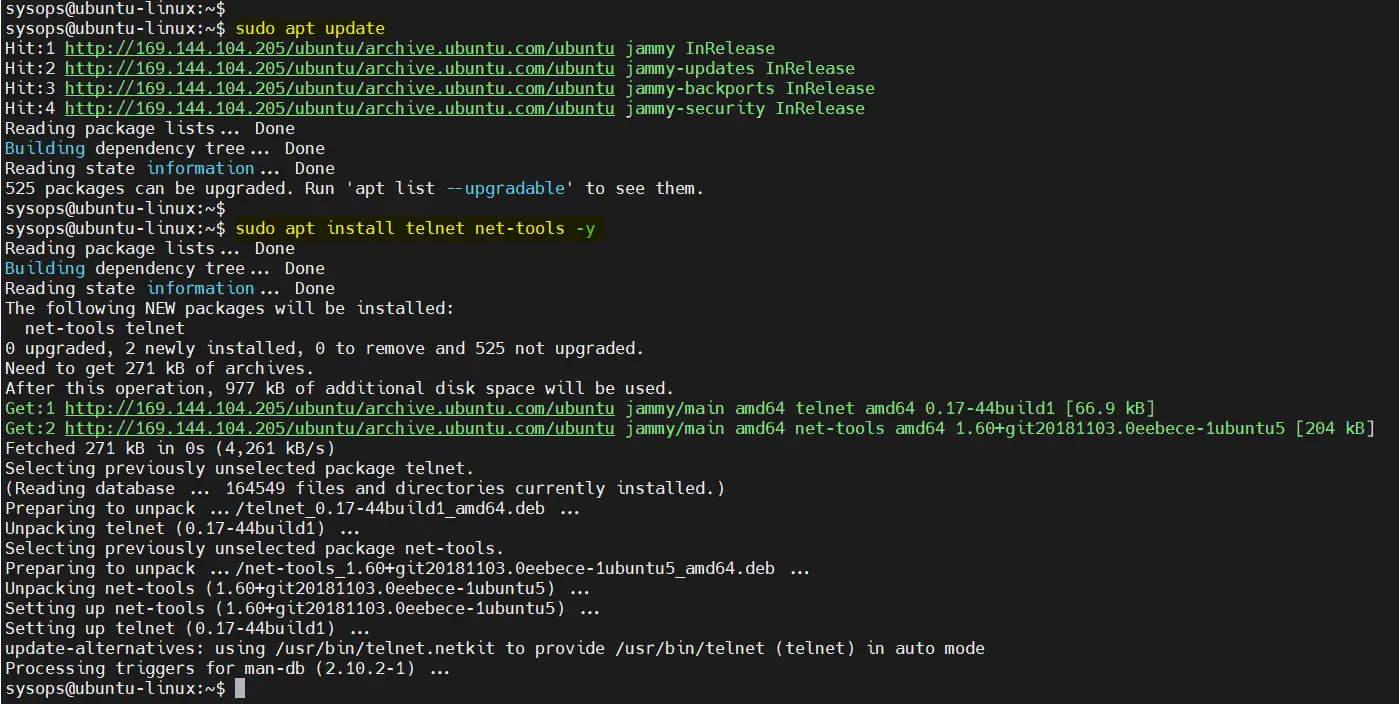
Now run ‘apt update’ command to verify that client machine is getting update from our local apt repository server,
$ sudo apt update
Perfect, above output confirms that client machine is successfully able to connect to our repository for fetching the packages and updates. That’s all from this guide, we hope this guide helps you to setup local apt repository server on Ubuntu 22.04 system.
Conclusion:
Setting up a local APT repository server using apt-mirror on Ubuntu 22.04 can significantly improve package management and reduce external network dependencies. This is especially beneficial for organizations and individuals managing custom packages or large-scale deployments. By following the steps outlined in this blog post, you can ensure a reliable, controlled, and efficient software distribution within your network.
Also Read : 14 Useful ls Command Examples in Linux




Hi Guys,
I have tried all the soutions above mentione for failed to fetch but still its throwing error, i need advice please.
Server version UBUNTU jammy 22.04
in below error I have replaced my reposerver IP with x.x.x.x
Need urgent support please
HI Niyaz,
I will try to update steps for Ubuntu 22.04 in this post.
Hi Niyaz,
May I know what error you’re having? and which part of the tutorial is it happening at?
I recently upgraded 18.04 LTS to 22.04 LTS and it seems okay.
Hi
I did all the steps in the tutorial instead the cronjob step. I get some errors as following:
Please help me )
E: Failed to fetch http://192.168.132.5/ubuntu/mirror/archive.ubuntu.com/ubuntu/dists/focal-backports/main/binary-amd64/Packages 404 Not Found [IP: 192.168.132.5 80]E: Failed to fetch http://192.168.132.5/ubuntu/mirror/archive.ubuntu.com/ubuntu/dists/focal-updates/main/cnf/Commands-amd64.xz Hash Sum mismatch
Hashes of expected file:
- Filesize:16968 [weak]
- SHA256:a2853985a54012119daedefa2cfe40b64f72910e08e56af972fb87542fff96ea
- SHA1:7aa4a3e3ed3fd0e42367c62bb20df8a53bfb12c5 [weak]
- MD5Sum:3ed2c21b74f9d79fe3e49e62accf3486 [weak]
Hashes of received file:
- SHA256:69dc328ced4a21b2ad87f082697acc3e9406ebcfada9a1a1be0a14f5b56dcc67
- SHA1:a4c098f120bfdcf249495aa5f9da49ba0c7859be [weak]
- MD5Sum:3346d131067120a925e8f8e2057ff957 [weak]
- Filesize:16968 [weak]
Last modification reported: Thu, 03 Aug 2023 18:18:11 +0000
Release file created at: Thu, 03 Aug 2023 20:01:41 +0000
E: Failed to fetch http://192.168.132.5/ubuntu/mirror/archive.ubuntu.com/ubuntu/dists/focal-updates/universe/cnf/Commands-amd64.xz
E: Failed to fetch http://192.168.132.5/ubuntu/mirror/archive.ubuntu.com/ubuntu/dists/focal-security/main/cnf/Commands-amd64.xz Hash Sum mismatch
Hashes of expected file:
- Filesize:13012 [weak]
- SHA256:913a09a340ac9174e8571169b80682f00eea224adeb89e61b0130852b7fd7523
- SHA1:ed0fee2ff53cd0e7dbfa658f563f2175fa65834e [weak]
- MD5Sum:44fc313d087fa7d7356f046faa75f576 [weak]
Hashes of received file:
- SHA256:08ae54589a0193419b4d962e3220edd1e12a49dda070e72f97737a95f6a76b46
- SHA1:7ab5262639d6091fb6e21fa1fcabde397e142355 [weak]
- MD5Sum:a3b6d43fe104d090e8055ec159b510ba [weak]
- Filesize:13012 [weak]
Last modification reported: Wed, 02 Aug 2023 17:19:29 +0000
Release file created at: Thu, 03 Aug 2023 17:45:16 +0000
E: Failed to fetch http://192.168.132.5/ubuntu/mirror/archive.ubuntu.com/ubuntu/dists/focal-security/universe/cnf/Commands-amd64.xz
E: Some index files failed to download. They have been ignored, or old ones used instead.
Hi Pradeep,
May i ask how do i include multiple repositories in the cnf script? currently it is as follows:
for p in “${1:-jammy}”{,security,updates}}/{main,restricted,universe,multiverse};
If i would like to include focal, what do i have to change or add?
Thank you.
############# end config ##############
deb http://archive.ubuntu.com/ubuntu focal main restricted universe multiversedeb http://archive.ubuntu.com/ubuntu focal-security main restricted universe multiverse
deb http://archive.ubuntu.com/ubuntu focal-updates main restricted universe multiverse
#deb http://archive.ubuntu.com/ubuntu focal-proposed main restricted universe multiverse
deb http://archive.ubuntu.com/ubuntu focal-backports main restricted universe multiverse
#deb http://archive.ubuntu.com/ubuntu artful main restricted universe multiverse

#deb http://archive.ubuntu.com/ubuntu artful-security main restricted universe multiverse

#deb http://archive.ubuntu.com/ubuntu artful-updates main restricted universe multiverse

#deb http://archive.ubuntu.com/ubuntu artful-proposed main restricted universe multiverse

#deb http://archive.ubuntu.com/ubuntu artful-backports main restricted universe multiverse
#deb-src http://archive.ubuntu.com/ubuntu artful main restricted universe multiverse#deb-src http://archive.ubuntu.com/ubuntu artful-security main restricted universe multiverse
#deb-src http://archive.ubuntu.com/ubuntu artful-updates main restricted universe multiverse
#deb-src http://archive.ubuntu.com/ubuntu artful-proposed main restricted universe multiverse
#deb-src http://archive.ubuntu.com/ubuntu artful-backports main restricted universe multiverse
Thanks for this tutorial. I would like to implement this on a VM to keep all the other VMs up to date. However, I cannot give this VM 300GB of disk space.
How to change the Apache folder to a NFS share on my NAS?
Hey Davide,
You can try following approach
1) Stop your Apache Server
2) Create a backup of /var/www/html
3) Now mount /var/www/html on NFS share, don’t forget to the entry in fstab file.
Hi and thanks for the great work. im having an issue when trying to access over http using chrome.
Forbidden
You don’t have permission to access this resource.
Apache/2.4.52 (Ubuntu) Server at 10.201.226.43 Port 80
I have made sure that i have followed all the steps especially permissions but i’m still unable to access.
Any ideas?
Update – I didn’t realise that i had to place proxy settings in the environment and DL working and can browse.
Can you please let me know what do you mean by proxy settings?
Hello guys, I have this issue
Forbidden
You don’t have permission to access this resource.
Apache/2.4.52 (Ubuntu) Server at 34.246.250.187 Port 80
Any chance to let me know what the issue would be please? I followed the instructions.
how much disk size is required my 600G disk is full
A full mirror of the Ubuntu 22.04 repository, including all architectures (amd64, arm64, i386, etc.) and components (main, universe, restricted, multiverse), typically requires 500GB–1TB or more. This includes all package versions, metadata, and additional files.