In this blog post, we will show you how to setup high availability NFS cluster on RHEL 9 / 8 using pacemaker.
NFS (Network File System) is the most widely server to provide files over network. With NFS server we can share folders over the network and allowed clients or system can access those shared folders and can use them in their applications. When it comes to the production environment then we should configure nfs server in high availability to rule out the single point of failure.
Prerequisites
- Pre-Install RHEL 9/8 on node1 & node2
- Red Hat Subscription or local yum repository
- Root User or Sudo User with Admin access
- Remote SSH Access
Lab Details
- NFS Server 1 (node1.example.net) – 192.168.1.140 – Minimal RHEL 9/8
- NFS Server 2 (node2.example.net) – 192.168.1.150 – Minimal RHEL 9/8
- NFS Server VIP – 192.168.1.151
- Shared Disk of size 20GB
1) Set Host Name and update hosts file
Login to both the nodes and set hostname using hostnamectl command as shown below:
//Node1
$ sudo hostnamectl set-hostname "node1.example.net"

$ exec bash
//Node2
$ sudo hostnamectl set-hostname "node2.example.net"
$ exec bash
Update the /etc/hosts file on both the nodes, add the following content
192.168.1.140  node1.example.net
192.168.1.150  node2.example.net
2) Install High Availability Software Package
On the both the nodes, first enable high availability yum repositories using subscription-manager command.
For RHEL 9 Systems
$ sudo subscription-manager repos –enable=rhel-9-for-x86_64-highavailability-rpms
For RHEL 8 Systems
$ sudo subscription-manager repos –enable=rhel-8-for-x86_64-highavailability-rpms
Post enabling the repository, run below command on both the nodes to install high availability software like pcs and pacemaker.
$ sudo dnf install pcs pacemaker fence-agents-all -y

After installing the packages, allow high availability ports in the firewall, run beneath command on both the nodes.
$ sudo firewall-cmd --permanent --add-service=high-availability
$ sudo firewall-cmd --reload
3) Assign Password to hacluster and Start pcsd Service
Whenever we install pcs then it creates a user with name “hacluster”, this user is used by pacemaker to authenticate the cluster nodes. Execute the following echo command on both the nodes.
$ echo "<Password-String>" | sudo passwd --stdin hacluster
Start the PCSD service using systemctl command on both the nodes.
$ sudo systemctl start pcsd && sudo systemctl enable pcsd
4) Authenticate Nodes and Form a Cluster
Run the below pcs command from either of the node to authenticate the node. In my case, I am running the command from node1,
$ sudo pcs host auth node1.example.net node2.example.net

Now, form a cluster using these two nodes. Run “pcs cluster setup” command from node1. This command needs cluster name and nodes.
$ sudo pcs cluster setup nfs_cluster --start node1.example.net node2.example.net
$ sudo pcs cluster enable --all
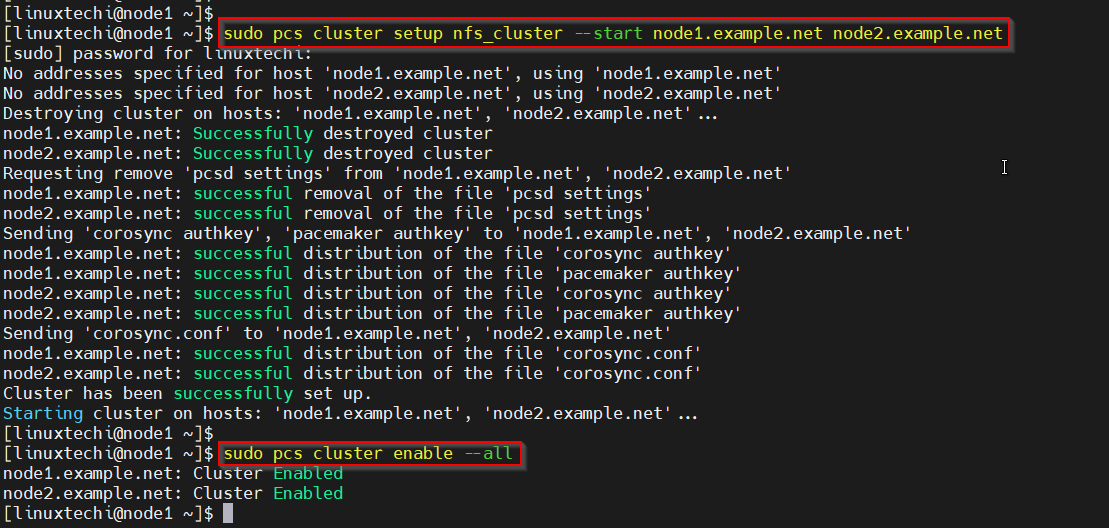
Next, check the cluster status using pcs cluster status command from any node.
$ sudo pcs cluster status

In my lab, we don’t have any fencing agent that’s why we are disabling fencing device using following command.
$ sudo pcs property set stonith-enabled=false
$ sudo pcs property set no-quorum-policy=ignore
Note : In production environments, it is highly recommended to configure the fencing device for your cluster.
If your cluster nodes are the VMware Virtual machines, then you can use “fence_vmware_soap” fencing agent. To configure “fence_vmware_soap” as fencing agent, refer the below logical steps:
a) Verify whether your cluster nodes can reach to VMware hypervisor or Vcenter
# fence_vmware_soap -a <vCenter_IP_address> -l <user_name> -p <password> \
 --ssl -z -v -o list |egrep "(node1.example.net|node2.example.net)"
or
# fence_vmware_soap -a <vCenter_IP_address> -l <user_name> -p <password> \
--ssl -z -o list |egrep "(node1.example.net|node2.example.net)"
if you are able to see the VM names in the output then it is fine, otherwise you need to check why cluster nodes not able to make connection esxi or vcenter.
b) Define the fencing device using below command,
# pcs stonith create vmware_fence fence_vmware_soap \
pcmk_host_map="node1:node1.example.net;node2:node2.example.net" \
ipaddr=<vCenter_IP_address> ssl=1 login=<user_name> passwd=<password>
c) check the stonith status using below command,
# pcs stonith show
5) Install NFS on both the nodes
Run the following dnf command on both the systems to install nfs,
$ sudo dnf install nfs-utils -y
Allow NFS Server ports in the firewall, following firewall-cmd on both the nodes.
$ sudo firewall-cmd --permanent --add-service={nfs,rpc-bind,mountd}
$ sudo firewall-cmd --reload
6) Configure Shared Disk for the Cluster
In my lab, we have attached a shared disk of size 20 GB on both the nodes. We will configure LVM on this disk and will format it with XFS file system.
Before using this disk, change the parameter “# system_id_source = “none”” to system_id_source = “uname” in /etc/lvm/lvm.conf file on both the nodes.
Run following sed command from both the systems.
$ sudo sed -i 's/# system_id_source = "none"/ system_id_source = "uname"/g' /etc/lvm/lvm.conf
Next, execute the following set of commands on node1 only to create lvm partition.
$ sudo pvcreate /dev/sdb
$ sudo vgcreate --setautoactivation n vol01 /dev/sdb
$ sudo lvcreate -L19.99G -n lv01 vol01
$ sudo lvs /dev/vol01/lv01
$ sudo mkfs.xfs /dev/vol01/lv01
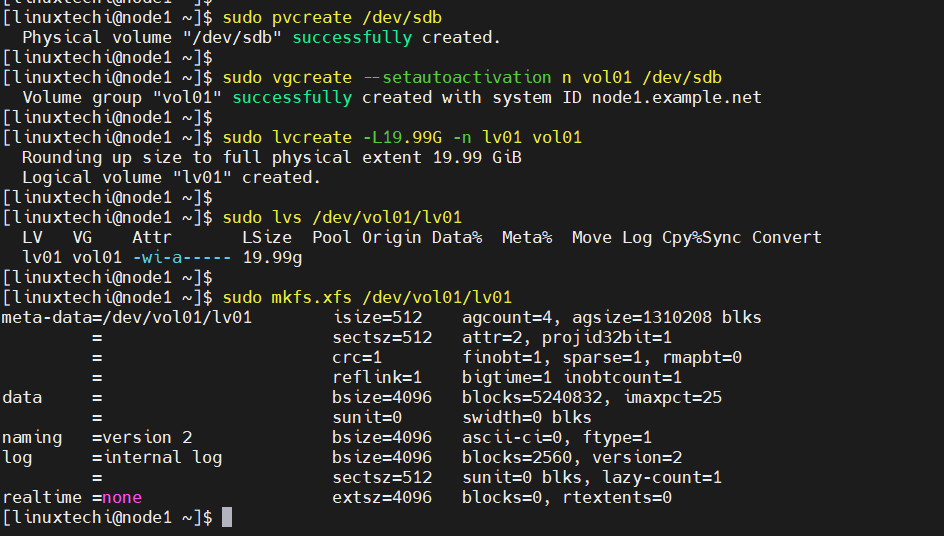
To have this lvm partition visible on the node2, then run beneath command from node2 only.
$ sudo lvmdevices --adddev /dev/sdb
Next configure NFS share for the nfs service , create the following folders on both the systems
$ sudo mkdir /nfsshare
Now try to mount above create lvm partition on this mount point from any node.
$ sudo lvchange -ay vol01/lv01
$ sudo mount /dev/vol01/lv01 /nfsshare/
$ df -Th /nfsshare/

Great, next umount it is using beneath commands.
$ sudo umount /dev/vol01/lv01
$ sudo  vgchange -an vol01
7) Setup High Availability NFS Cluster on RHEL 9/8
Define the Resource group and cluster resources for your nfs cluster. We have used following resource group and cluster reesources.
- nfsgroup is the group name under which all resources will created.
- nfs_lvm is name of resource for shared lvm volume (/dev/vol01/lv01)
- nfsshare is name of filesystem resource which will be mounted on /nsfshare
- nfsd is nfs-daemon for nfsserver
- nfs-root is the resource which define the allowed client’s specification.
- nfs_vip is the resource for VIP (IPadd2) for nic enp0s3.
- nfs-notify is the resource for NFS reboot notification.
Run the following pcs commands from either of the node.
$ sudo pcs resource create nfs_lvm ocf:heartbeat:LVM-activate vgname=vol01 vg_access_mode=system_id --group nfsgroup
$ sudo pcs resource create nfsshare Filesystem device=/dev/vol01/lv01 directory=/nfsshare fstype=xfs --group nfsgroup
$ sudo pcs resource create nfsd nfsserver nfs_shared_infodir=/nfsshare/nfsinfo nfs_no_notify=true --group nfsgroup
$ sudo pcs resource create nfs-root exportfs clientspec=192.168.1.0/24 options=rw,sync,no_root_squash directory=/nfsshare fsid=0 --group nfsgroup
$ sudo pcs resource create nfs_vip IPaddr2 ip=192.168.1.151 cidr_netmask=24 nic=enp0s3  --group nfsgroup
$ sudo pcs resource create nfs-notify nfsnotify source_host=192.168.1.151 --group nfsgroup

Next verify the cluster resources status,
$ sudo pcs status
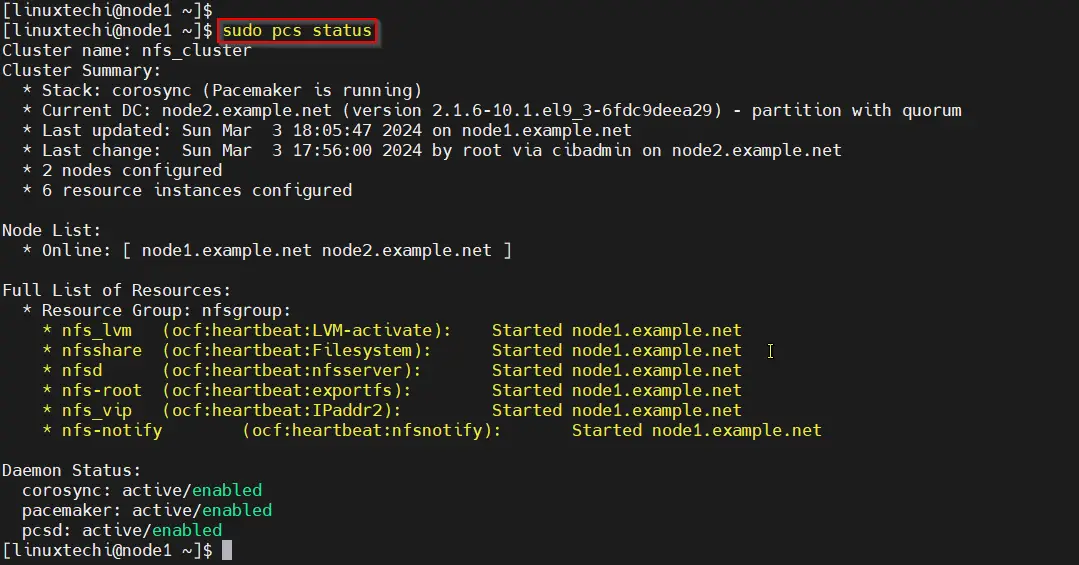
Perfect, output above confirms that all the resources are started successfully on node1.
8) Test NFS Cluster Installation
To test nfs cluster installation, put the node1 in standby mode and verify whether resources are moving to node2 automatically.
$ sudo pcs node standby node1.example.net
$ sudo pcs status
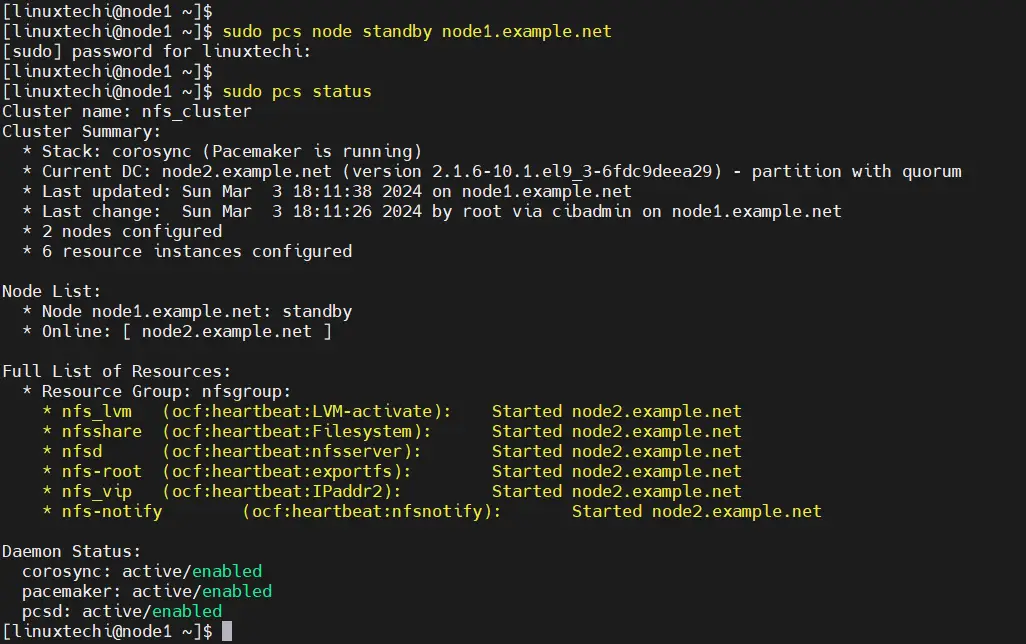
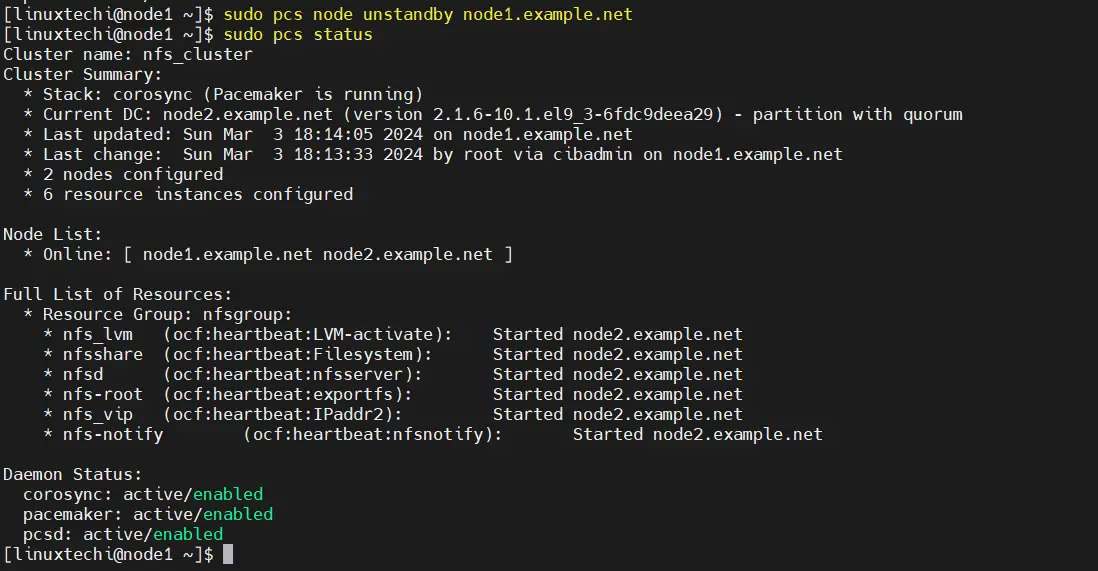
To unstandby the node, run
$ sudo pcs node unstandby node1.example.net
$ sudo pcs status
In order to mount NFS share on the client machine using following mount command.
$ sudo mount -t nfs 192.168.1.151:/nfsshare /mnt
$ df -h /mnt
$ cd /mnt
$ sudo touch test-file
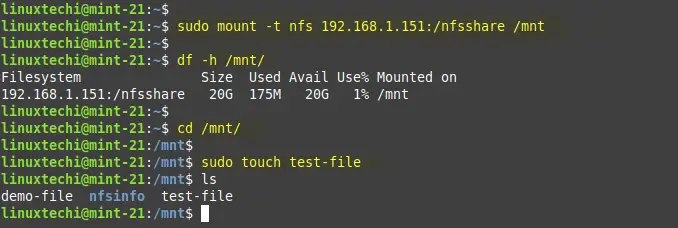
Above output confirms we are able to access the nfs share from the client machine.
That’s all from this guide, we believe that you have found it informative and useful. Feel free to post your queries and feedback in below comments section.



Amazing article! I haven’t had a chance to try it yet, but does it work with NFSv4?
Yes Tomas, It will work with NFSv4
Thanks to this article, I’ve managed to get the whole NFSv4 pacemaker cluster deployed via Puppet.
One small thing, you did group the resources together, but you didn’t set any order. I had a problem where the nfsroot resource failed because the nfsshare was not yet available. I’ve configured ordering constraints to resolve it.
Hi Tomas
How exactly did you do that
Hi,
Is this type of fence devices works if i using another scenario such as app cluster?
It does work regardless of the service that is clustered.
I just noticed that you use a shared disk on VirtualBox.
What happens when you actually try to fence a node manually? For example:
# pcs stonith fence nfs2
I cannot see anything here showing that you tested it, and that it worked. I don’t use VirtualBox therefore genuinely curious.
Hi Tomas,
‘pcs stonith fence’ command should fence the mentioned node
Will it work with RHEL 8?
Hello.
How can I make this procedure plus cifs shares?
Greetings.
Great article ! Exactly my need.
Just a question regarding resource configuration how much memory and cpu would you dedicate for each cluster node, for almost 50 users using a shared disk of almost 500GB?
not able to mount any suggestions?
I just added a disk as /dev/sdb, but when I issue the command ls -l /dev/disk/by-id I could not see what wwn-0x6001405e49919dad5824dc2af5fb3ca0 related to sdb, so I could not configure by your hints any any further !!! Any hints could provide ?
i have question : if i have one lun that is HA NFS on 3 clusters nodes , x ,y and z . if we suppose that cluster is mounted on server x , can we add nfs mount point on servers y z using the VIP ?
so the lun will be direct mounted to x and NFS mounted to Y and Z .
if yes ? then if server x went down will the lun will be mounted on Y or Z even if the NFS mount exist ?
Using Pacemaker we usually configure Active-Passive NFS cluster, All the services including VIP and NFS LUN will be available on active Node, let’s say x node, if due to some reasons this node went down then all services ( including NFS LUN and VIP) will be migrated to either y or z node.
I find also by this one “pcs resource create nfsshare Filesystem device=/dev/sdb1 directory=/nfsshare fstype=xfs –group nfsgrp”.
Because modern Linux will interchange the device name so I got /dev/sdb1 and /dev/sdc1 interchanged on reboot at some time and I could not find pcs create will accept UUID so once the NFS node is down whether it could resume is an unknown factor by this method !!!
perfect article for FC San storage and two physical Node Nfs cluster ,
i`ve completed one of my project with the help of this article
thank you 🙂