GlusterFS is a free and open source file and object storage solution that can be used across the physical, virtual and cloud servers over the network. The main benefit of GlusterFS is that we can scale up or scale out the storage up-to multiple petabytes without any downtime, it also provides the redundancy and high availability of the storage.
Where to use GluserFS … ?
GllusterFS based storage can be used in Physical, Virtual and Cloud Servers over the network.
It can also be used in the firms where they used to serve multimedia or other content to the Internet users and have to deal hundreds of terabytes of files.
GlusterFS can also be used as object Storage in private and public cloud.
Different Terminology used in GlusterFS storage :
- Trusted Storage Pool : It is a group of multiple servers that trust each other and form a storage cluster.
- Node : A node is storage server which participate in trusted storage pool
- Brick : A brick is LVM based XFS (512 byte inodes) file system mounted on folder or directory.
- Volume : A Volume is a file system which is presented or shared to the clients over the network. A volume can be mounted using glusterfs, nfs and smbs methods.
Different types of Volumes that can be configure using GlusterFS :
- Distribute Volumes :It is the default volume which is created when no option is specified while creating volume. In this type of volume files will be distributed across the the bricks using elastic hash algorithm
- Replicate Volumes : As the name suggests in this type of volume files will replicated or mirrored across the bricks , In other words a file which is written in one brick will also be replicated to another bricks.
- striped Volumes : In this type of volume larger files are cut or split into chunks and then distributed across the bricks.
- Distribute Replicate Volumes : As the name suggest in type of volume files will be first distributed among the bricks and then will be replicated to different bricks.
Though other combination can be tried to form different volumes like striped-replicated.
In this article I will demonstrate how to setup GlusterFS Storage on RHEL 7.x and CentOS 7.x. In my case i taking four RHEL 7 / CentOS 7 Server with minimal installation and assuming additional disk is attached to these servers for glustesfs setup.
- server1.example.com (192.168.43.10 )
- server2.example.co m ( 192.168.43.20 )
- server3.example.com ( 192.168.43.30 )
- server4.example.com ( 192.168.43.40 )
Add the following lines in /etc/hosts file in case you have your own dns server.
192.168.43.10  server1.example.com server1
192.168.43.20  server2.example.com server2
192.168.43.30  server3.example.com server3
192.168.43.40  server4.example.com server4
Install Glusterfs server packages on all servers.
Glusterfs packages are not included in the default centos and RHEL repositories so we will setup gluster repo and EPEL repo. Run the following commands one after the another on all 4 servers.
~]# yum install wget
~]# yum install centos-release-gluster -y
~]#yum install epel-release -y
~]# yum install glusterfs-server -y
Start and enable the GlusterFS Service on all the four servers.
~]# systemctl start glusterd
~]# systemctl enable glusterd
Allow the ports in the firewall so that servers can communicate and form storage cluster (trusted pool). Run the beneath commands on all 4 servers.
~]# firewall-cmd --zone=public --add-port=24007-24008/tcp --permanent
~]# firewall-cmd --zone=public --add-port=24009/tcp --permanent
~]# firewall-cmd --zone=public --add-service=nfs --add-service=samba --add-service=samba-client --permanent
~]# firewall-cmd --zone=public --add-port=111/tcp --add-port=139/tcp --add-port=445/tcp --add-port=965/tcp --add-port=2049/tcp --add-port=38465-38469/tcp --add-port=631/tcp --add-port=111/udp --add-port=963/udp --add-port=49152-49251/tcp --permanent
~]# firewall-cmd --reload
Distribute Volume Setup :
I am going to form trusted storage pool which consists of server 1 and server 2 in and will create bricks on that and after that will create distributed volume. I am also assuming that a raw disk of 16 GB (/dev/sdb) is allocated to both servers.
Run the below command from server 1 console to form a trusted storage pool with server 2.
[root@server1 ~]# gluster peer probe server2.example.com
peer probe: success.
[root@server1 ~]#
We can check the peer status using below command :
[root@server1 ~]# gluster peer status
Number of Peers: 1

Hostname: server2.example.com
Uuid: 9ef0eff2-3d96-4b30-8cf7-708c15b9c9d0
State: Peer in Cluster (Connected)
[root@server1 ~]#
Create Brick on Server 1
To create brick first we have to setup thing provision logical Volumes on the raw disk (/dev/sdb).
Run the following commands on Server 1
[root@server1 ~]# pvcreate /dev/sdb /dev/vg_bricks/dist_brick1 /bricks/dist_brick1 xfs rw,noatime,inode64,nouuid 1 2
[root@server1 ~]# vgcreate vg_bricks /dev/sdb
[root@server1 ~]# lvcreate -L 14G -T vg_bricks/brickpool1
In the above command brickpool1 is the name of thin pool.
Now create a create a logical volume of 3 GB
[root@server1 ~]# lvcreate -V 3G -T vg_bricks/brickpool1 -n dist_brick1
Now format the logical Volume using xfs file system
[root@server1 ~]# mkfs.xfs -i size=512 /dev/vg_bricks/dist_brick1
[root@server1 ~]# mkdir -p /bricks/dist_brick1
Mount the brick using mount command
[root@server1 ~]# mount /dev/vg_bricks/dist_brick1 /bricks/dist_brick1/
To mount it permanently add the following line in /etc/fsatb
/dev/vg_bricks/dist_brick1 /bricks/dist_brick1 xfs rw,noatime,inode64,nouuid 1 2
create a directory with brick under the mount point
[root@server1 ~]# mkdir /bricks/dist_brick1/brick
Similarly perform the following set of commands on sever 2
[root@server2 ~]# pvcreate /dev/sdb ; vgcreate vg_bricks /dev/sdb
[root@server2 ~]# lvcreate -L 14G -T vg_bricks/brickpool2
[root@server2 ~]# lvcreate -V 3G -T vg_bricks/brickpool2 -n dist_brick2
[root@server2 ~]# mkfs.xfs -i size=512 /dev/vg_bricks/dist_brick2
[root@server2 ~]# mkdir -p /bricks/dist_brick2
[root@server2 ~]# mount /dev/vg_bricks/dist_brick2 /bricks/dist_brick2/
[root@server2 ~]# mkdir /bricks/dist_brick2/brick
Create distributed volume using below gluster command :
[root@server1 ~]# gluster volume create distvol server1.example.com:/bricks/dist_brick1/brick server2.example.com:/bricks/dist_brick2/brick
[root@server1 ~]# gluster volume start distvol
volume start: distvol: success
[root@server1 ~]#
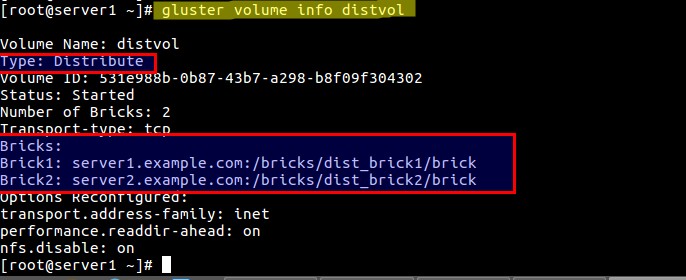
Verify the Volume status using following command :
[root@server1 ~]# gluster volume info distvol
Mount Distribute volume on the Client :
Before mounting the volume using glusterfs first we have to make sure that glusterfs-fuse package is installed on the client. Also make sure to add the gluster storage server entries in /etc/hosts file in case you do don’t have local DNS server.
Login to the client and run the below command from the console to install glusterfs-fuse
[root@glusterfs-client ~]# yum install glusterfs-fuse -y
Create a mount for distribute volume :
[root@glusterfs-client ~]# mkdir /mnt/distvol
Now mount the ‘distvol‘ using below mount command :
[root@glusterfs-client ~]# mount -t glusterfs -o acl server1.example.com:/distvol /mnt/distvol/
For permanent mount add the below entry in the /etc/fstab file
server1.example.com:/distvol /mnt/distvol glusterfs _netdev 0 0
Run the df command to verify the mounting status of volume.

Now start accessing the volume “distvol”
Replicate Volume Setup :
For replicate volume setup i am going to use server 3 and server 4 and i am assuming additional disk (/dev/sdb ) for glusterfs is already assigned to the servers. Refer the following steps :
Add server 3 and server 4 in trusted storage pool
[root@server1 ~]# gluster peer probe server3.example.com
peer probe: success.
[root@server1 ~]# gluster peer probe server4.example.com
peer probe: success.
[root@server1 ~]#
Create and mount the brick on Server 3. Run the beneath commands one after the another.
[root@server3 ~]# pvcreate /dev/sdb ; vgcreate vg_bricks /dev/sdb
[root@server3 ~]# lvcreate -L 14G -T vg_bricks/brickpool3
[root@server3 ~]# lvcreate -V 3G -T vg_bricks/brickpool3 -n shadow_brick1
[root@server3 ~]# mkfs.xfs -i size=512 /dev/vg_bricks/shadow_brick1
[root@server3 ~]# mkdir -p /bricks/shadow_brick1
[root@server3 ~]# mount /dev/vg_bricks/shadow_brick1 /bricks/shadow_brick1/
[root@server3 ~]# mkdir /bricks/shadow_brick1/brick
Do the below entry in /etc/fstab file for brick permanent mounting :
/dev/vg_bricks/shadow_brick1 /bricks/shadow_brick1/ xfs rw,noatime,inode64,nouuid 1 2
Similarly perform the same steps on server 4 for creating and mounting brick :
[root@server4 ~]# pvcreate /dev/sdb ; vgcreate vg_bricks /dev/sdb
[root@server4 ~]# lvcreate -L 14G -T vg_bricks/brickpool4
[root@server4 ~]# lvcreate -V 3G -T vg_bricks/brickpool4 -n shadow_brick2
[root@server4 ~]# mkfs.xfs -i size=512 /dev/vg_bricks/shadow_brick2
[root@server4 ~]# mkdir -p /bricks/shadow_brick2
[root@server4 ~]# mount /dev/vg_bricks/shadow_brick2 /bricks/shadow_brick2/
[root@server4 ~]# mkdir /bricks/shadow_brick2/brick
For permanent mounting of brick do the fstab entry.
Create Replicated Volume using below gluster command.
[root@server3 ~]# gluster volume create shadowvol replica 2 server3.example.com:/bricks/shadow_brick1/brick server4.example.com:/bricks/shadow_brick2/brick
volume create: shadowvol: success: please start the volume to access data
[root@server3 ~]# gluster volume start shadowvol
volume start: shadowvol: success
[root@server3 ~]#
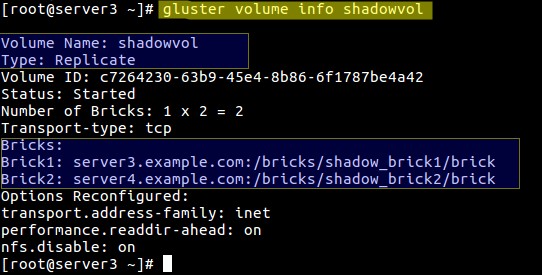
Verify the Volume info using below gluster command :
[root@server3 ~]# gluster volume info shadowvol
If you want to access this volume “shadowvol” via nfs set the following :
[root@server3 ~]# gluster volume set shadowvol nfs.disable off
Mount the Replicate volume on the client via nfs
Before mounting create a mount point first.
[root@glusterfs-client ~]# mkdir /mnt/shadowvol
Note : One of the limitation in gluster storage is that GlusterFS server only supports version 3 of NFS protocol.
Add the below entry in the file “/etc/nfsmount.conf” on both the Storage Servers (Server 3 & Server 4 )
Defaultvers=3
After making the above entry reboot both servers once.Use below mount command to volume “shadowvol”
[root@glusterfs-client ~]# mount -t nfs -o vers=3 server4.example.com:/shadowvol /mnt/shadowvol/
For permanent mount add the following entry in /etc/fstab file
server4.example.com:/shadowvol /mnt/shadowvol/ nfs vers=3 0 0
Verify the size and mounting status of the volume :
[root@glusterfs-client ~]# df -Th

Distribute-Replicate Volume Setup :
For setting up Distribute-Replicate volume i will be using one brick from each server and will form the volume. I will create the logical volume from the existing thin pool on the respective servers.
Create a brick on all 4 servers using beneath commands
Server 1
[root@server1 ~]# lvcreate -V 3G -T vg_bricks/brickpool1 -n prod_brick1
[root@server1 ~]# mkfs.xfs -i size=512 /dev/vg_bricks/prod_brick1
[root@server1 ~]# mkdir -p /bricks/prod_brick1
[root@server1 ~]# mount /dev/vg_bricks/prod_brick1 /bricks/prod_brick1/
[root@server1 ~]# mkdir /bricks/prod_brick1/brick
Server 2
[root@server2 ~]# lvcreate -V 3G -T vg_bricks/brickpool2 -n prod_brick2
[root@server2 ~]# mkfs.xfs -i size=512 /dev/vg_bricks/prod_brick2
[root@server2 ~]# mkdir -p /bricks/prod_brick2
[root@server2 ~]# mount /dev/vg_bricks/prod_brick2 /bricks/prod_brick2/
[root@server2 ~]# mkdir /bricks/prod_brick2/brick
Server 3
[root@server3 ~]# lvcreate -V 3G -T vg_bricks/brickpool3 -n prod_brick3
[root@server3 ~]# mkfs.xfs -i size=512 /dev/vg_bricks/prod_brick3
[root@server3 ~]# mkdir -p /bricks/prod_brick3
[root@server3 ~]# mount /dev/vg_bricks/prod_brick3 /bricks/prod_brick3/
[root@server3 ~]# mkdir /bricks/prod_brick3/brick
Server 4
[root@server4 ~]# lvcreate -V 3G -T vg_bricks/brickpool4 -n prod_brick4
[root@server4 ~]# mkfs.xfs -i size=512 /dev/vg_bricks/prod_brick4
[root@server4 ~]# mkdir -p /bricks/prod_brick4
[root@server4 ~]# mount /dev/vg_bricks/prod_brick4 /bricks/prod_brick4/
[root@server4 ~]# mkdir /bricks/prod_brick4/brick
Now Create volume with name “dist-rep-vol” using below gluster command :
[root@server1 ~]# gluster volume create dist-rep-vol replica 2 server1.example.com:/bricks/prod_brick1/brick server2.example.com:/bricks/prod_brick2/brick server3.example.com:/bricks/prod_brick3/brick server4.example.com:/bricks/prod_brick4/brick force
[root@server1 ~]# gluster volume start dist-rep-vol
Verify volume info using below command :
[root@server1 ~]# gluster volume info dist-rep-vol
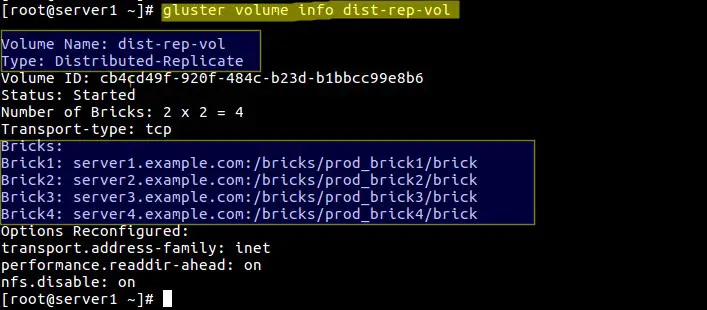
In this volume first files will be distributed on any two bricks and then the files will be replicated into remaining two bricks.
Now Mount this volume on the client machine via gluster
let’s first create the mount point for this volume :
[root@glusterfs-client ~]# mkdir  /mnt/dist-rep-vol
[root@glusterfs-client ~]# mount.glusterfs server1.example.com:/dist-rep-vol /mnt/dist-rep-vol/
Add below entry in fstab for permanent entry
server1.example.com:/dist-rep-vol /mnt/dist-rep-vol/ glusterfs _netdev 0 0
Verify the Size and volume using df command :

That’s it. Hope you have enjoyed the gluster storage configuration steps.

good article and thanks for sharing!
There are a few typos that I would like to highlight (–permanent) (double –)
sudo tee gfs.fw <<-'EOF'
sudo systemctl enable firewalld
sudo systemctl start firewalld
sudo firewall-cmd –permanent –zone=public –add-port=24007-24008/tcp
sudo firewall-cmd –permanent –zone=public –add-port=24009/tcp
sudo firewall-cmd –permanent –zone=public –add-service=nfs –add-service=samba –add-service=samba-client
sudo firewall-cmd –permanent –zone=public –add-port=111/tcp –add-port=139/tcp –add-port=445/tcp –add-port=965/tcp –add-port=2049/tcp –add-port=38465-38469/tcp –add-port=631/tcp –add-port=111/udp –add-port=963/udp –add-port=49152-49251/tcp
sudo systemctl reload firewalld
sudo systemctl status firewalld
EOF
and pls add a note for nfs …
sudo systemctl stop nfs-lock.service
sudo systemctl stop nfs.target
sudo systemctl disable nfs.target
sudo systemctl start rpcbind.service
— to fix user not allowed issues by doing the above and also check /etc/exports and /etc/allow
Very well written. good reference material.
I have 2 suggestions :
1. glusterfs-server package provides firewalld service file which opens up the required ports. You can use this service file, instead of opening ports one by one.
# firewall-cmd –zone=public –add-service=glusterfs
# firewall-cmd –zone=public –add-service=glusterfs –permanent
2. Striped volumes are getting deprecated soon with glusterfs-3.9
‘http://www.gluster.org/pipermail/gluster-devel/2016-August/050377.html’
Thank You Satheesaran for the comments and suggestions. Your suggestion will help our readers while setting up glusterfs firewall rules.
Good reference material, but any reasons why the bricks getting created under Virtual volumes.. (i.e: lvcreate -V ) Is there any advantages ? Thanks !
Hi Jimbob ,
If you want to use thinly provisioned Bricks then use lvm partition otherwise you can can tradition partitions and file system method.
Thanks for sharing the detail. I need your suggestion. I am planning to setup glusterfs in our organization to replace ftp and we will use it to distribute large number files over the wan at different location. will it the right approach and will method we should use to setup glusterfs out of 4 you defined above ? Please reply
Hi Krishna,
It depends on your requirements whether you want use glusterfs volume as distributed or replicated.
Hello article owner and reviewer, I Malina, a learner of linux belongs from a poor family, I spend times on internet to learn glusterFS but none of the article updated with complete information, then I found this peace, I’m not in a position to spend money to visit institute to learn redhat glusterFS, I request to your goodself if you update this article with complete information, like in starting it is mention that “assuming additional disk is attached to these servers for glustesfs setup”, I/we have no idea in which servers and how to attach disk, whereas i know LVM, but not sure what to do in glusterFS.
me like students coming from very poor families will be thankful whole life to you all, you please help us via your article to learn complete glusterFS, we can not understand this valuable atricle as many thing is not mentioned. have a good day ahead, god blase you all.