In our Previous article we have already discuss ‘How to Install Katell on CentOS 7 Server‘. Now our next task is to download Linux Server’s repositories and create the Sync plan and after that create Activation key and then register the clients to katello server using activation keys and do the patching of registered servers from Katello Dashboard.
In this tutorial we will download CentOS 7 yum repositories.
Steps to download & sync CentOS 7 Repositories from Katello Dashboard
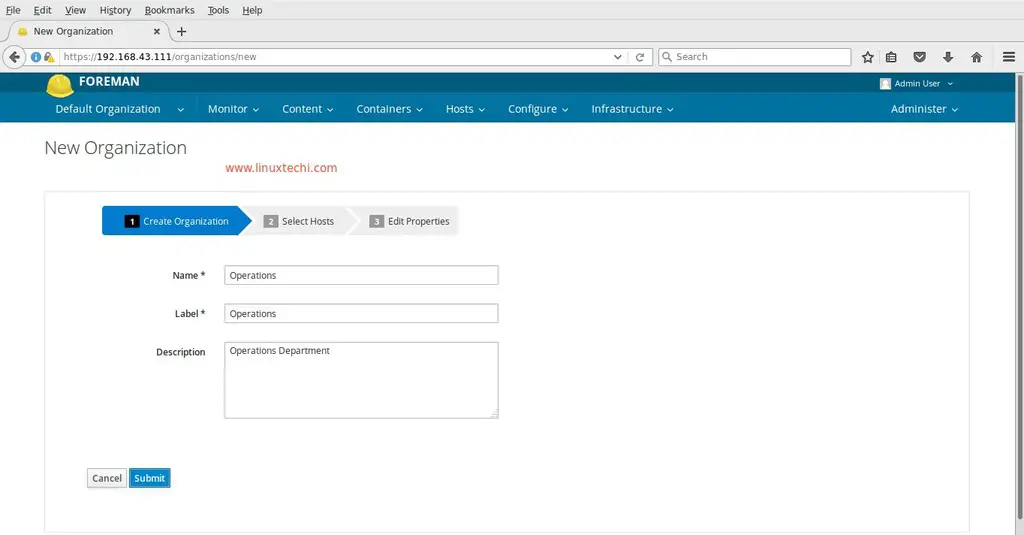
When we install katello default organization and location is created. So before proceeding let’s first create organization with name ‘Operations’ and will keep the default location as it is.
Login to the Dashboard –> Select on “Default Organization” and click on ‘Manage Organization‘.
To Create New organization , click on ‘New Organization’ option. Specify the name as per your requirement
click on ‘Submit‘
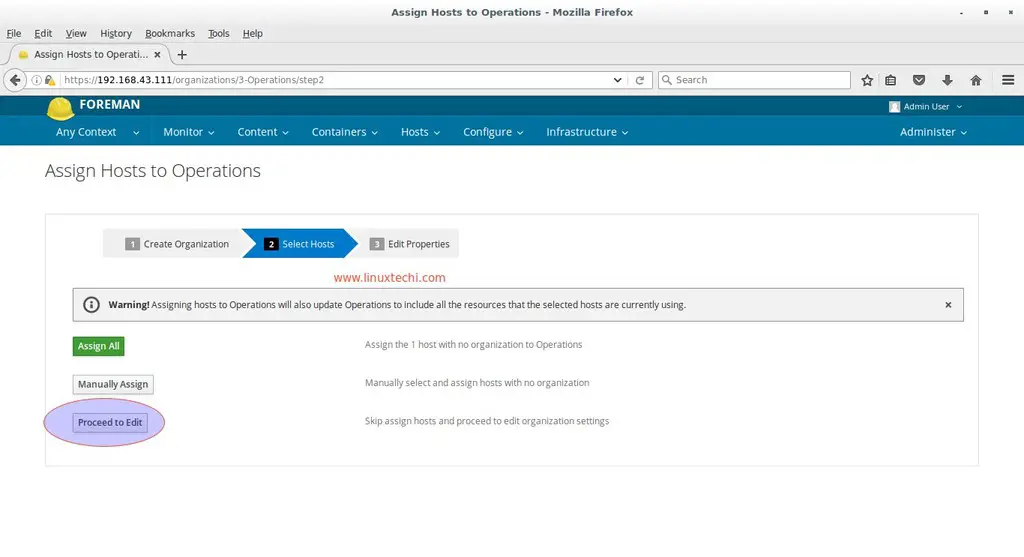
In the next Window click on ‘Proceed to Edit‘ option as this point of time we don’t have any hosts.
Then finally click on Submit in next Window.
Now onward whatever we do in dashboard first make sure we are using ‘Operations‘ Organization. So Go to Organization Tab and Select ‘Operations‘
Let’s first create the GPG keys for CentOS 7 yum repositories. Download the CentOS 7 GPG key from URL ‘http://mirror.centos.org/centos/‘ Or use below wget command
linuxtechi@cloudworld:~/Desktop$ wget http://mirror.centos.org/centos/RPM-GPG-KEY-CentOS-7
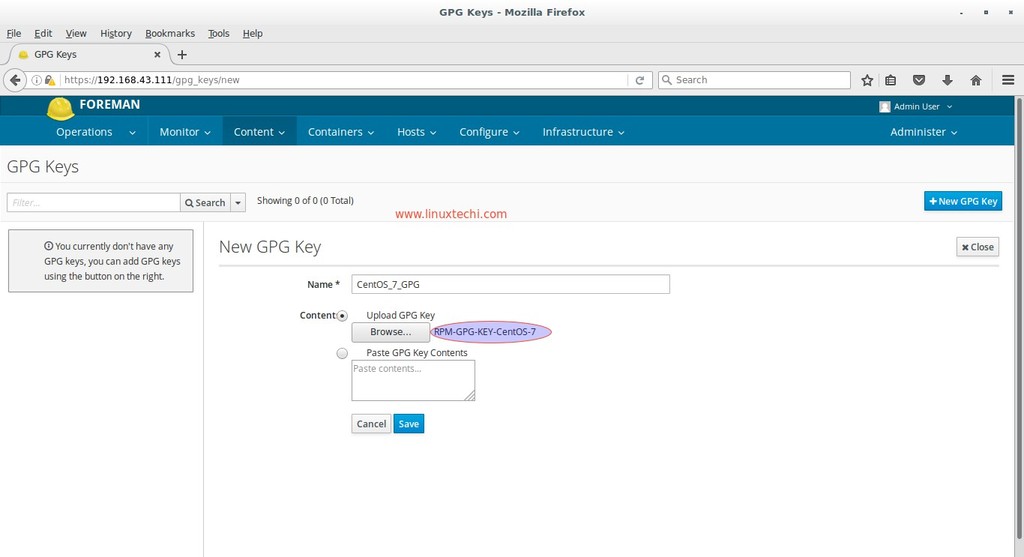
Now from the Contents Tab —> Select GPG Keys —> click on ‘New GPG key‘
Specify the Key Name , in my case i am putting as ‘CentOS_7_GPG‘ and upload the above downloaded CentOS 7 RPM key.
Click on Save.
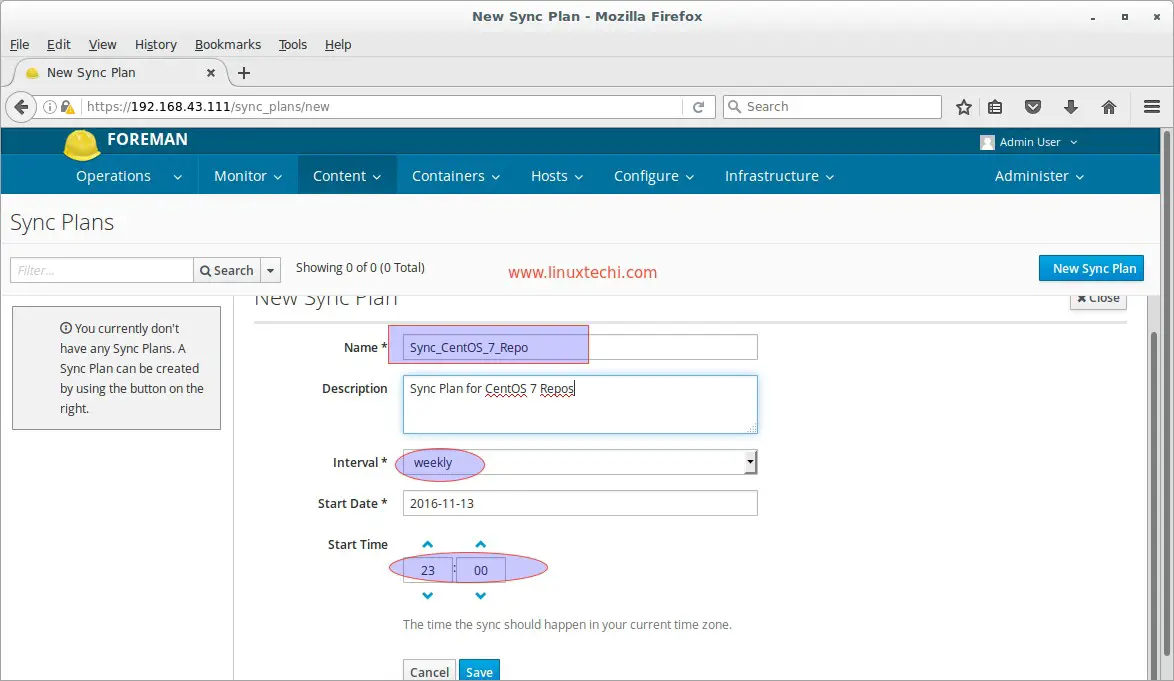
Let’s Create the Sync Plan for Repositories. From the Content Tab select ‘Sync Plans‘ and click on ‘New Sync Plan‘ , Specify Sync Plan Name , interval and Start time as per your setup
Click on Save
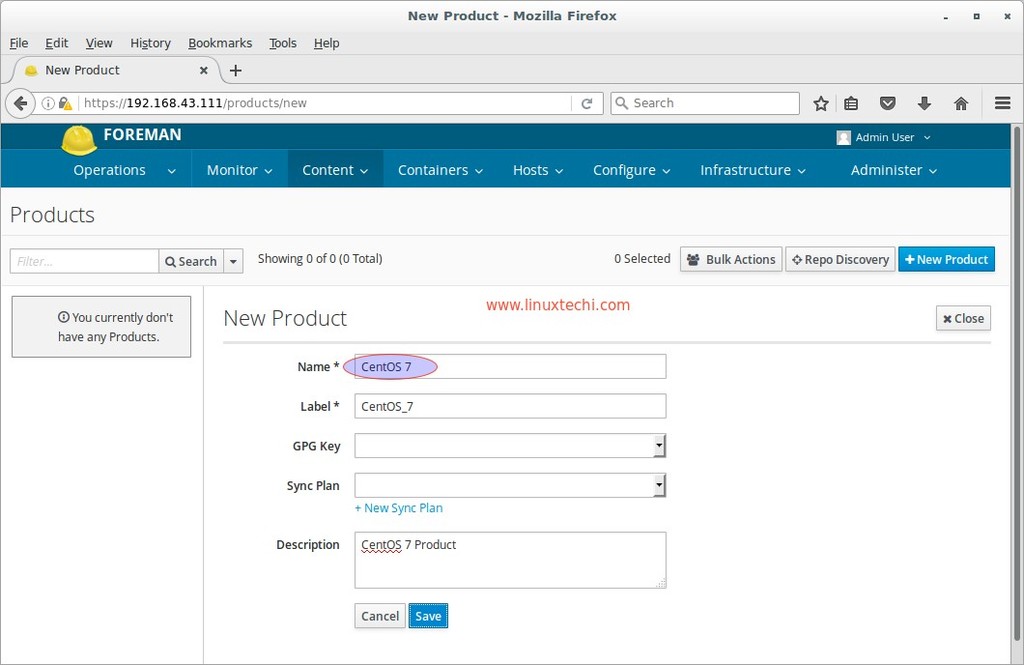
Now from the Content Tab select the Products option and then Click on ‘New Product‘.
Specify the Product Name and it’s label will be automatically set as per Product Name.
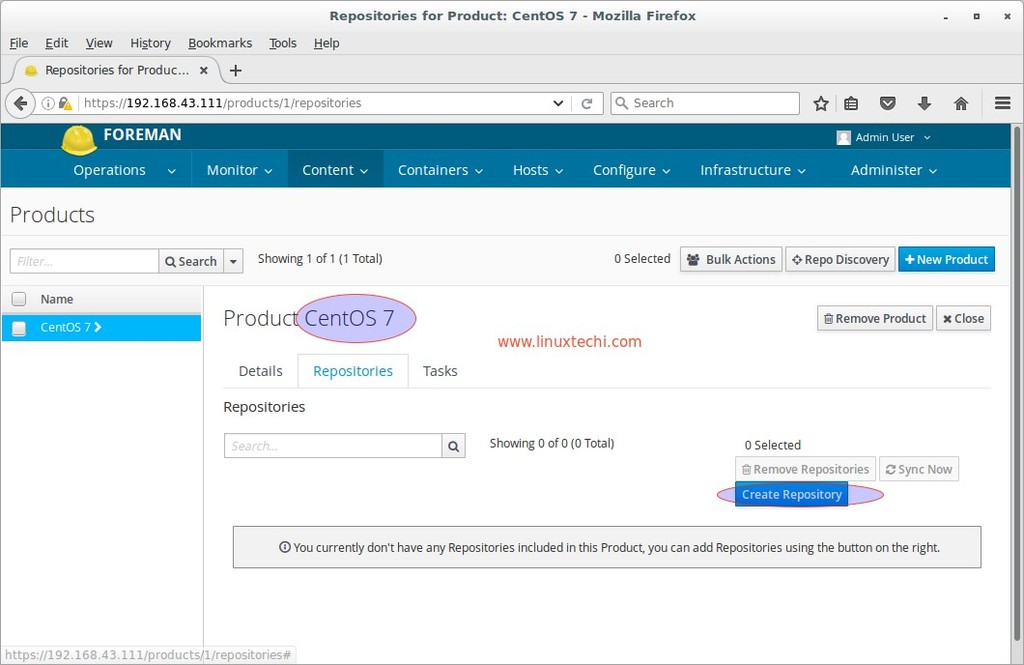
Click on Save and then we will get the below screen.
Now Click on Create Repository.
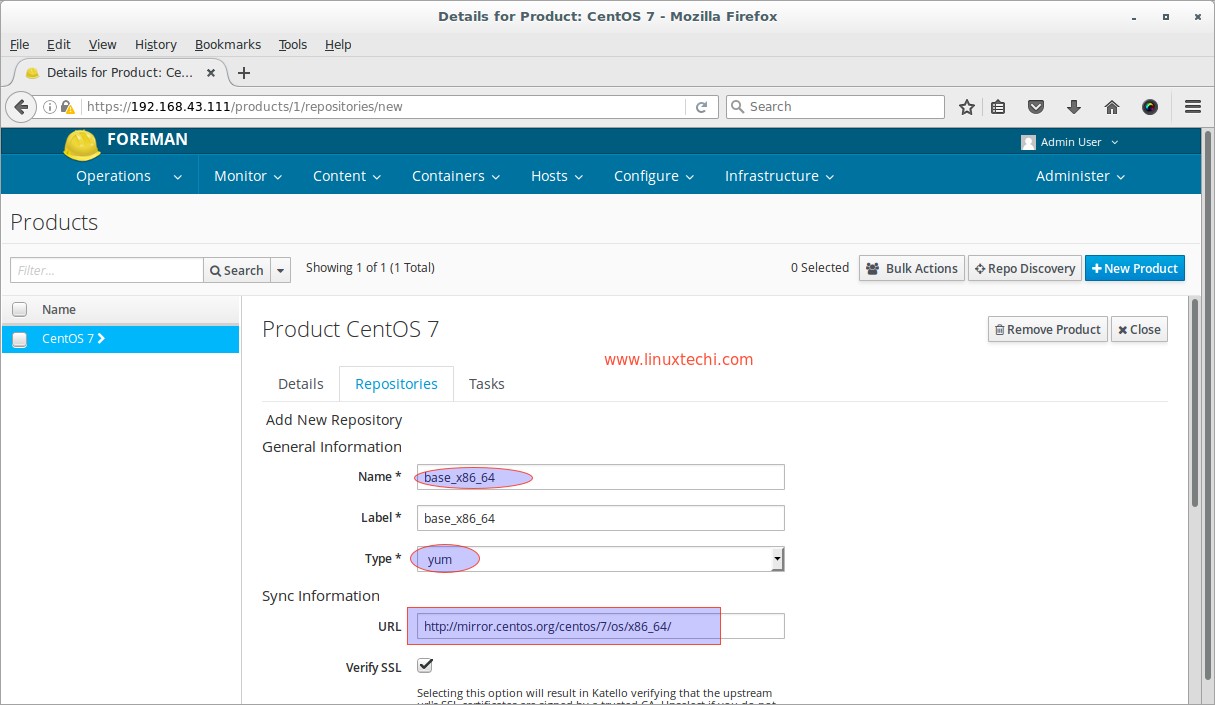
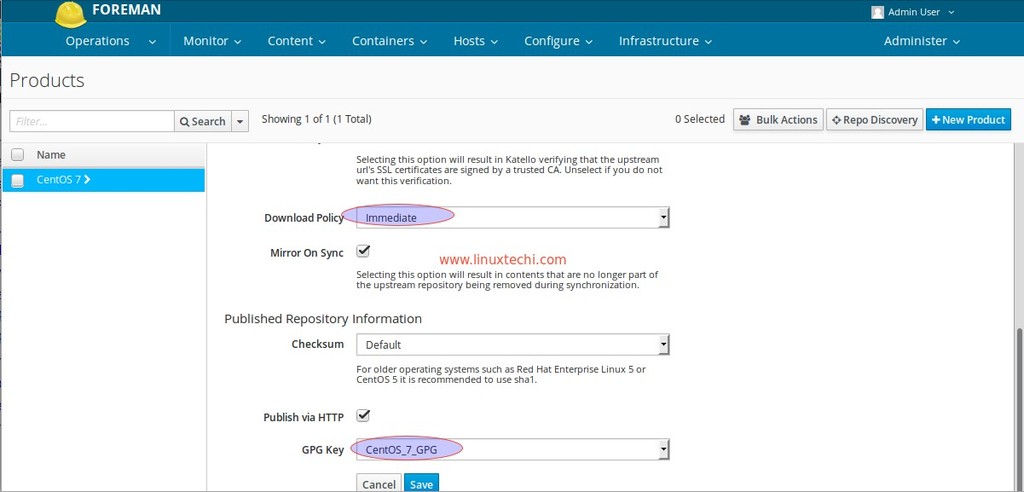
Specify the followings and leave other parameters as its.
- Name = base_x86_64
- Label = base_x86_64
- Type = yum
- url = http://mirror.centos.org/centos/7/os/x86_64/
- Download Policy = Immediate
- GPG Key = CentOS_7_GPG
Click on Save
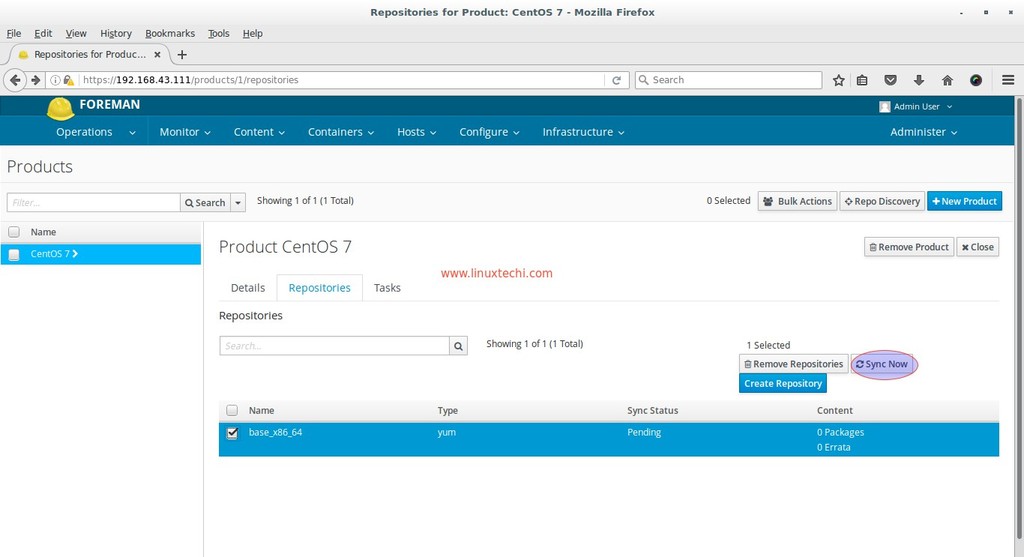
In the next window, Select the Repository and Click on ‘Sync Now‘
Similarly create two more repositories for updates and extras.
For Updates repository use the beneath details
- name = updates_x86_64
- type = yum
- url = http://mirror.centos.org/centos/7/updates/x86_64/
- Download Policy = Immediate
- GPG Key = CentOS_7_GPG
For Extras repository use the beneath details
- name = extras_x86_64
- type = yum
- url = http://mirror.centos.org/centos/7/extras/x86_64/
- Download Policy = Immediate
- GPG Key = CentOS_7_GPG
Note: We can also download and sync the customize and EPEL repository by referring above steps.
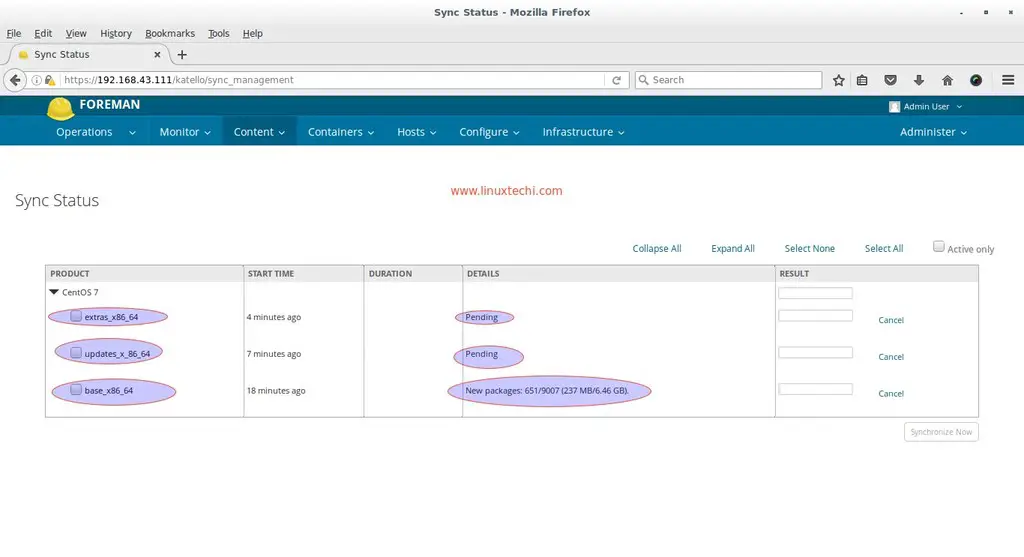
Monitor and Verify the Sync Status of Repositories.
From the Content Tab select ‘Sync Status‘ option
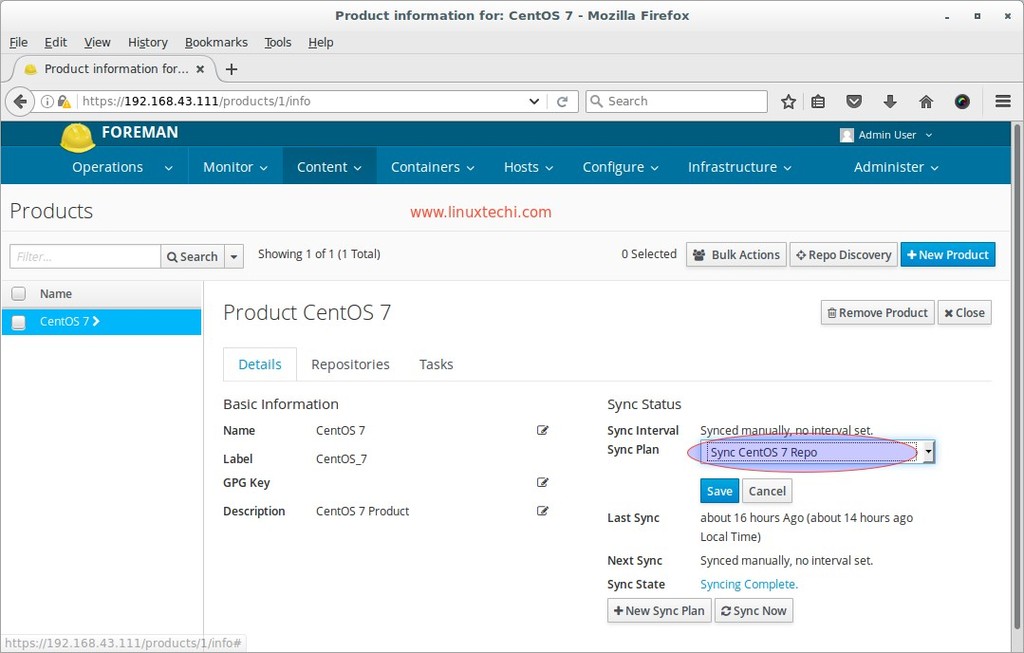
Depending on your Internet Speed it will download and sync repositories. Once it is done attach the Sync plan to the Product ‘CentOS 7‘
Click on Save.
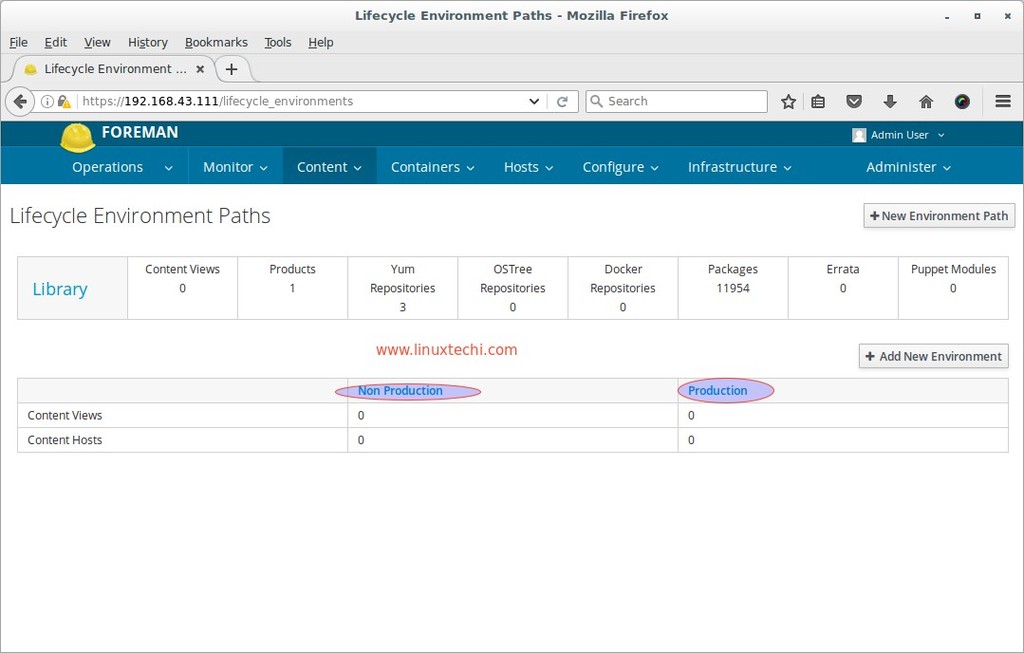
In Katello by default ‘Library Environment‘ is created during the installation, we can create environment as per our requirement keeping Library as Parent Env. In this tutorial i am going to create below two Environments and will publish content view to these environments.
- Non Production
- Production
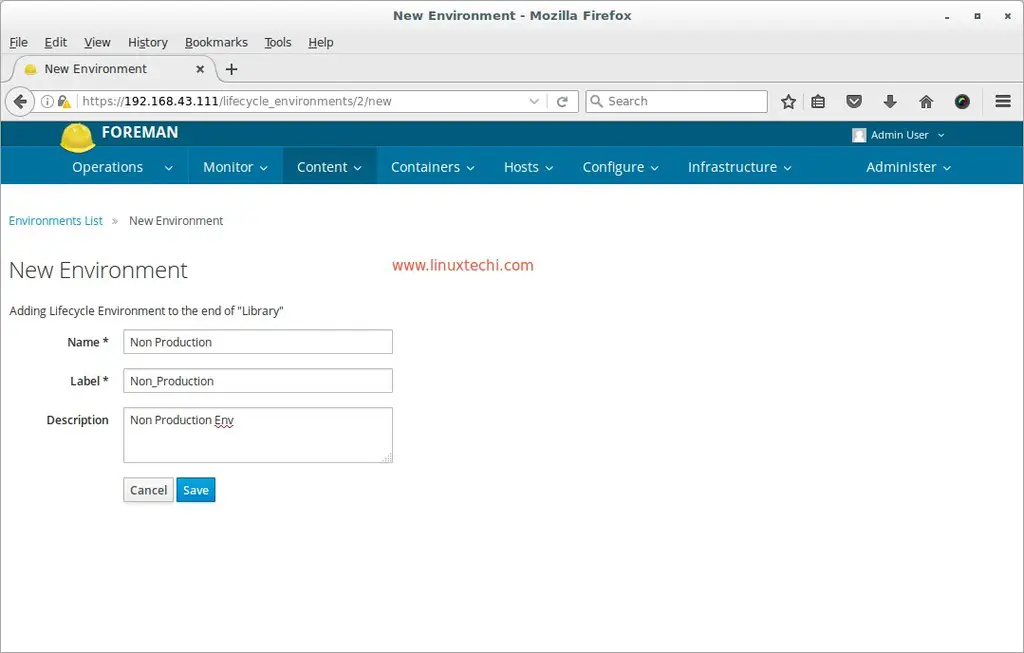
Go To Content Tab –> Select Life Cycle Environment –> Click on New Environment Path
Specify the Environment name as ‘Non Production‘
click on Save, Similarly create One more Environment with name ‘Production‘
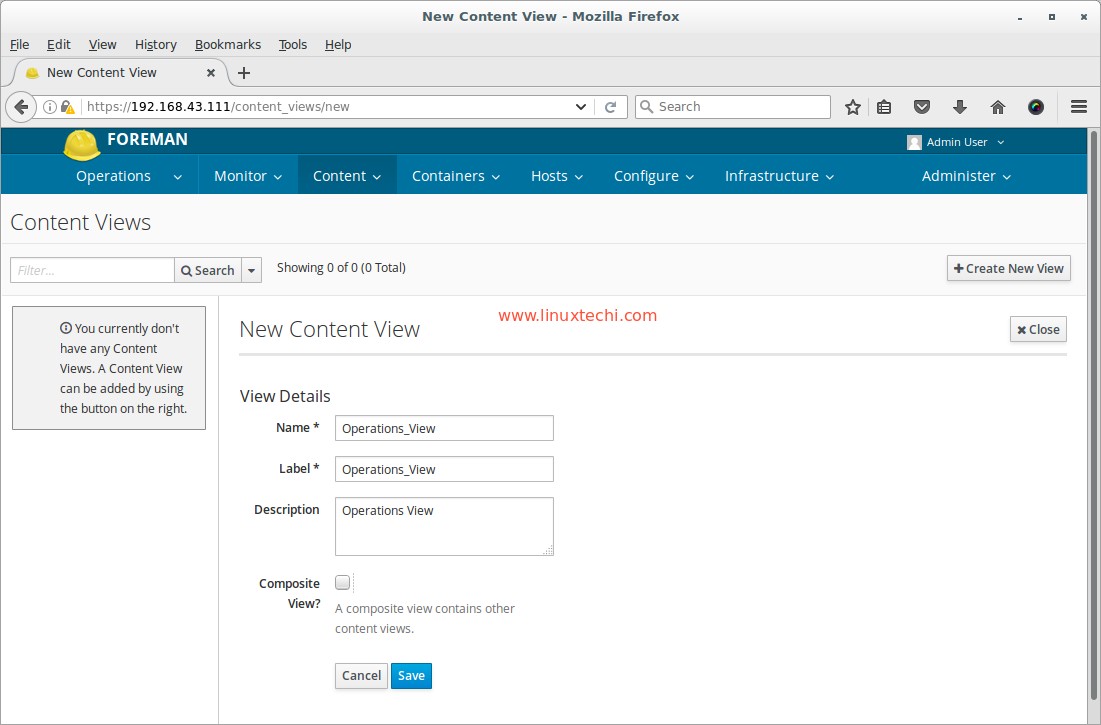
Now Let’s Create the Content View and promote it to above created Environments.
Go To Content Tab —> Select Content Views —> Click on Create New View
click on Save
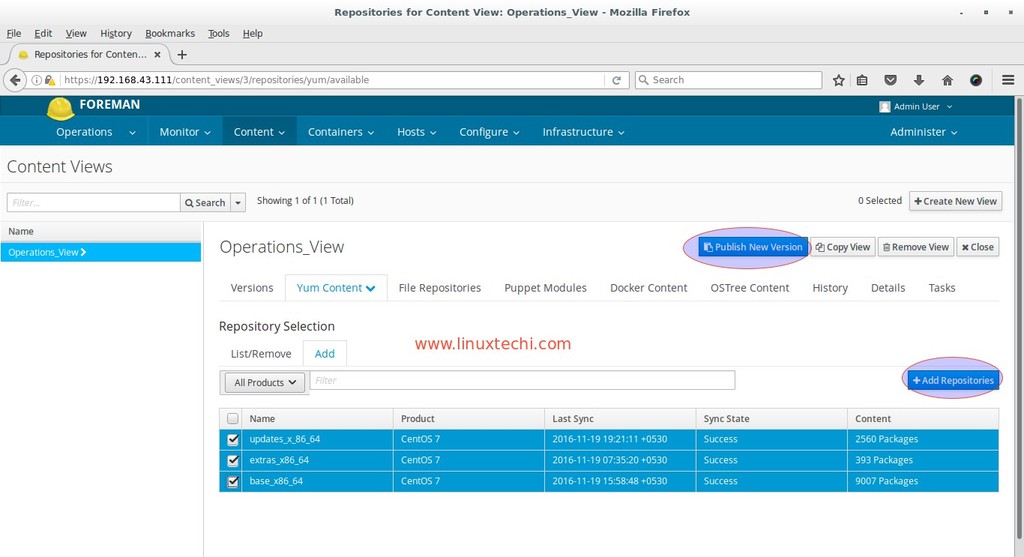
Now Select the Repositories that you want add to this view. In my case i am adding all repositories.
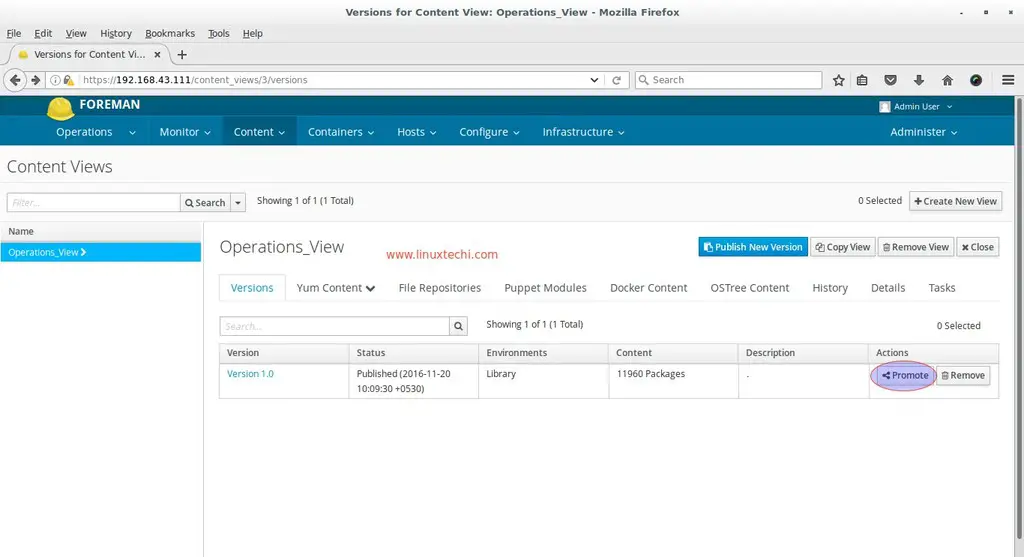
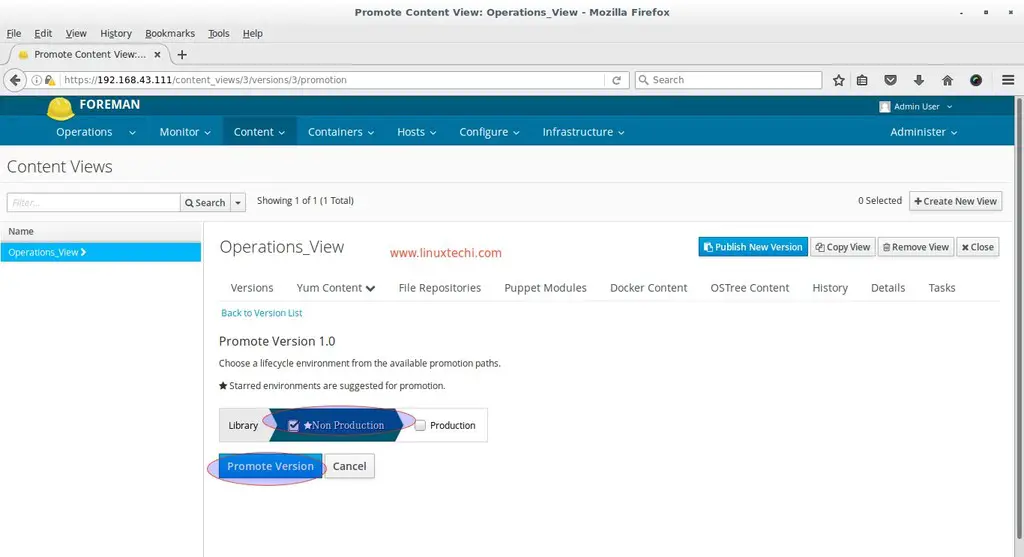
After Adding the repositories and then click on ‘Publish New Version’, first this view will be promoted to Library Environment and then we will Click on ‘Promote‘ then Select the ‘Non Production‘ environment and once done then again promote it to Production Environment.
Similarly repeat the same steps for promoting the view to Production Environment.
Creating Activation Keys
At this point of time we have downloaded the repositories and created the content views for respective environments. Now it’s time to create Activation Key for registering Linux Clients to Katello Server.
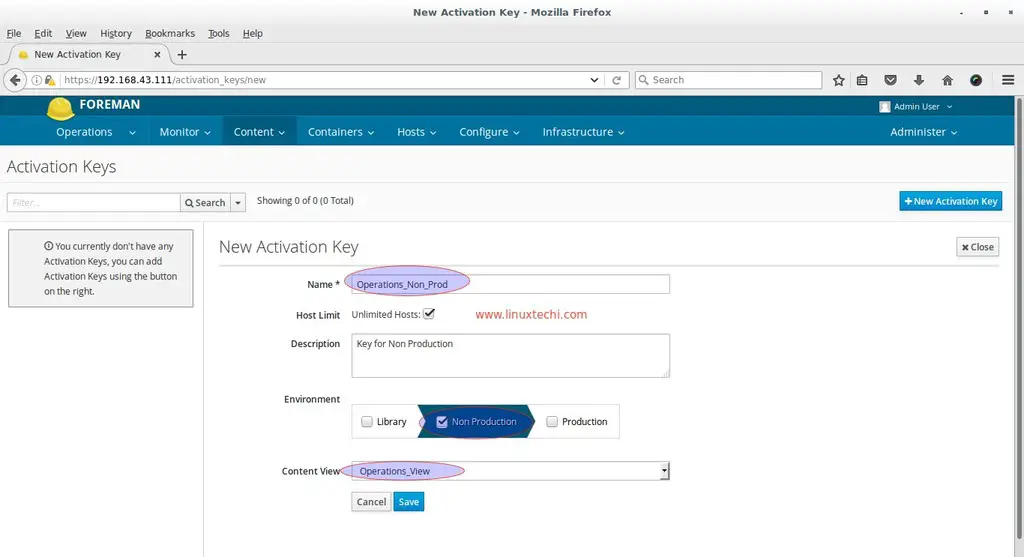
Go To Content Tab –> Select Activation Keys –> click on New Activation Key
Specify the Key Name, Environment and Content View as per your setup.
Click on Save
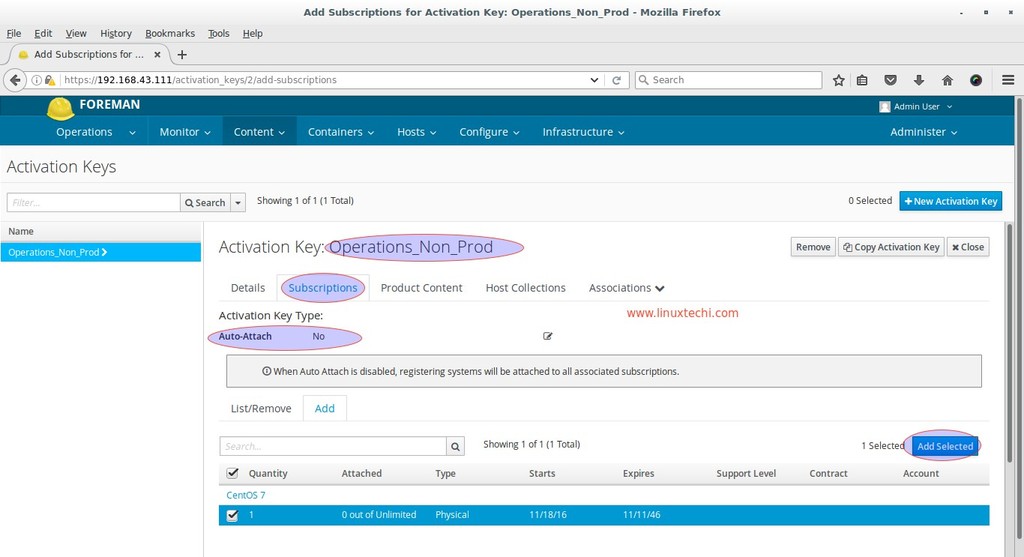
Now Go to Subscription Tab and Add ‘CentOS 7‘ Product and disable auto-attach option
Once you are done with Activation Key. Now Start Registering the Linux Servers to Katello.
Register Clients to Katello Server using Activation Keys
ssh your CentOS 7 Server which we want to register on Katello Server and perform the following Steps from the command line.
Install the Subscription-manager using existing centos repository and bootstrap rpm from your katello server
[root@web ~]# yum install subscription-manager
[root@web ~]# rpm -ivh http://192.168.43.111/pub/katello-ca-consumer-katello.example.com-1.0-1.noarch.rpm
Now run below subscription manager command to register the server to katello.
[root@web ~]# subscription-manager register --org="Operations" --activationkey="Operations_Non_Prod"
The system has been registered with ID: 7c0a6c2f-96f8-41b6-85e2-9765e0ec6ddf

No products installed.
[root@web ~]#
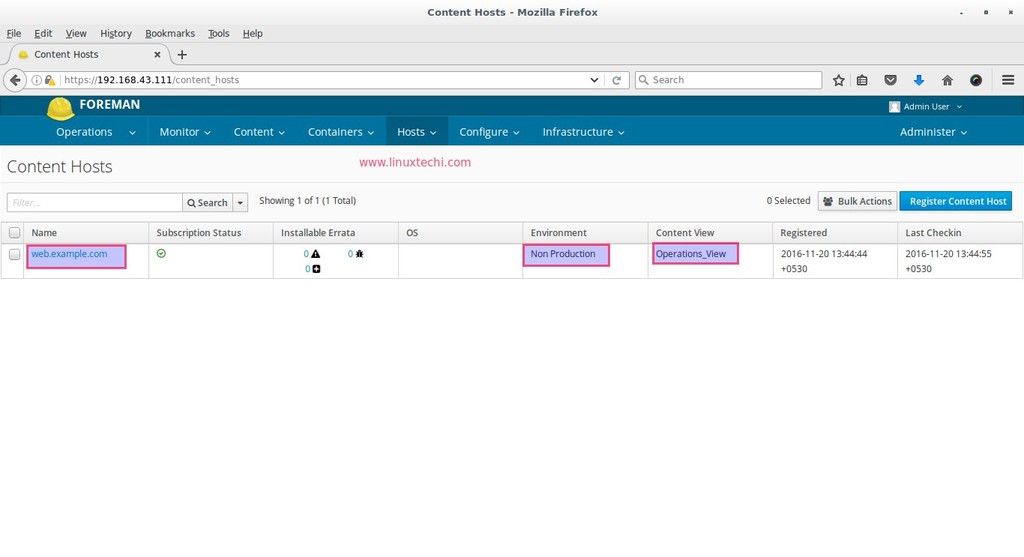
No Go to Katello Dashboard, Select Operations as the Organization.
Under the Hosts Tab —> Select Content Hosts
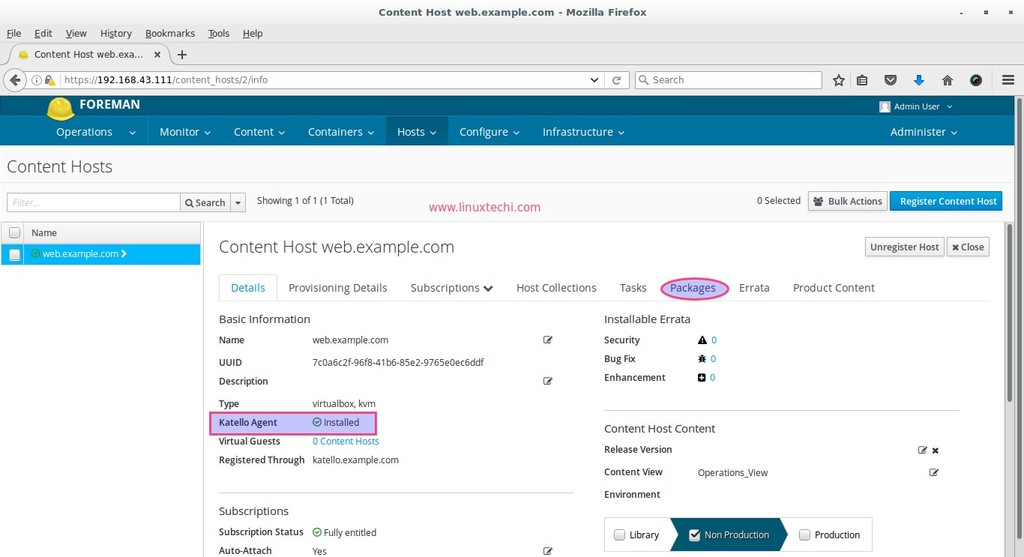
As we can see that host or server is automatically register under Non Production Environment and its content View is Operation_view
Now again access the Server (web.example.com) and verify which repositories are enabled. Run the below commands.
[root@web ~]# subscription-manager repos --list
You can also run below yum command to verify which yum repositories are enabled
[root@web ~]# yum repolist
If we want to push updates from Katello dashboard to its content hosts then katello-agent package needs to be installed on register clients or its content hosts.
Katello agent Package is not available in default CentOS 7 repositories , so set the katello agent repository and run yum command to install.
[root@web ~]# yum install -y http://fedorapeople.org/groups/katello/releases/yum/3.2/client/el7/x86_64/katello-client-repos-latest.rpm
[root@web ~]# rpm -ivh https://dl.fedoraproject.org/pub/epel/epel-release-latest-7.noarch.rpm
[root@web ~]#  yum install katello-agent -y
[root@web ~]# systemctl start  goferd.service
[root@web ~]# systemctl enable  goferd.service
Note : Once the Katello agent is installed then you can move default CentOS 7 and katell-agent repository to other location.
[root@web ~]# cd /etc/yum.repos.d/
[root@web yum.repos.d]# mv CentOS-* epel* katello-client.repo /mnt/
[root@web yum.repos.d]# yum clean all
[root@web yum.repos.d]# yum repolist
Now Only Repositories from your Katello Server should be available.
From Katello Dashboard verify whether katello-agent is installed on the content host.
From Packages Tab now we can manage packages (like install , remove and update particular or list of packages )
That’s all for this article. Hope you get an idea how to download repositories and register Linux server for patching in Katello setup. Please share your feedback and comments 🙂


Thank you for the post. I need help with one thing. Where does katello keep the synced repositories? I want them to be on dedicated disk but can`t find where to configure it 🙁
/var/lib/pulp