The step-by-step guide on this page will explain you how to install Kubernetes cluster on Debian 12/11 with Kubeadm utility.
Kubernetes has become the go-to container orchestration platform for managing containerized applications efficiently.Kubernetes (k8s) cluster contains master and worker nodes which are used to run containerized applications. Master node works as control plan and worker nodes offers environment for actual application workload.
Prerequisites
- Minimal Installed Debian 12 /11
- 2 CPU / vCPU
- 2 GB RAM
- 20 GB free disk space
- Sudo User with Admin rights
- Stable Internet Connectivity
- Ensure that each node can communicate with the others via a reliable network connection.
Lab Setup
For the demonstration, I am using three Debian 12 systems.
- Master Node (k8s-master) – 192.168.1.23
- Worker Node 1 (k8s-worker01) – 192.168.1.24
- Worker Node 2 (k8s-worker02) – 192.168.1.25
Without any further delay, let’s jump into Kubernetes Cluster installation steps.
1) Set Host Name and Update Hosts File
Login to each node (master & woker nodes) and set their hostname using hostnamectl command.
$ sudo hostnamectl set-hostname "k8s-master.linuxtechi.local"      // Run on master node
$ sudo hostnamectl set-hostname "k8s-worker01.linuxtechi.local"    // Run on 1st worker node
$ sudo hostnamectl set-hostname "k8s-worker02.linuxtechi.local"    // Run on 2nd worker node
Also add the following entries in /etc/hosts file on all the nodes,
192.168.1.23   k8s-master.linuxtechi.local     k8s-master
192.168.1.24   k8s-worker01.linuxtechi.local   k8s-worker01
192.168.1.25   k8s-worker02.linuxtechi.local   k8s-worker02
2) Disable Swap on All Nodes
For kubelet to work smoothly, it is recommended to disable swap. Run following commands on master and worker nodes to turn off swap.
$ sudo swapoff -a
$ sudo sed -i '/ swap / s/^\(.*\)$/#\1/g' /etc/fstab
3) Add Firewall Rules for Kubernetes Cluster
In case, OS firewall is enabled on your Debian systems then allow following ports on master and worker nodes respectively.
On Master node, run
$ sudo ufw allow 6443/tcp
$ sudo ufw allow 2379/tcp
$ sudo ufw allow 2380/tcp
$ sudo ufw allow 10250/tcp
$ sudo ufw allow 10251/tcp
$ sudo ufw allow 10252/tcp
$ sudo ufw allow 10255/tcp
$ sudo ufw reload
On Worker Nodes,
$ sudo ufw allow 10250/tcp
$ sudo ufw allow 30000:32767/tcp
$ sudo ufw reload
Note: If firewall is disabled on your Debian 12/11 systems, then you can skip this step.
4) Install Containerd Run time on All Nodes
Containerd is the industry standard container run time and supported by Kubernetes. So, install containerd on all master and worker nodes.
Before installing containerd, set the following kernel parameters on all the nodes.
$ cat <<EOF | sudo tee /etc/modules-load.d/containerd.conf
overlay
br_netfilter
EOF
$ sudo modprobe overlay
$ sudo modprobe br_netfilter
$ cat <<EOF | sudo tee /etc/sysctl.d/99-kubernetes-k8s.conf
net.bridge.bridge-nf-call-iptables = 1
net.ipv4.ip_forward = 1
net.bridge.bridge-nf-call-ip6tables = 1
EOF
To make above changes into the effect, run
$ sudo sysctl --system
Now, install conatinerd by running following apt command on all the nodes.
$ sudo apt update
$ sudo apt -y install containerd
Next, configure containerd so that it works with Kubernetes, run beneath command on all the nodes
$ containerd config default | sudo tee /etc/containerd/config.toml >/dev/null 2>&1
Set cgroupdriver to systemd on all the nodes,
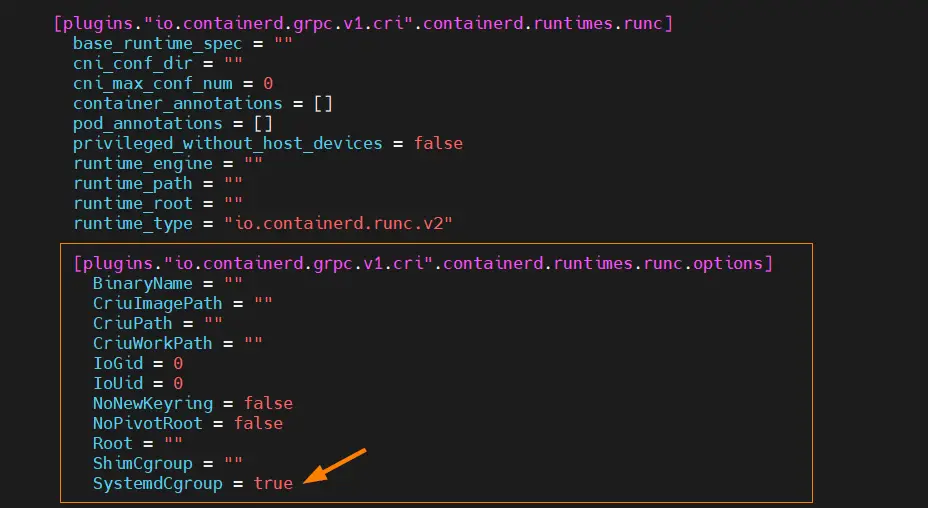
Edit the file ‘/etc/containerd/config.toml’ and look for the section ‘[plugins.”io.containerd.grpc.v1.cri”.containerd.runtimes.runc.options]’ and change ‘SystemdCgroup = false’ to ‘SystemdCgroup = true‘
$ sudo vi /etc/containerd/config.toml
Save and exit the file.
Restart and enable containerd service on all the nodes,
$ sudo systemctl restart containerd
$ sudo systemctl enable containerd
5) Add Kubernetes Apt Repository
In Debian 12/11, Kubernetes related packages are not available in the default package repositories. We have to add additional Kubernetes apt repository on all the nodes, run
$ echo "deb [signed-by=/etc/apt/keyrings/kubernetes-apt-keyring.gpg] https://pkgs.k8s.io/core:/stable:/v1.28/deb/ /" | sudo tee /etc/apt/sources.list.d/kubernetes.list
$ curl -fsSL https://pkgs.k8s.io/core:/stable:/v1.28/deb/Release.key | sudo gpg --dearmor -o /etc/apt/keyrings/kubernetes-apt-keyring.gpg
6) Install Kubernetes Tools
Next, install the Kubernetes tools, including kubeadm, kubelet, and kubectl on all the nodes.
$ sudo apt update
$ sudo apt install kubelet kubeadm kubectl -y
$ sudo apt-mark hold kubelet kubeadm kubectl
7) Install Kubernetes Cluster with Kubeadm
kubelet doesn’t appreciate the command-line options anymore (these are deprecated). Instead, I suggest to create a configuration file, say ‘kubelet.yaml’ with following content.
$ vi kubelet.yaml
apiVersion: kubeadm.k8s.io/v1beta3
kind: InitConfiguration
---
apiVersion: kubeadm.k8s.io/v1beta3
kind: ClusterConfiguration
kubernetesVersion: "1.28.0" # Replace with your desired version
controlPlaneEndpoint: "k8s-master"
---
apiVersion: kubelet.config.k8s.io/v1beta1
kind: KubeletConfiguration
Now, we are all set to initialize Kubernetes cluster, run following command only from master node,
$ sudo kubeadm init --config kubelet.yaml
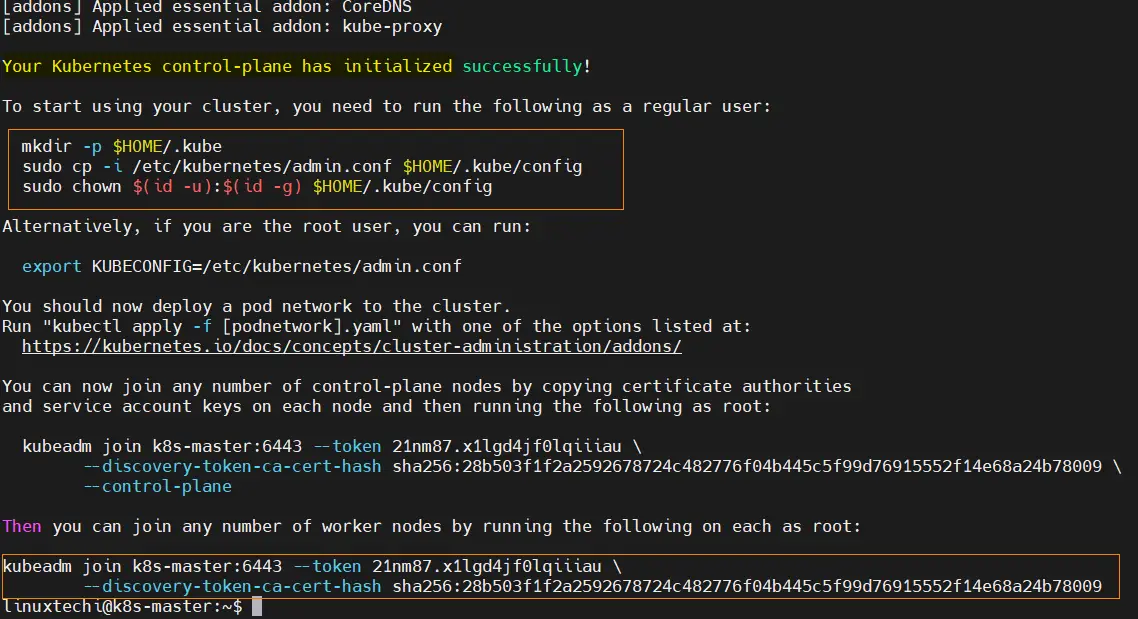
Output,
Above output confirms that control plane has been initialized successfully. In the output, we have commands for regular user for interacting with the cluster and also the command to join any worker node to this cluster.
To start interacting with cluster, run following commands on master node,
$ mkdir -p $HOME/.kube
$ sudo cp -i /etc/kubernetes/admin.conf $HOME/.kube/config
$ sudo chown $(id -u):$(id -g) $HOME/.kube/config
Run following kubectl command to get nodes and cluster information,
$ kubectl get nodes
$ kubectl cluster-info
Output of above commands,
On your worker nodes, join them to the cluster by running the command that was displayed when you initialized the master node. It will look something like this ‘Kubeadm join’
Note: Copy the exact command from the output of ‘kubeadm init’ command. In my case, following is the command
$ sudo kubeadm join k8s-master:6443 --token 21nm87.x1lgd4jf0lqiiiau \
--discovery-token-ca-cert-hash sha256:28b503f1f2a2592678724c482776f04b445c5f99d76915552f14e68a24b78009
Output from Worker Node 1,
Output from Worker Nod 2 ,
Check the nodes status by running following command from master node,
$ kubectl get nodes
To make nodes status ready, we must install POD network addons like Calico or flannel.
8) Setup Pod Network Using Calico
On the master node, run beneath command to install calico,
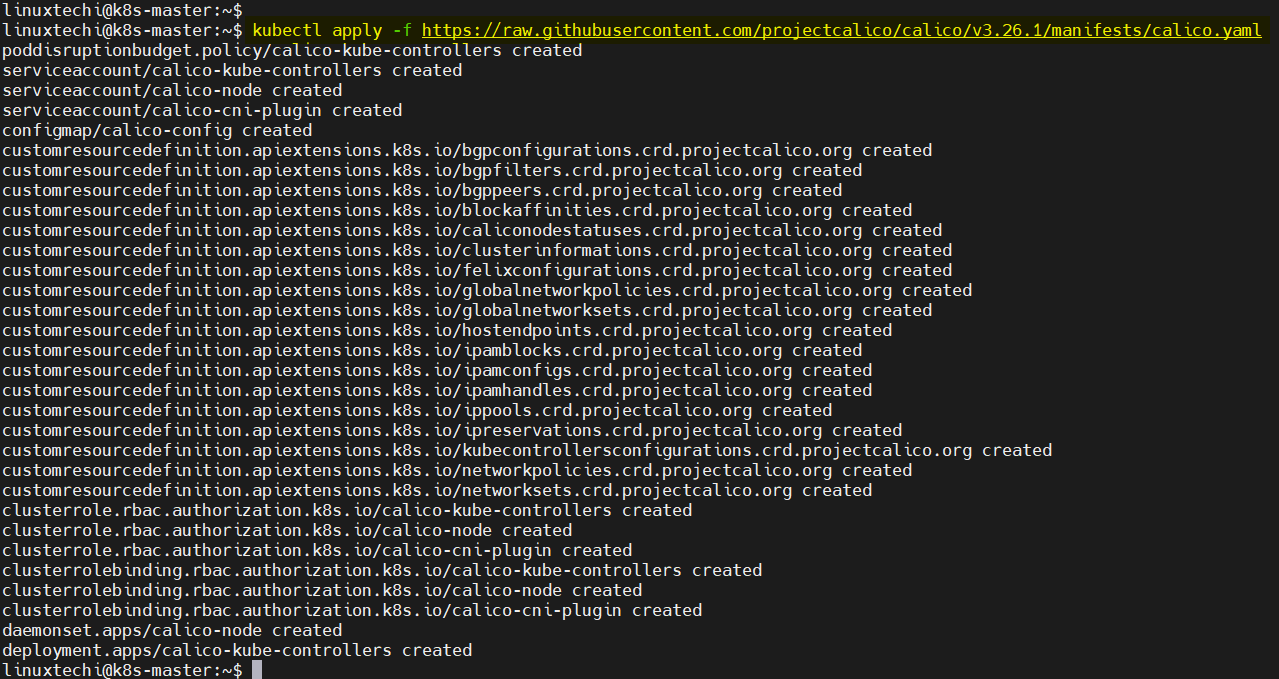
$ kubectl apply -f https://raw.githubusercontent.com/projectcalico/calico/v3.26.1/manifests/calico.yaml
Output,
Allow Calico ports in OS firewall, run beneath ufw commands on all the nodes,
$ sudo ufw allow 179/tcp
$ sudo ufw allow 4789/udp
$ sudo ufw allow 51820/udp
$ sudo ufw allow 51821/udp
$ sudo ufw reload
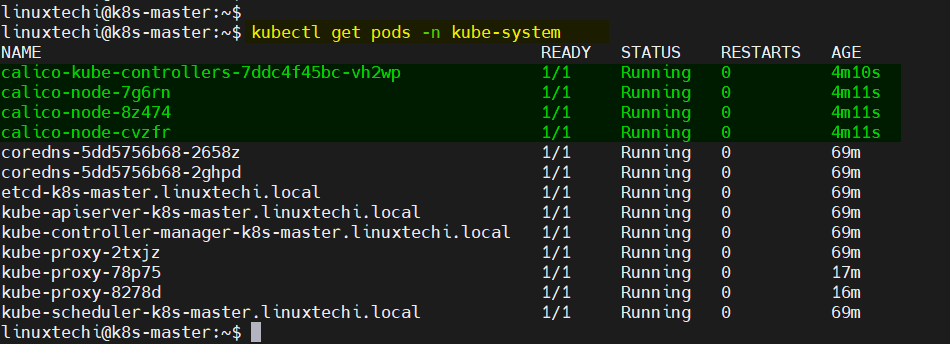
Verify the status of Calico pods, run
$ kubectl get pods -n kube-system
Perfect, now check nodes status again,
Great, above confirms that master and worker nodes are in ready staate. Now, we can say our cluster ready handle workload.
9) Test Kubernetes Cluster Installation
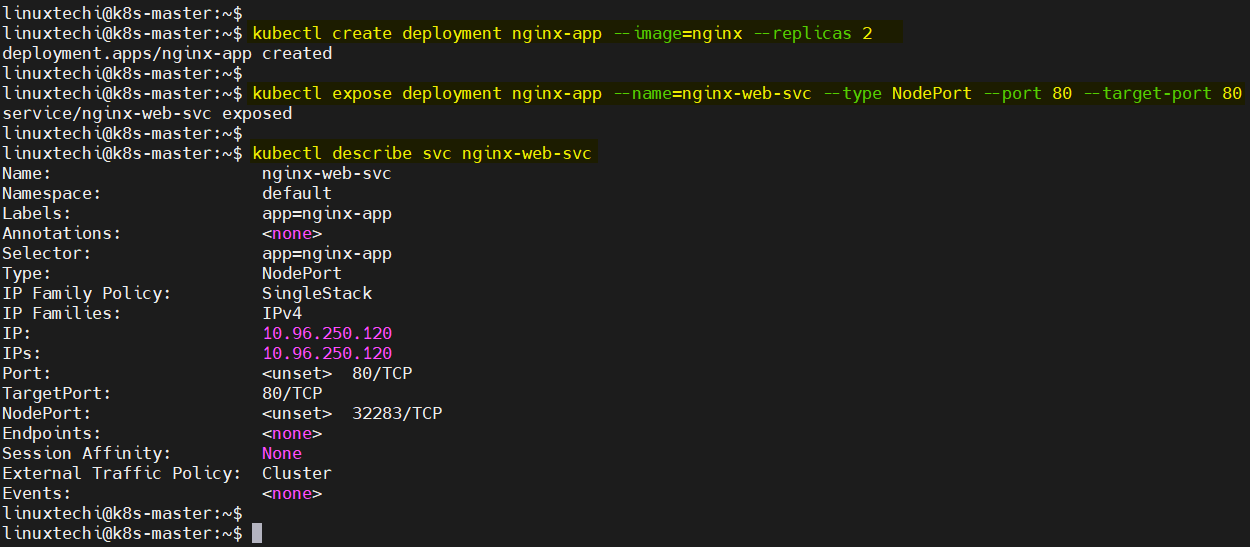
In order validate and test Kubernetes cluster installation, let’s try to deploy nginx based application via deployment. Run beneath commands,
$ kubectl create deployment nginx-app --image=nginx --replicas 2
$ kubectl expose deployment nginx-app --name=nginx-web-svc --type NodePort --port 80 --target-port 80
$ kubectl describe svc nginx-web-svc
Output of above commands,
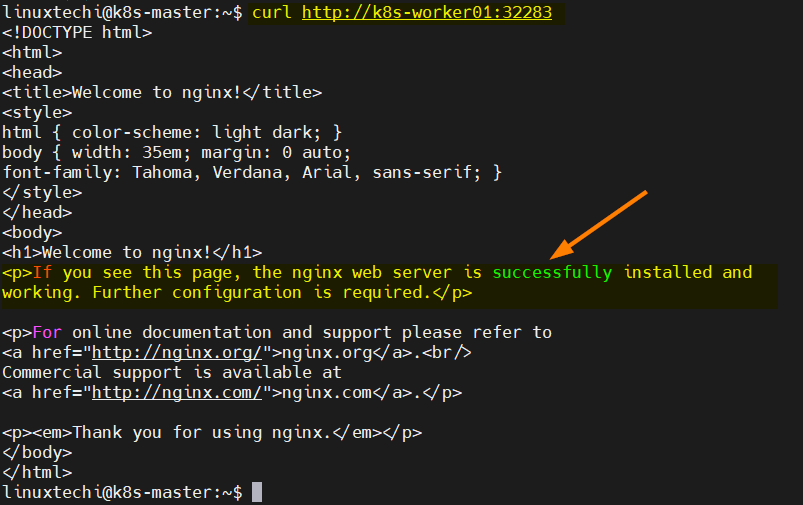
Try to access the nginx based application using following curl command along with the nodeport 32283.
Note : In the curl command we can use either of worker node’s hostname.
$ curl http://k8s-worker01:32283
Great, output above confirms that we are able to access our nginx based application.
That’s all from this guide, I hope you have found it informative and able to install Kubernetes cluster on Debian 12 smoothly. Kindly do post your queries and feedback in below comments section.




Thanks. This really helped me out!
Thank you very much for the detailed explanation! It helped me out to understand a lot.
One question: shouldn’t you add the NGINX port (30036 in your case) to the UFW allowed ports?
If I follow strictly your tutorial, the curl command is blocked until I explicitely allow the port on the remote host.
Hi Sovattha,
In case firewall is up and running on your Debian system before actual Kubernetes cluster installation then you must allow node port in the firewall.
Thanks, this is really useful!
Very good, thank you very much for sharing!
Thanks for this guide! Easy to follow and useful!
The current version of Kubernetes (v1.26) remove support for containerd <=1.5 (‘https://kubernetes.io/blog/2022/11/18/upcoming-changes-in-kubernetes-1-26/#cri-api-removal’).
In Debian 11's stable branch, containerd v1.4.3 is used:
containerd/stable 1.4.13~ds1-1~deb11u3 amd64
To resolve, you'll need to install containerd from Debian's unstable branch which uses v1.6.14.
Yes you do need it.
The easy way I found was to add the following repo to my source list:
sudo nano /etc/apt/sources.list
#Deb unstable
deb http://ftp.ca.debian.org/debian sid main
Save and exit
the run sudo apt update
To see the available versions run:
$ apt-cache madison containerd
To install specific version
sudo apt install containerd=1.6.16~ds1-1
thank you so match!!
great post
The file does not exist ?
‘https://docs.tigera.io/calico/manifests/calico.yaml’
Hi Matt,
Please use the following latest calico yaml file,
kubectl apply -f ‘https://raw.githubusercontent.com/projectcalico/calico/v3.25.0/manifests/calico.yaml’
Thank you very much for the tutorial!!
Right now, the URL
“https://projectcalico.docs.tigera.io/manifests/calico.yaml”
does not exist anymore (did work a week ago). It seems that installing calico is more complicated, now.
Flannel is an alternative, that does still work with ease. One should:
– add “–pod-network-cidr=10.244.0.0/16” to kubeadm init and then
– kubectl apply -f “https://raw.githubusercontent.com/coreos/flannel/master/Documentation/kube-flannel.yml”
In terms of getting the CRI, docker is an alternative to messing with the debian unstable repository:
– add “deb https://download.docker.com/linux/debian bullseye stable” to sources.list and add key as described on docker website
– apt install containerd.io
This should provide more frequent updates. Debian repos might be to static relative to kubernetes. It does also allow for installing docker-ce in parallel if someone wants to build on the master node, for example.
P.S. Would you consider writing a tutorial on running a private registry? With kubernetes 1.26.1 and modern CRI, the certificate issues become much more challenging. I think that the instructions on “insecure registries” and “skip verification” no not work anymore.
Sadly not working for me at all.
After creating the cluster the api server works for me. When adding nodes port 6443 isn’t anymore bound to the master and i receive the error: The connection to the server k8s-master:6443 was refused – did you specify the right host or port?
From the worker nodes i receive following error: E0225 22:04:20.015581 566 memcache.go:238] couldn’t get current server API group list: Get “http://localhost:8080/api?timeout=32s”: dial tcp 127.0.0.1:8080: connect: connection refused
Kind regards,
Tim