Ceph is free and open source distributed storage solution through which we can easily provide and manage block storage, object storage and file storage. Ceph storage solution can be used in traditional IT infrastructure for providing the centralize storage, apart from this it also used in private cloud (OpenStack & Cloudstack). In Red Hat OpenStack Ceph is used as cinder backend.
In this article, we will demonstrate how to install and configure Ceph Cluster(Mimic) on CentOS 7 Servers.
In Ceph Cluster following are the major components:
- Monitors (ceph-mon) : As the name suggests a ceph monitor nodes keep an eye on cluster state, OSD Map and Crush map
- OSD ( Ceph-osd): These are the nodes which are part of cluster and provides data store, data replication and recovery functionalities. OSD also provides information to monitor nodes.
- MDS (Ceph-mds) : It is a ceph meta-data server and stores the meta data of ceph file systems like block storage.
- Ceph Deployment Node : It is used to deploy the Ceph cluster, it is also called as Ceph-admin or Ceph-utility node.
My Lab setup details :
- Ceph Deployment Node: (Minimal CentOS 7, RAM: 4 GB, vCPU: 2, IP: 192.168.1.30, Hostname: ceph-controller)
- OSD or Ceph Compute 1: (Minimal CentOS 7, RAM: 10 GB, vCPU: 4, IP: 192.168.1.31, Hostname: ceph-compute01)
- OSD or Ceph Compute 2: (Minimal CentOS 7, RAM: 10 GB, vCPU: 4, IP: 192.168.1.32, Hostname: ceph-compute02)
- Ceph Monitor: (Minimal CentOS 7, RAM: 10 GB, vCPU: 4, IP: 192.168.1.33, Hostname: ceph-monitor)
Note: In all the nodes we have attached two nics (eth0 & eth1), on eth0 IP from the VLAN 192.168.1.0/24 is assigned . On eth1 IP from VLAN 192.168.122.0/24 is assigned and will provide the internet access.
Let’s Jump into the installation and configuration steps:
Step:1) Update /etc/hosts file, NTP, Create User & Disable SELinux on all Nodes
Add the following lines in /etc/hosts file of all the nodes so that one can access these nodes via their hostname as well.
192.168.1.30    ceph-controller
192.168.1.31    ceph-compute01
192.168.1.32    ceph-compute02
192.168.1.33    ceph-monitor
Configure all the Ceph nodes with NTP Server so that all nodes have same time and there is no drift in time,
~]# yum install ntp ntpdate ntp-doc -y
~]# ntpdate europe.pool.ntp.org
~]# systemctl start ntpd
~]# systemctl enable ntpd
Create a user with name “cephadm” on all the nodes and we will be using this user for ceph deployment and configuration
~]# useradd cephadm && echo "CephAdm@123#" | passwd --stdin cephadm
Now assign admin rights to user cephadm via sudo, execute the following commands,
~]# echo "cephadm ALL = (root) NOPASSWD:ALL" | sudo tee /etc/sudoers.d/cephadm
~]# chmod 0440 /etc/sudoers.d/cephadm
Disable SELinux on all the nodes using beneath sed command, even ceph official site recommends to disable SELinux ,
~]# sed -i --follow-symlinks 's/SELINUX=enforcing/SELINUX=disabled/g' /etc/sysconfig/selinux
Reboot all the nodes now using beneath command,
~]# reboot
Step:2 Configure Passwordless authentication from Ceph admin to all OSD and monitor nodes
From Ceph-admin node we will use the utility known as “ceph-deploy“, it will login to each ceph node and will install ceph package and will do all the required configurations. While accessing the Ceph node it will not prompt us to enter the credentials of ceph nodes that’s why we required to configure passwordless or keys-based authentication from ceph-admin node to all ceph nodes.
Run the following commands as cephadm user from Ceph-admin node (ceph-controller). Leave the passphrase as empty.
[cephadm@ceph-controller ~]$ ssh-keygen
Generating public/private rsa key pair.
Enter file in which to save the key (/home/cephadm/.ssh/id_rsa):
Created directory '/home/cephadm/.ssh'.
Enter passphrase (empty for no passphrase):
Enter same passphrase again:
Your identification has been saved in /home/cephadm/.ssh/id_rsa.
Your public key has been saved in /home/cephadm/.ssh/id_rsa.pub.
The key fingerprint is:
93:01:16:8a:67:34:2d:04:17:20:94:ad:0a:58:4f:8a cephadm@ceph-controller
The key's randomart image is:
+--[ RSA 2048]----+
|o.=+*o+.         |
| o.=o+..         |
|.oo++.  .        |
|E..o.    o       |
|o       S        |
|.        .       |
|                 |
|                 |
|                 |
+-----------------+
[cephadm@ceph-controller ~]$
Now copy the keys to all the ceph nodes using ssh-copy-id command
[cephadm@ceph-controller ~]$ ssh-copy-id cephadm@ceph-compute01
[cephadm@ceph-controller ~]$ ssh-copy-id cephadm@ceph-compute02
[cephadm@ceph-controller ~]$ ssh-copy-id cephadm@ceph-monitor
It recommended to add the following in the file “~/.ssh/config”
[cephadm@ceph-controller ~]$ vi ~/.ssh/config
Host ceph-compute01
   Hostname ceph-compute01
   User cephadm
Host ceph-compute02
   Hostname ceph-compute02
   User cephadm
Host ceph-monitor
   Hostname ceph-monitor
   User cephadm
Save and exit the file.
cephadm@ceph-controller ~]$ chmod 644 ~/.ssh/config
[cephadm@ceph-controller ~]$
Note: In the above command replace the user name and host name that suits to your setup.
Step:3) Configure firewall rules for OSD and monitor nodes
In case OS firewall is enabled and running on all ceph nodes then we need to configure the below firewall rules else you can skip this step.
On Ceph-admin node, configure the following firewall rules using beneath commands,
[cephadm@ceph-controller ~]$ sudo firewall-cmd --zone=public --add-port=80/tcp --permanent
success
[cephadm@ceph-controller ~]$ sudo firewall-cmd --zone=public --add-port=2003/tcp --permanent
success
[cephadm@ceph-controller ~]$ sudo firewall-cmd --zone=public --add-port=4505-4506/tcp --permanent
success
[cephadm@ceph-controller ~]$ sudo firewall-cmd --reload
success
[cephadm@ceph-controller ~]$
Login the OSD or Ceph Compute Nodes and configure the firewall rules using firewall-cmd command,
[cephadm@ceph-compute01 ~]$ sudo firewall-cmd --zone=public --add-port=6800-7300/tcp --permanent
success
[cephadm@ceph-compute01 ~]$ sudo firewall-cmd --reload
success
[cephadm@ceph-compute01 ~]$
[cephadm@ceph-compute02 ~]$ sudo firewall-cmd --zone=public --add-port=6800-7300/tcp --permanent
success
[cephadm@ceph-compute02 ~]$ sudo firewall-cmd --reload
success
[cephadm@ceph-compute02 ~]$
Login to Ceph Monitor node and execute the firewalld command to configure firewall rules,
[cephadm@ceph-monitor ~]$ sudo firewall-cmd --zone=public --add-port=6789/tcp --permanent
success
[cephadm@ceph-monitor ~]$ sudo firewall-cmd --reload
success
[cephadm@ceph-monitor ~]$
Step:4) Install and Configure Ceph Cluster from Ceph Admin node
Login to your Ceph-admin node as a “cephadm” user and enable the latest version of Ceph yum repository. At time of writing this article, Mimic is latest version of Ceph,
[cephadm@ceph-controller ~]$ sudo rpm -Uvh https://download.ceph.com/rpm-mimic/el7/noarch/ceph-release-1-1.el7.noarch.rpm
Enable EPEL repository as well,
[cephadm@ceph-controller ~]$ sudo yum install -y https://dl.fedoraproject.org/pub/epel/epel-release-latest-7.noarch.rpm
Install the Ceph-deploy utility using the following yum command,
[cephadm@ceph-controller ~]$ sudo yum update -y && sudo yum install ceph-deploy python2-pip -y
Create a directory with name “ceph_cluster“, this directory will have all Cluster configurations
[cephadm@ceph-controller ~]$ mkdir ceph_cluster
[cephadm@ceph-controller ~]$ cd ceph_cluster/
[cephadm@ceph-controller ceph_cluster]$
Now generate the cluster configuration by executing the ceph-deploy utility on ceph-admin node, we are registering ceph-monitor node as monitor node in ceph cluster. Ceph-deploy utility will also generate “ceph.conf” in the current working directory.
[cephadm@ceph-controller ceph_cluster]$ ceph-deploy new ceph-monitor
Output of above command would be something like below:
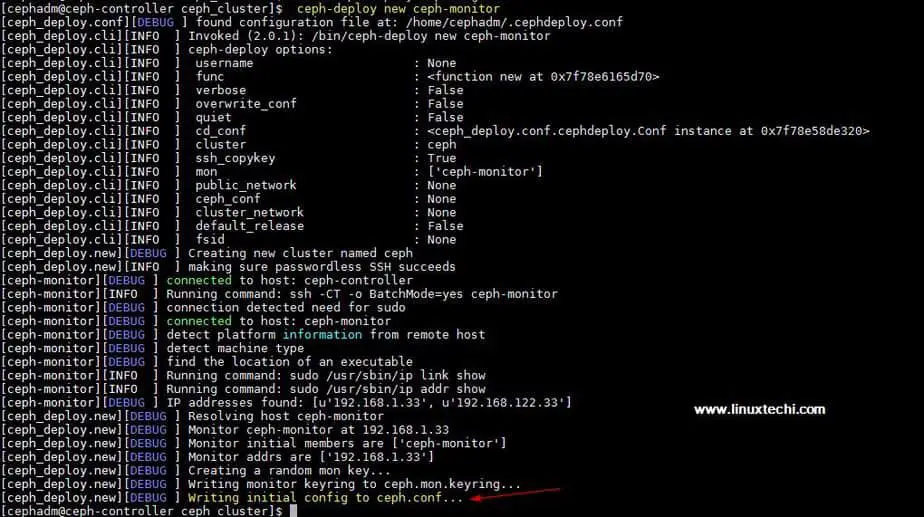
Update Network address (public network) under the global directive in ceph.conf file, Here Public network is the network on which Ceph nodes will communicate with each other and external client will also use this network to access the ceph storage,
[cephadm@ceph-controller ceph_cluster]$ vi ceph.conf
[global]
fsid = b1e269f0-03ea-4545-8ffd-4e0f79350900
mon_initial_members = ceph-monitor
mon_host = 192.168.1.33
auth_cluster_required = cephx
auth_service_required = cephx
auth_client_required = cephx
public network = 192.168.1.0/24
Save and exit the file.
Now Install ceph on all the nodes from the ceph-admin node, run the “ceph-deploy install” command
[cephadm@ceph-controller ~]$ ceph-deploy install ceph-controller ceph-compute01 ceph-compute02 ceph-monitor
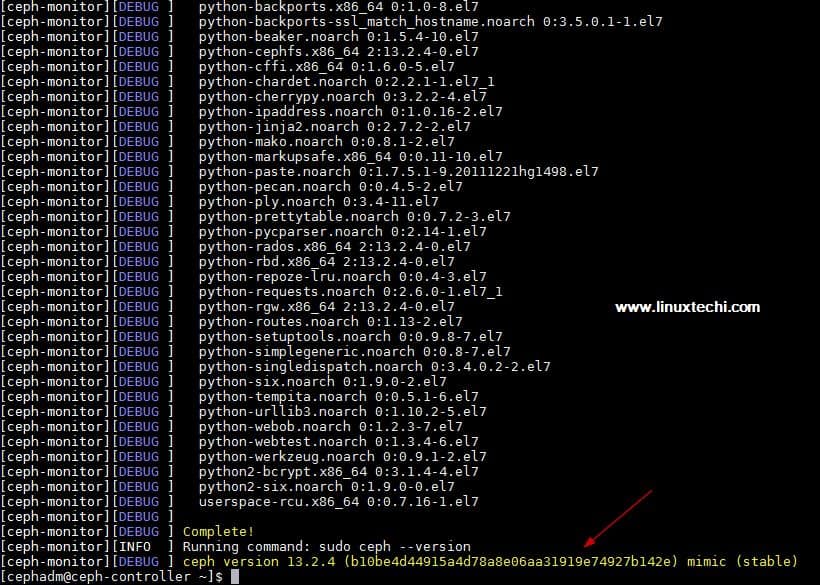
Above command will install ceph along with other dependencies automatically on all the nodes, it might take some time depending on the internet speed on ceph nodes.
Output of above “ceph-deploy install” command output would be something like below:
Execute “ceph-deploy mon create-initial” command from ceph-admin node, it will deploy the initial monitors and gather the keys.
[cephadm@ceph-controller ~]$ cd ceph_cluster/
[cephadm@ceph-controller ceph_cluster]$ ceph-deploy mon create-initial
Execute “ceph-deploy admin” command to copy the configuration file from ceph-admin node to all ceph nodes so that one can use ceph cli command without specifying the monitor address.
[cephadm@ceph-controller ceph_cluster]$ ceph-deploy admin ceph-controller ceph-compute01 ceph-compute02 ceph-monitor
Install the Manager daemon from Ceph-admin node on Ceph Compute Nodes (OSD) using the following command
[cephadm@ceph-controller ceph_cluster]$ ceph-deploy mgr create ceph-compute01 ceph-compute02
Step:5) Add OSD disks to Cluster
In my setup I have attached two disks /dev/vdb & /dev/vdc on both the compute nodes, I will use these four disks from compute nodes as OSD disk.
Let’s verify whether ceph-deploy utility can see these disks or not. Run the “ceph-deploy disk list” command from ceph-admin node,
[cephadm@ceph-controller ceph_cluster]$ ceph-deploy disk list ceph-compute01 ceph-compute02
Output of above command:
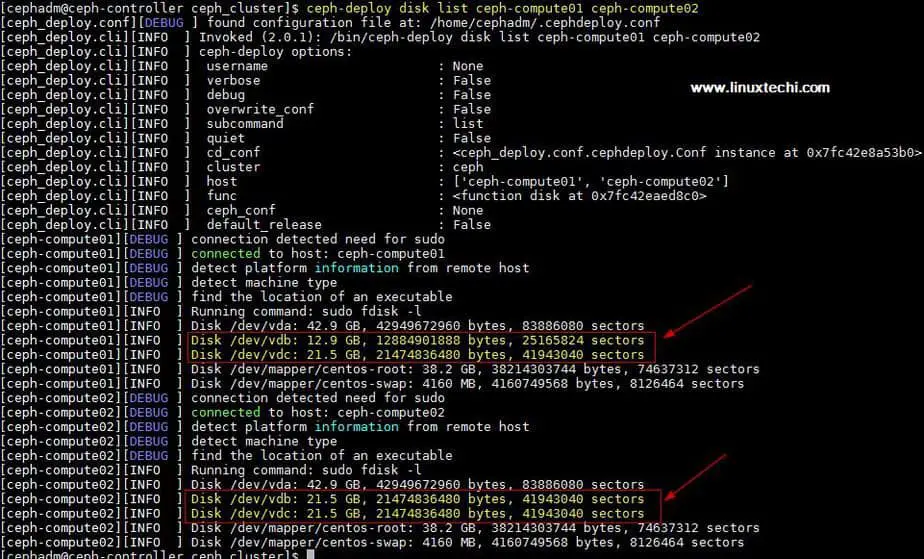
Note: Make sure these disks are not used anywhere and does not contain any data
To clean up and delete data from disks use the following commands,
[cephadm@ceph-controller ceph_cluster]$ ceph-deploy disk zap ceph-compute01 /dev/vdb
[cephadm@ceph-controller ceph_cluster]$ ceph-deploy disk zap ceph-compute01 /dev/vdc
[cephadm@ceph-controller ceph_cluster]$ ceph-deploy disk zap ceph-compute02 /dev/vdb
[cephadm@ceph-controller ceph_cluster]$ ceph-deploy disk zap ceph-compute02 /dev/vdc
Now Mark these disks as OSD using the following commands
[cephadm@ceph-controller ceph_cluster]$ ceph-deploy osd create --data /dev/vdb ceph-compute01
[cephadm@ceph-controller ceph_cluster]$ ceph-deploy osd create --data  /dev/vdc ceph-compute01
[cephadm@ceph-controller ceph_cluster]$ ceph-deploy osd create --data /dev/vdb ceph-compute02
[cephadm@ceph-controller ceph_cluster]$ ceph-deploy osd create --data /dev/vdc ceph-compute02
Step:6) Verify the Ceph Cluster Status
Verify your Ceph cluster status using “ceph health” & “ceph -s“, run these commands from monitor node
[root@ceph-monitor ~]# ceph health
HEALTH_OK
[root@ceph-monitor ~]#
[root@ceph-monitor ~]# ceph -s
  cluster:
    id:     4f41600b-1c5a-4628-a0fc-2d8e7c091aa7
    health: HEALTH_OK

  services:
    mon: 1 daemons, quorum ceph-monitor
    mgr: ceph-compute01(active), standbys: ceph-compute02
    osd: 4 osds: 4 up, 4 in

  data:
    pools:   0 pools, 0 pgs
    objects: 0  objects, 0 B
    usage:   4.0 GiB used, 76 GiB / 80 GiB avail
    pgs:
[root@ceph-monitor ~]#
As we can see in above output that health of ceph cluster is OK and we have 4 OSDs , all of these OSDs are up and active, apart from this we can see that have 80 GB disk space available in our cluster.
This Confirm that we have successfully installed and configured Ceph Cluster on CentOS 7 System, if these steps help you to install ceph in your environment then please do share your feedback and comments.
In the coming article we will discuss how to assign block storage from Ceph cluster to the clients and will see how client can access the block storage.



Hi There,
Thanks for the tutorial, please do make a tutorial on adding and removing mds to ceph cluster
Great article!!! Thank you! I am really waiting for second part!
Can you please create an article for kolla-ansible plus ceph storage.
Thanks for this; To deploy the ceph 14.2 I used
ceph-deploy install –release nautilus
I have problem with
$ ceph health
2020-11-03 16:01:38.868 7f6b10870700 -1 auth: unable to find a keyring on /etc/ceph/ceph.client.admin.keyring,/etc/ceph/ceph.keyring,/etc/ceph/keyring,/etc/ceph/keyring.bin,: (2) No such file or directory
2020-11-03 16:01:38.868 7f6b10870700 -1 monclient: ERROR: missing keyring, cannot use cephx for authentication
[errno 2] error connecting to the cluster
Ran into the same problem. Was running on openstack centos 7 and found the security group in which my servers were part of did not have the correct ports open(as suggested in the firewall section in the article)
You should use sudo:
sudo ceph health
Please change permission of /etc/ceph directory and their internal file.
#chown cephadm /etc/ceph/*
#chogro cephadm /etc/ceph/*