Ansible is an awesome automation tool for Linux sysadmins. It is an open source configuration tool which allows sysadmins to manage hundreds of servers from one centralize node i.e Ansible Server. Ansible is the preferred configuration tool when it is compared with similar tools like Puppet, Chef and Salt because it doesn’t need any agent and it works on SSH and python.
In this tutorial we will learn how to install and use Ansible on CentOS 8 and RHEL 8 system
Ansible Lab Details:
- Minimal CentOS 8 / RHEL 8 Server (192.168.1.10) with Internet Connectivity
- Two Ansible Nodes – Ubuntu 18.04 LTS (192.168.1.20) & CentOS 7 (192.168.1.30)
Ansible Installation steps on CentOS 8
Ansible package is not available in default CentOS 8 package repository. so we need to enable EPEL Repository by executing the following command,
[pkumar@linuxtechi ~]$ sudo dnf install https://dl.fedoraproject.org/pub/epel/epel-release-latest-8.noarch.rpm -y
Once the epel repository is enabled, execute the following dnf command to install Ansible
[pkumar@linuxtechi ~]$ sudo dnf install ansible
Output of above command :
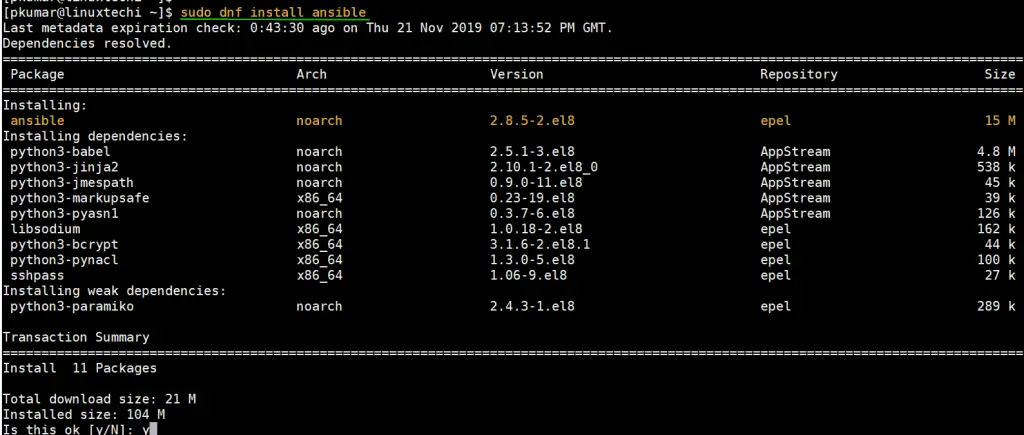
Once the ansible is installed successfully, verify its version by running the following command
[pkumar@linuxtechi ~]$ sudo ansible --version

Above output confirms that Installation is completed successfully on CentOS 8.
Let’s move to RHEL 8 system
Ansible Installation steps on RHEL 8
If you have a valid RHEL 8 subscription then use following subscription-manager command to enable Ansible Repo,
[pkumar@linuxtechi ~]$ sudo subscription-manager repos --enable ansible-2.8-for-rhel-8-x86_64-rpms
Once the repo is enabled then execute the following dnf command to install Ansible,
[pkumar@linuxtechi ~]$ sudo dnf install ansible -y
Once the ansible and its dependent packages are installed then verify ansible version by executing the following command,
[pkumar@linuxtechi ~]$ sudo ansible --version
Alternate Way to Install Ansible via pip3 on CentOS 8 / RHEL 8
If you wish to install Ansible using pip (python’s package manager) then first install pyhton3 and python3-pip packages using following command,
[pkumar@linuxtechi ~]$ sudo dnf install python3 python3-pip -y
After pyhthon3 installation, verify its version by running
[pkumar@linuxtechi ~]$ python3 -V
Python 3.6.8
[pkumar@linuxtechi ~]$
Now run below pip3 command to install Ansible,
[pkumar@linuxtechi ~]$ pip3 install ansible --user
Output,
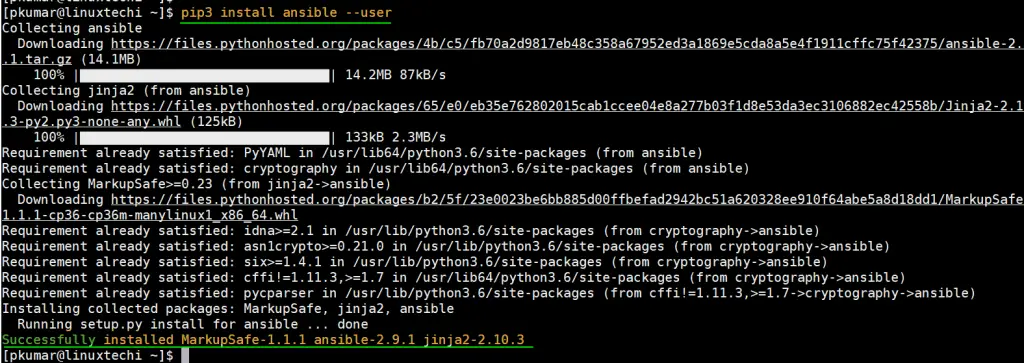
Above output confirms that Ansible has been installed successfully using pip3. Let’s see how we can use Ansible
How to Use Ansible Automation Tool?
When we install Ansible using yum or dnf command then its configuration file, inventory file and roles directory created automatically under /etc/ansible folder.
So, let’s add a group with name “labservers” and under this group add ubuntu 18.04 and CentOS 7 System’s ip address in /etc/ansible/hosts file
[pkumar@linuxtechi ~]$ sudo vi /etc/ansible/hosts
…
[labservers]
192.168.1.20
192.168.1.30
…
Save & exit file.
Once the inventory file (/etc/ansible/hosts) is updated then exchange your user’s ssh public keys with remote systems which are part of “labservers” group.
Let’s first generate your local user’s public and private key using ssh-keygen command,
[pkumar@linuxtechi ~]$ ssh-keygen
Now exchange public key between the ansible server and its clients using the following command,
[pkumar@linuxtechi ~]$ ssh-copy-id [email protected]
[pkumar@linuxtechi ~]$ ssh-copy-id [email protected]
Now let’s try couple of Ansible commands, first verify the connectivity from Ansible server to its clients using ping module,
[pkumar@linuxtechi ~]$ ansible -m ping "labservers"
Note: If we don’t specify the inventory file in above command then it will refer the default hosts file (i.e /etc/ansible/hosts)
Output,
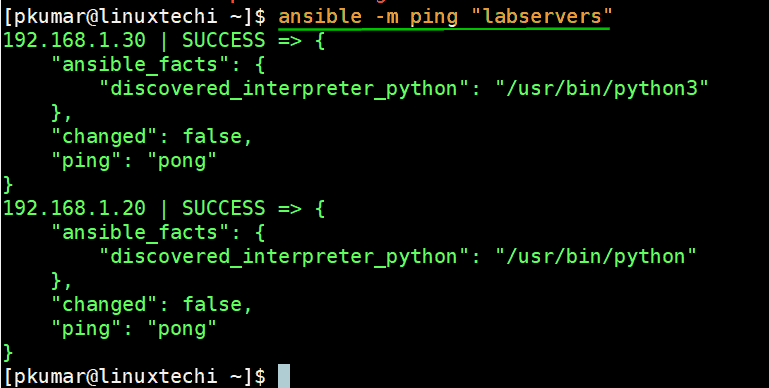
Let’s check kernel version of each client using Ansible shell command,
[pkumar@linuxtechi ~]$ ansible -m command -a "uname -r" "labservers"
192.168.1.30 | CHANGED | rc=0 >>
4.15.0-20-generic
192.168.1.20 | CHANGED | rc=0 >>
3.10.0-327.el7.x86_64
[pkumar@linuxtechi ~]$
Use the following ansible command to list all hosts from the inventory file,
[pkumar@linuxtechi ~]$ ansible all -i /etc/ansible/hosts --list-hosts
  hosts (4):
    192.168.100.1
    192.168.100.10
    192.168.1.20
    192.168.1.30
[pkumar@linuxtechi ~]$
Use the following ansible command to list only hosts from “labservers” group
pkumar@linuxtechi ~]$ ansible labservers -i /etc/ansible/hosts --list-hosts
  hosts (2):
    192.168.1.20
    192.168.1.30
[pkumar@linuxtechi ~]$
That’s all from this article, we have successfully demonstrated on how to install and use Ansible on CentOS 8 and RHEL 8 System. Please do you share your feedback and comments.
Read Also : How to Install Ansible AWX with Docker-Compose on CentOS 8
Read Also : How to Manage Remote Windows Host using Ansible


Hi,
Very nice, i had successfully configuration Ansible on a CentOS8 exactely as showed in this helpful support.
Many thanks to you