Ansible AWX is a free and open-source web application that provides a user-friendly interface for managing Ansible playbooks and inventories. It also includes a REST API for automating Ansible operations. AWX serves as the open-source version of Red Hat Ansible Tower.
In this post, we will explain how to install Ansible AWX on Ubuntu 24.04. To deploy AWX, a Kubernetes infrastructure such as MicroK8s, K3s, or Minikube is required. In this demo, we will use Minikube, a single-node Kubernetes cluster. Refer to the following URL for Minikube installation:
Prerequisites
Before we get started, ensure that Ubuntu 24.04 system has the following:
- 8 GB of RAM
- 3.4 GHz CPU with 2 Cores
- Hard disk space 20 GB
- Internet Connection
- Pre Installed minikube
Let’s jump into Ansible AWX installation steps
1) Install Required Packages
Log in to your Ubuntu system and install following required packages
$ sudo apt install git make -y
2) Start minikube cluster
It is recommended to start the Minikube cluster with 4 CPUs and 8 GB of RAM. If resources are lower than this, the pods may take longer to initialize.
To start the minikube, run following minikube command as regular user,
$ minikube start --vm-driver=docker --addons=ingress

Execute beneath commands to verify minikube and pods status
$ minikube status
$ kubectl get pods -A

3) Deploy Ansible AWX via Operator
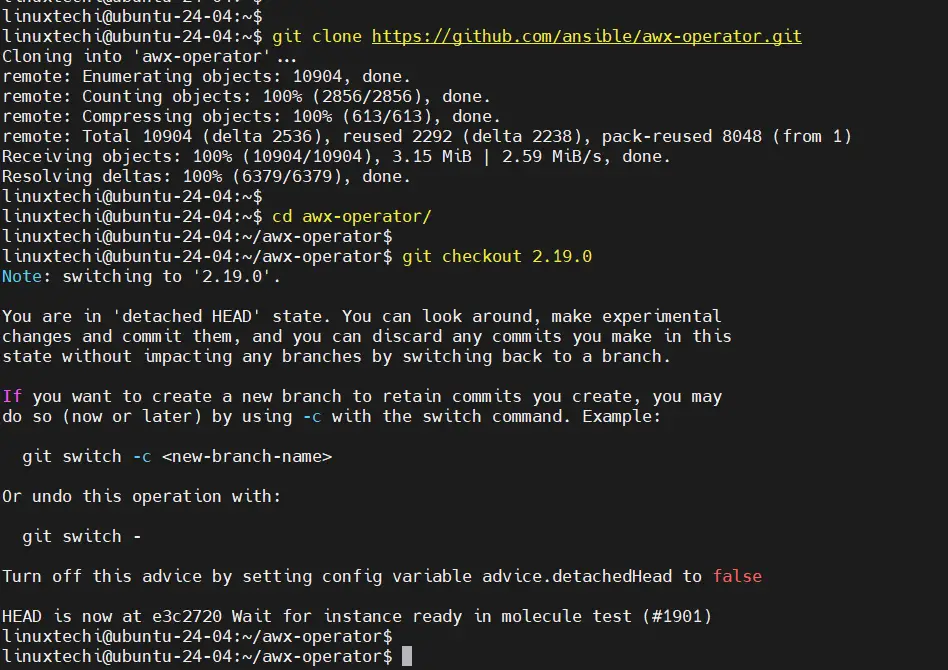
Use following git clone command to get AWX operator,
$ git clone https://github.com/ansible/awx-operator.git
$ cd awx-operator/
$ git checkout 2.19.0

Note: As of the time of writing this post, the latest version of the AWX Operator was 2.19.0. You can check for the latest version on the official release page: https://github.com/ansible/awx-operator/releases.
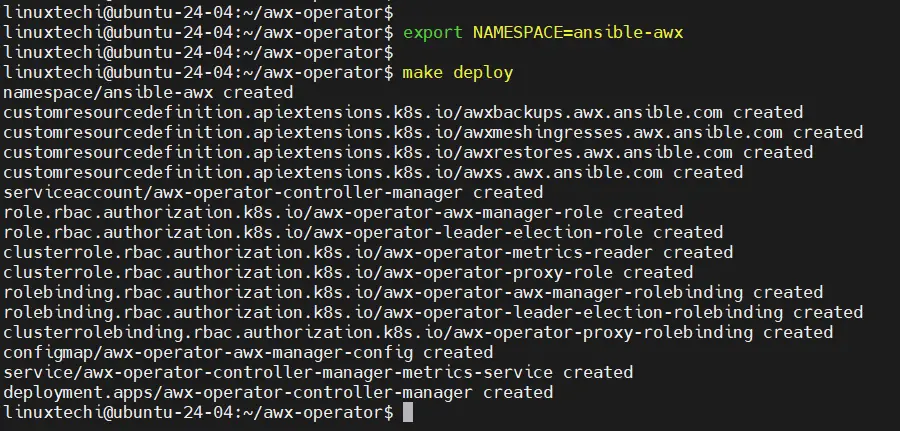
Next , set the namespace “ansibe-awx” and run make deploy command
$ export NAMESPACE=ansible-awx
$ make deploy

Next, check the status pods in ansible-awx namespace,
$ kubectl get pods -n ansible-awx

Now, copy awx demo file with the name ‘awx-ubuntu.yml’
$ cp awx-demo.yml awx-ubuntu.yml
Edit this file using vi editor, change the name from awx-demo to awx-ubuntu.
$ vi awx-ubuntu.yml
---
apiVersion: awx.ansible.com/v1beta1
kind: AWX
metadata:
  name: awx-ubuntu
spec:
  service_type: nodeport
Save and close the file.

Deploy AWX using following kubectlc command,
$ kubectl create -f awx-ubuntu.yml -n ansible-awx
awx.awx.ansible.com/awx-ubuntu created
$
Monitor pods and service status of ansible-awx namespace,
$ kubectl get pods -n ansible-awx
$ kubectl get svc -n ansible-awx

Great, output above confirms that AWX pods and service are up and running.
You can track the installation for AWX from the deployment,
$ kubectl logs -f deployments/awx-operator-controller-manager -c awx-manager -n ansible-awx
4) Access AWX Dashboard
To access the dashboard from Ubuntu system itself, run following command to get dashboard url,
$ minikube service awx-ubuntu-service --url -n ansible-awx
http://192.168.49.2:30770
$
In case, you are trying to access outside of your Ubuntu system then run following kubectl command,
$ kubectl port-forward service/awx-ubuntu-service -n ansible-awx --address 0.0.0.0 10445:80 &> /dev/null &

Open the web browser, type following URL
http://<Your-Ubuntu-IP-Address>:10445
To retrieve admin user password, run the following kubectl command,
$ kubectl get secret -n ansible-awx | grep -i password
$ kubectl get secret awx-ubuntu-admin-password -o jsonpath="{.data.password}" -n ansible-awx | base64 --decode; echo
4zzsWN4fYJxgidx6cSiYJq3vrPSK6JHR
$

Copy this password string and paste it on password field on AWX login page,
Click on ‘Login In‘
And that’s it! We have successfully installed Ansible AWX on Ubuntu 24.04. I hope you found this guide helpful and informative. Feel free to share your questions and feedback in the comments section below.
Also Read : How to Run and Schedule Ansible Playbook Using AWX GUI


Many thanks for this great effort! The only problem I had was after stopping nginx, there was no more failure. I was then able to access the AWX website.
Hello Everyone, Can someone guide me how add route to access the Ansible clients from the AWX server? Thanks in advance.
Thanks,
Sunil.K
Docker Compose Install did not work for me because the 2nd grep failed due to “Linux” being lowercase “l”. Once I changed it to lowercase, the step passed.
The step: $ curl -s ‘https://api.github.com/repos/docker/compose/releases/latest’ \
| grep browser_download_url | grep docker-compose-Linux-x86_64 \
| cut -d ‘”‘ -f 4 | wget -qi –
Just wanted to confirm if there is bug in this version . I have installed awx using container and version is 17.1.0.
Many of the things are performing in weird way or sometimes not even giving output or error
Hi James,
Now is 2023 July, and probably lots of stuff have changed. I followed your steps and I have a bucket load of errors on the last step (ansible-playbook -i inventory install.yml). I am a newbie in AWX. My question is do you maintain this page?
Hi Sandy,
Yes, Installation approach is changed now. I have updated the post with updated steps.
I have already a working AWX instance and so far everything works great. One question I have is how can I check which python modules have been installed? For example I would like to use winrm for Windows hosts management. If the python modules are mot present, how we can add them to this setup?
How to add SSL certificate on this server to make it accessible over https ?
Good afternoon, great how to, just to complement, if you use kubectl port-forward service/awx-demo-service -n ansible-awx –address 0.0.0.0 10445:80 , it will get the terminal stuck and it keeps listening,
Handling connection for 10445
Handling connection for 10445
Handling connection for 10445
To solve it, just run it with the option ( &> /dev/null & ), example below.
kubectl port-forward service/awx-demo-service -n ansible-awx –address 0.0.0.0 10445:80 &> /dev/null &
Hi Jose,
After following all procedures i’m successfully able to install AWX and login page loads but when i’m giving the credentials it’s getting error like invalid username or password error . Please let us know what’s the solution for this .
Thank you for the guide. How to generate a self-signed certificate and enable https on AWX.
After following all procedures I’m successfully able to install AWX and login page loads but when I’m giving the credentials it’s getting error like invalid username or password error. Please let us know what’s the solution for this.
Same error for me. Please Help!.
kubectl exec -it pod/awx-web-6dfd4d4855-2k9k5 -n awx — awx-manage changepassword admin
kubectl logs awx-web-6dfd4d4855-2k9k5 -n awx -f