Hello Readers, in this blog post, we will show you how to install KVM on Ubuntu 24.04 step-by-step.
Kernel-based Virtual Machine (KVM) is a powerful virtualization technology built into Linux. It allows you to create and manage multiple virtual machines (VMs) on your Ubuntu 24.04 system. Follow this step-by-step guide to install KVM and get started with virtualization on your Linux server.
Prerequisites
- Pre-Install Ubuntu 24.04 Instance (Server or Desktop)
- A local user with sudo rights.
- Stable Internet Connection
- Ensure that your system supports virtualization. You can verify this by checking if your CPU has the necessary virtualization extensions (Intel VT or AMD-V) and if they are enabled in the BIOS.
Note: To enable the Virtualization, you need to go to bios settings of your system and enable Intel VT or AMD-V.
Check for Virtualization Support
$ egrep -c '(vmx|svm)' /proc/cpuinfo
If the output is more than 0, your CPU supports virtualization.

1) Update the System
It is highly recommended, start by updating your package list to ensure you have the latest versions. Run the following command from the terminal.
$ sudo apt update && sudo apt upgrade -y
2) Install KVM and Related Packages
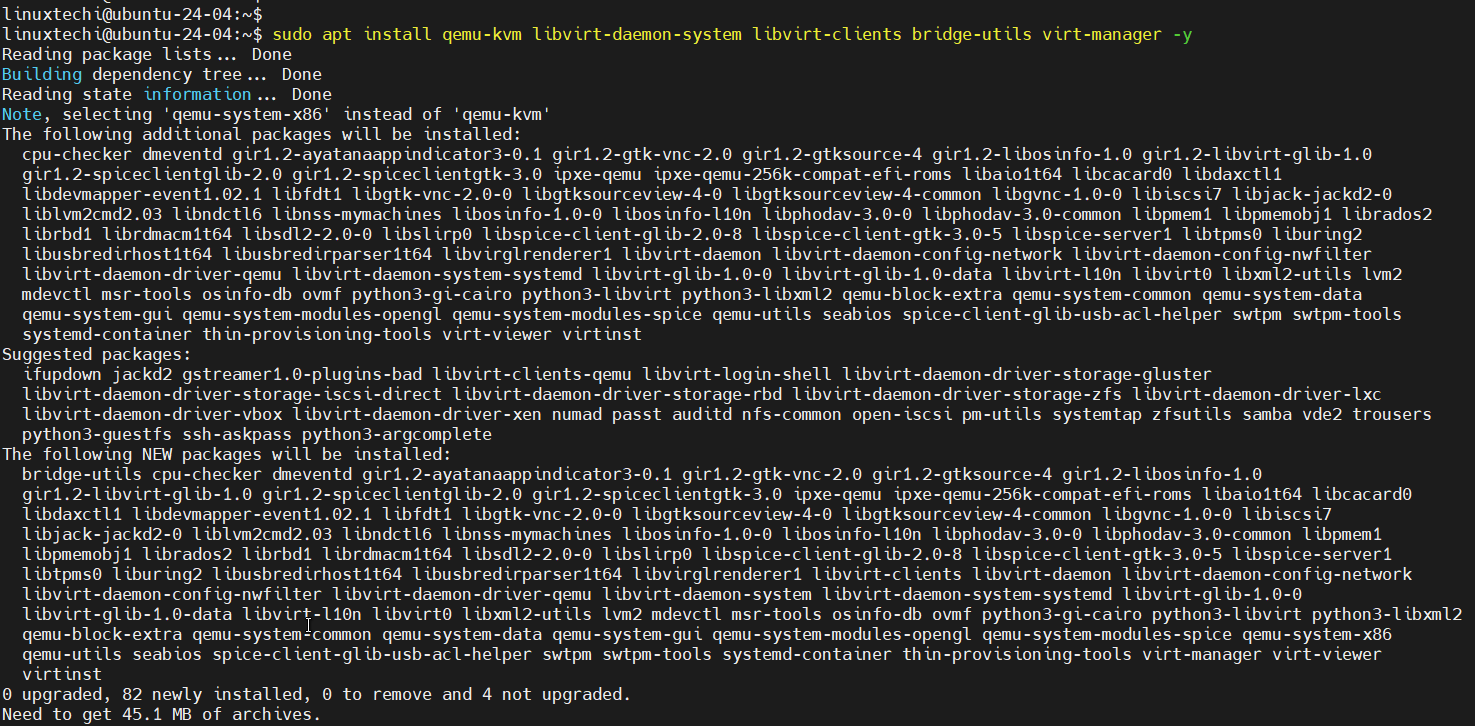
KVM and its related packages are available in the default apt repository of Ubuntu 24.04, so for its installation, run
$ sudo apt install qemu-kvm libvirt-daemon-system libvirt-clients bridge-utils virt-manager -y
This command installs KVM, QEMU, virt-mamager and other tools required to manage virtual machines.
After the installation of above packages, start libvirtd service.
3) Start and Enable Libvirtd service
Start and enable the libvirtd service using following systemctl command.
$ sudo systemctl enable --now libvirtd
Next, check libvirtd service status
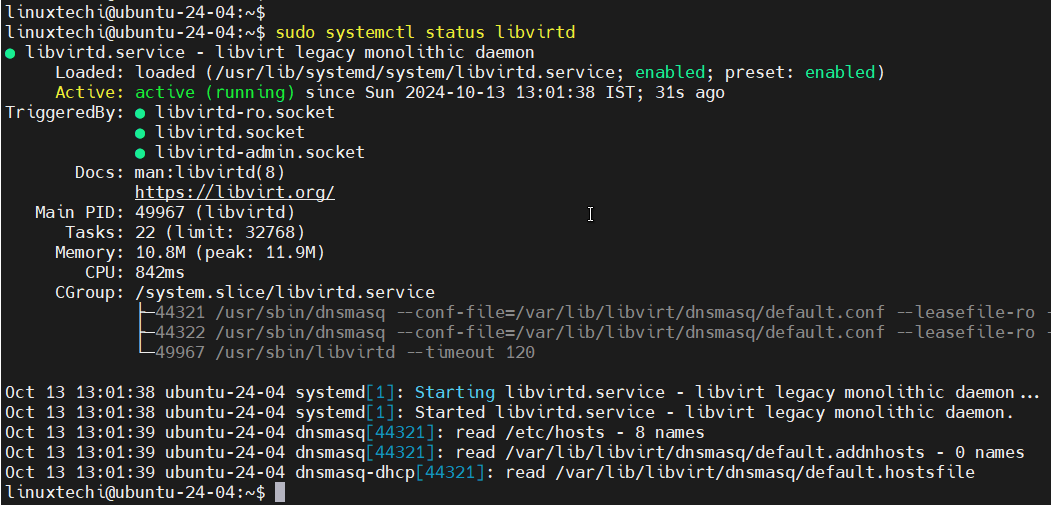
If the service is active and running, your installation was successful.
4) Add Your Local User to the KVM and Libvirt Group
For non-root users to manage virtual machines, add your user to the `libvirt` and `kvm` groups:
$ sudo usermod -aG libvirt,kvm $USER
Log out and log back in for these changes to take effect.

5) Create Network Bridge using netplan
To access KVM virtual machines from outside your Ubuntu 24.04 system, you need to map the VM’s interface to a network bridge. While KVM creates a default virtual bridge called virbr0 for testing, it’s not suitable for external connections. To set up a proper network bridge, you should create a configuration file with extension *.yaml in the /etc/netplan directory. This configuration ensures that your VMs can communicate with other devices on the network efficiently.
$ cd /etc/netplan/
$ ls
50-cloud-init.yaml
$
Note : This file name may vary according to your setup but extension will be yaml.
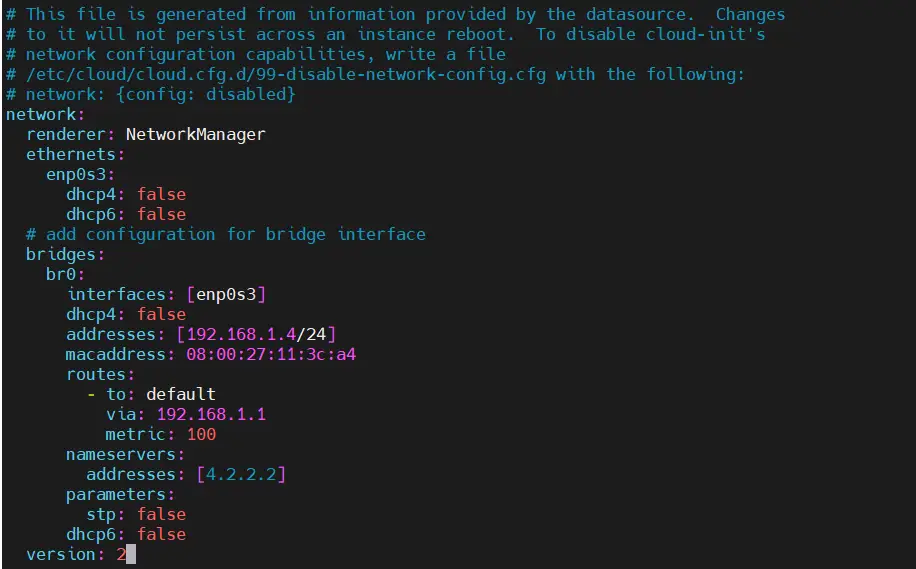
Modify this file and add the following content to it.
$ sudo vi 50-cloud-init.yaml
network:
  renderer: NetworkManager
  ethernets:
    enp0s3:
      dhcp4: false
      dhcp6: false
  # add configuration for bridge interface
  bridges:
    br0:
      interfaces: [enp0s3]
      dhcp4: false
      addresses: [192.168.1.4/24]
      macaddress: 08:00:27:11:3c:a4
      routes:
        - to: default
          via: 192.168.1.1
          metric: 100
      nameservers:
        addresses: [4.2.2.2]
      parameters:
        stp: false
      dhcp6: false
  version: 2
Save and close the file.
Note : Change Interface Name, its macaddress, IP details that suits to your setup.
Apply these changes so that they comes into the affect, run
$ sudo netplan apply
Now, run ‘ip add show’ command to verify the bridge and ip details.
$ ip add show
$ ip route show
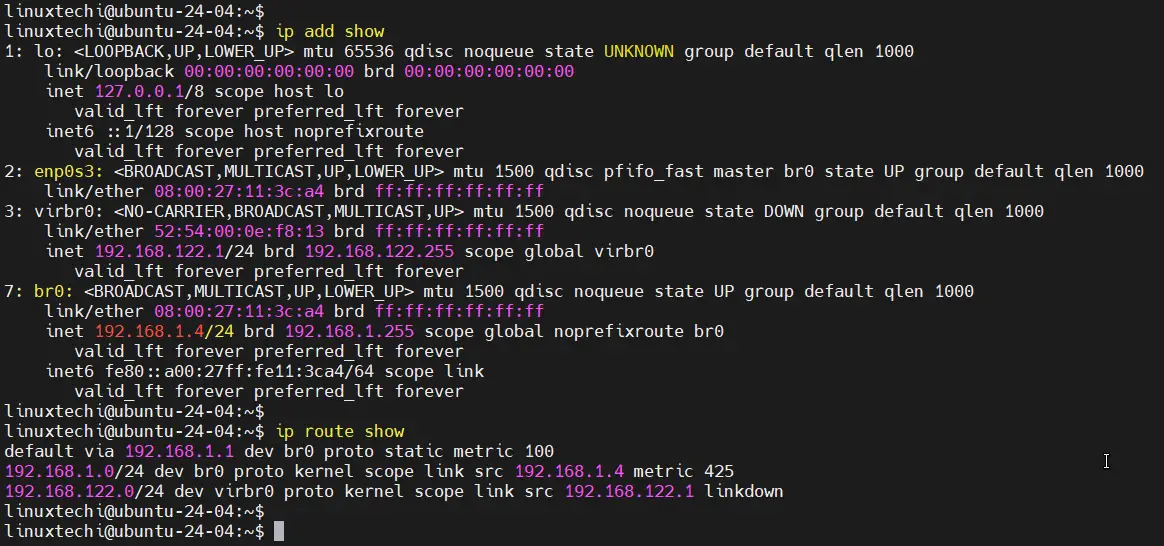
Great, output above confirms that we have successfully created a network bridge named br0 and has assigned a static IP address to it. Interface for the bridge is ‘enp0s3’.
6) Launch Virt-Manager and Create virtual Machine
Virt-Manager is a graphical interface that makes it easier to create and manage virtual machines.
You can now create and manage your VMs through a user-friendly interface.
- Open Virt-Manager and click on “Create a New Virtual Machine.”
- Follow the prompts to specify the installation source, disk space, memory, and CPU settings for your new VM.
- Complete the setup and start your new virtual machine.
Alternate way to create virtual machine is from the command line using virt-install command. This is mostly used on Ubuntu servers where we don’t have desktop environment.
Creating Virtual Machine from Command Line
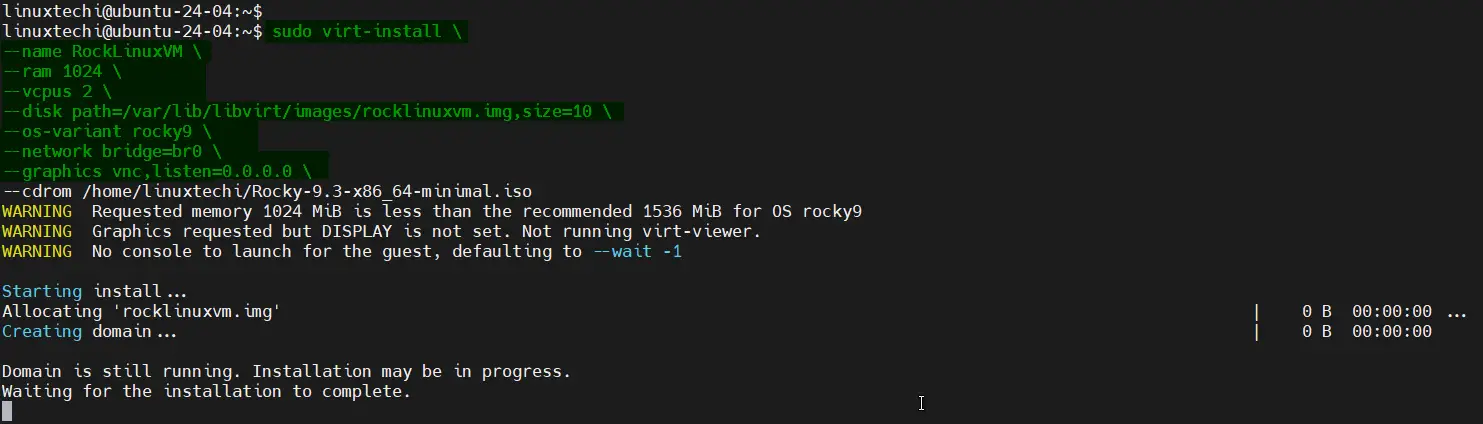
Use the virt-install command to create a VM, as shown below.
$ sudo virt-install \
--name RockLinuxVM \
--ram 1024 \
--vcpus 2 \
--disk path=/var/lib/libvirt/images/rocklinuxvm.img,size=10 \
--os-variant rocky9 \
--network bridge=br0 \
--graphics vnc,listen=0.0.0.0 \
--cdrom /home/linuxtechi/Rocky-9.3-x86_64-minimal.iso
Note: Adjust these parameters that suits to your setup.
Now start the VNC viewer and connect it your Ubuntu 24.04 on port 5900, as shown below.
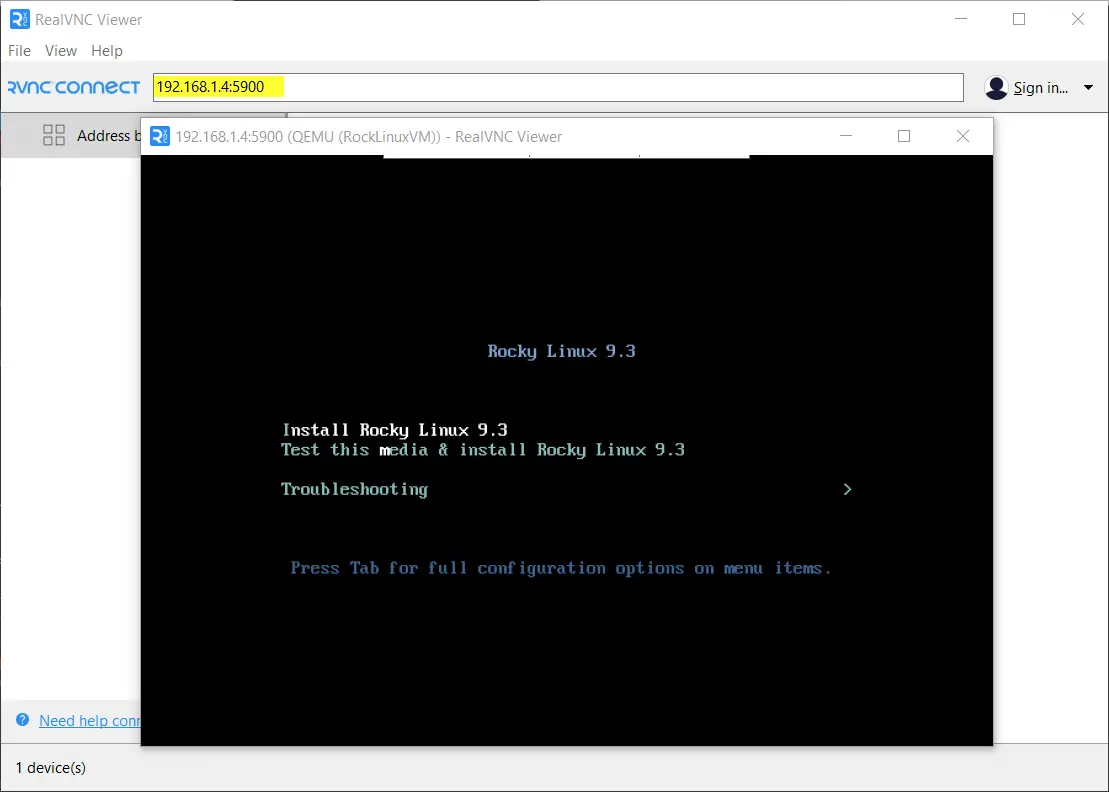
Follow the screen instructions and complete the installation.
That’s all from this post, I believe you have found these instructions useful. Feel free to ask if you need further details or assistance with your KVM setup!


we are not able to connect
http://archive.ubuntu.com/ubuntu/. because of this i am not able to connect DNS server on workstations.Could you please assist on this.
Thank you for reaching out. It seems there may be connectivity issues affecting access to
http://archive.ubuntu.com/ubuntu/and potentially the DNS resolution for your workstations.I would suggest confirm the DNS server IP addresses and check whether is configured correctly or not. Apart from this, check the default gateway connectivity and make sure it should be reachable before fixing the DNS resolution issue.
Thanks for Quick response. as u said we are able to ping gateway and getting response. but problem facing at connecting to the DNS servers and http://archive.ubuntu.com/ubuntu/. same issue i observed while doing server 24.04 OS installation on VM. same is issue continuing it seems.
my doubt is it was not able to be connecting host machine.
could you please provide any document after connecting VNC .
# This file is generated from information provided by the datasource. Changes
# to it will not persist across an instance reboot. To disable cloud-init’s
# network configuration capabilities, write a file
# /etc/cloud/cloud.cfg.d/99-disable-network-config.cfg with the following:
# network: {config: disabled}
network:
ethernets:
eno1:
dhcp4: no
# add configuration for bridge interface
bridges:
br0:
interfaces: [eno1]
dhcp4: no
addresses: [192.168.10.99/23]
macaddress: e0:07:1b:f5:83:f0
routes:
– to: default
via: 192.168.10.1
metric: 100
nameservers:
addresses:
– 8.8.8.8
– 4.2.2.2
version: 2
in the above network settings do i need to change.
please assist me.
The provided network configuration seems mostly correct. However, ensure the following:
Check that the br0 bridge interface is correctly linked to the physical interface (eno1).
Verify that the routes section accurately points to the gateway (192.168.10.1).
Confirm that the addresses and nameservers settings are valid and applied.
You can use the following command to apply and verify the settings:
sudo netplan applyip addr show
ip route show
Disable Cloud-Init Network Configuration
If you’re observing cloud-init overwriting your network configuration, create the file
/etc/cloud/cloud.cfg.d/99-disable-network-config.cfgwith the following content:network: {config: disabled}Then apply the settings manually using netplan.
sudo netplan applyHi , As you suggested I disabled network – config and applied the settings mannully on 01-netconfig.yaml. even though not able to DNS. Any other suggestions. please