In this post, we will learn how to enable Nested Virtualization (VT-x/AMD-v) in VirtualBox on a Linux host.
Nested virtualization allows you to run virtual machines inside other virtual machines, enabling advanced setups for development, testing, and training. It refers to the ability to run a hypervisor inside a virtual machine. For instance, you can run VirtualBox, VMware, or KVM inside a VirtualBox VM.
By default nested virtualization in Oracle VM VirtualBox on linux system is disabled. With the release of VirtualBox 6.1 we can enable nested virtualization on Intel CPUs starting with 5th generation Core i.
Prerequisites
Before enabling nested virtualization, ensure the following things are in place.
- Host CPU Support: Your processor must support virtualization extensions:
For Intel: VT-x
For AMD: AMD-v - VirtualBox Version: VirtualBox 6.1 or later is recommended, as it supports nested virtualization.
- Linux Host: This guide assumes you are using a Linux distribution as the host OS.
- A Virtual Machine: A VM already set up in VirtualBox.
Recommended Read :
Steps to Enable Nested Virtualization (VT-x/AMD-v) In VirtualBox
1) Verify Virtualization Support on Your Host
Check if your CPU supports virtualization extensions, run the following command from the terminal.
$ egrep -c "svm|vmx" /proc/cpuinfo
16
$
If the output is more than zero then it confirms that CPU supports virtualization.
In case Virtualization is not enabled on your Linux system, then reboot your machine.
- Enter BIOS/UEFI settings (usually by pressing F2, Del, or Esc during boot).
- Enable options like Intel VT-x or AMD-v under the CPU configuration.
2) Update VirtualBox
Note: To install latest version of virtualbox, make sure you have configured official VirtualBox repository.
// VirtualBox Repository for Debian based Linux Distributions
$ curl -fsSL https://www.virtualbox.org/download/oracle_vbox_2016.asc|sudo gpg --dearmor -o /etc/apt/trusted.gpg.d/vbox.gpg
$ curl -fsSL https://www.virtualbox.org/download/oracle_vbox.asc|sudo gpg --dearmor -o /etc/apt/trusted.gpg.d/oracle_vbox.gpg
$ echo "deb [arch=amd64] http://download.virtualbox.org/virtualbox/debian $(lsb_release -sc) contrib" | sudo tee /etc/apt/sources.list.d/virtualbox.list
// VirtualBox Repository for RHEL based Linux Distributions
$ sudo dnf config-manager --add-repo=https://download.virtualbox.org/virtualbox/rpm/el/virtualbox.repo
$ sudo rpm --import https://www.virtualbox.org/download/oracle_vbox.asc
In order to update your virtualbox to latest version, run beneath command.
$ sudo apt update && sudo apt install virtualbox-7.1 -y
Replace apt with your package manager (dnf, zypper, etc.) if you’re using a different Linux distribution.
$ vboxmanage --version
Note: At time of writing this article, latest version of VirtualBox is 7.1,
3) Enable Nested Virtualization for a VM
Suppose I have a Ubuntu virtual machine (VM) running on VirtualBox, and I want to enable nested virtualization for this VM. Before proceeding, log in to the VM console and run the following command to check for nested virtualization support:
$ grep -E --color 'vmx|svm' /proc/cpuinfo
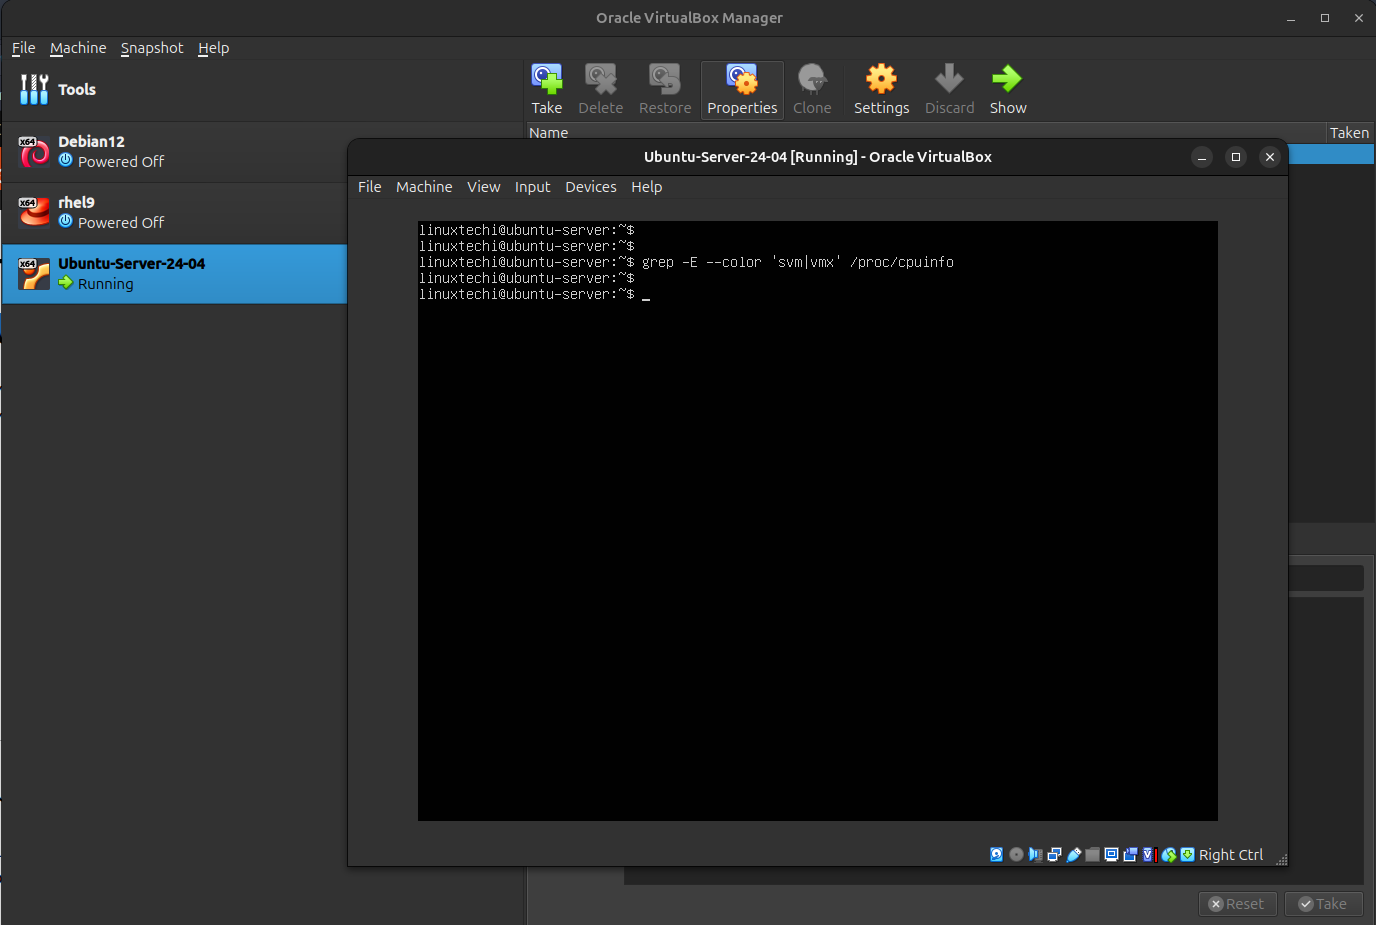
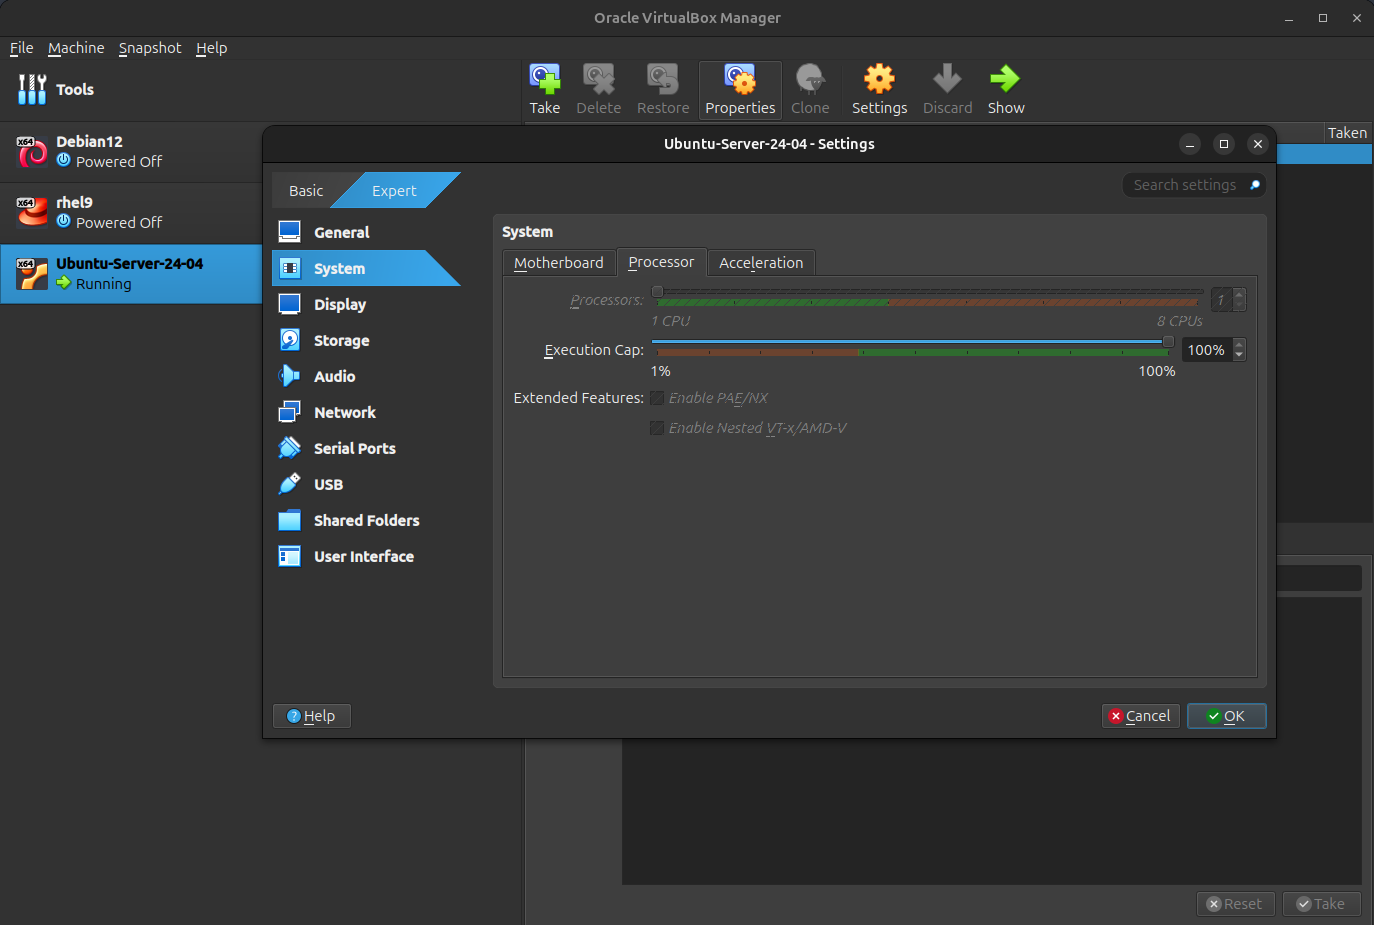
Output above shows that virtualization is not enabled inside Ubuntu Server VM. This also confirms that VirtualBox does not enable nested virtualization by default.. You need to configure it manually:
a) Power off the virtual machine you want to configure.
b) Use the VBoxManage command to enable nested virtualization, run the following command.
$ VBoxManage modifyvm “Your_VM_Name” –nested-hw-virt on
Replace Your_VM_Name with the name of your VM.
Example:
$ VBoxManage modifyvm 'Ubuntu-Server-24-04' --nested-hw-virt on

c) Confirm the setting, run
$ VBoxManage showvminfo "Ubuntu-Server-24-04" | grep Nested
The output should indicate that nested virtualization is enabled.

Now, head back to GUI, Select the desired VM, then go to Settings. Under the System tab, navigate to the Processor section.
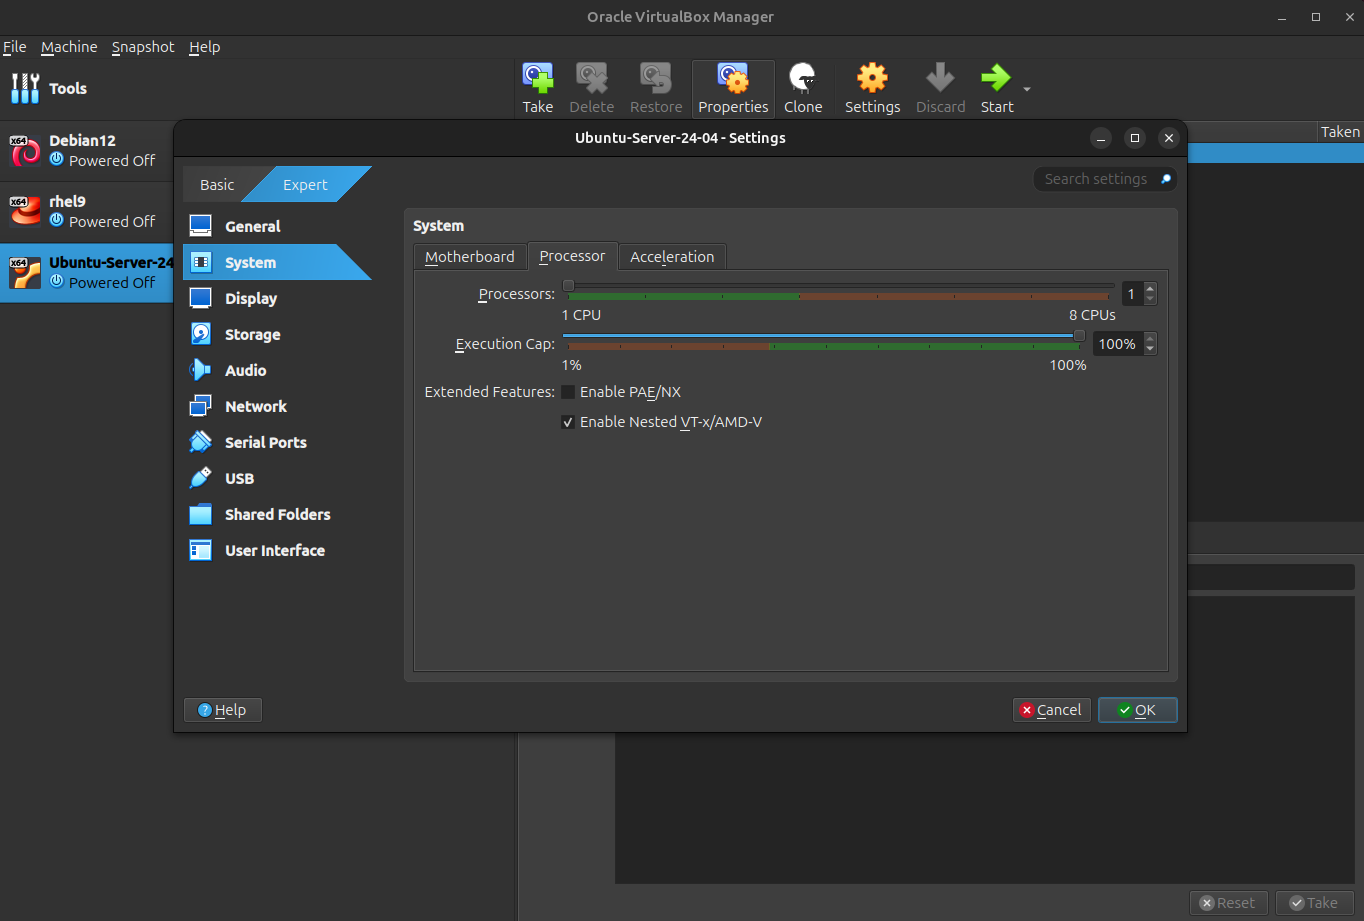
Now, let’s verify whether nested virtualization is enabled on the Ubuntu Server VM. Power on the VM, log in to the console, and execute the following commands:
$ egrep -E –color ‘svm|vmx’ /proc/cpuinfo
$ grep -c 'svm|vmx' /proc/cpuinfo
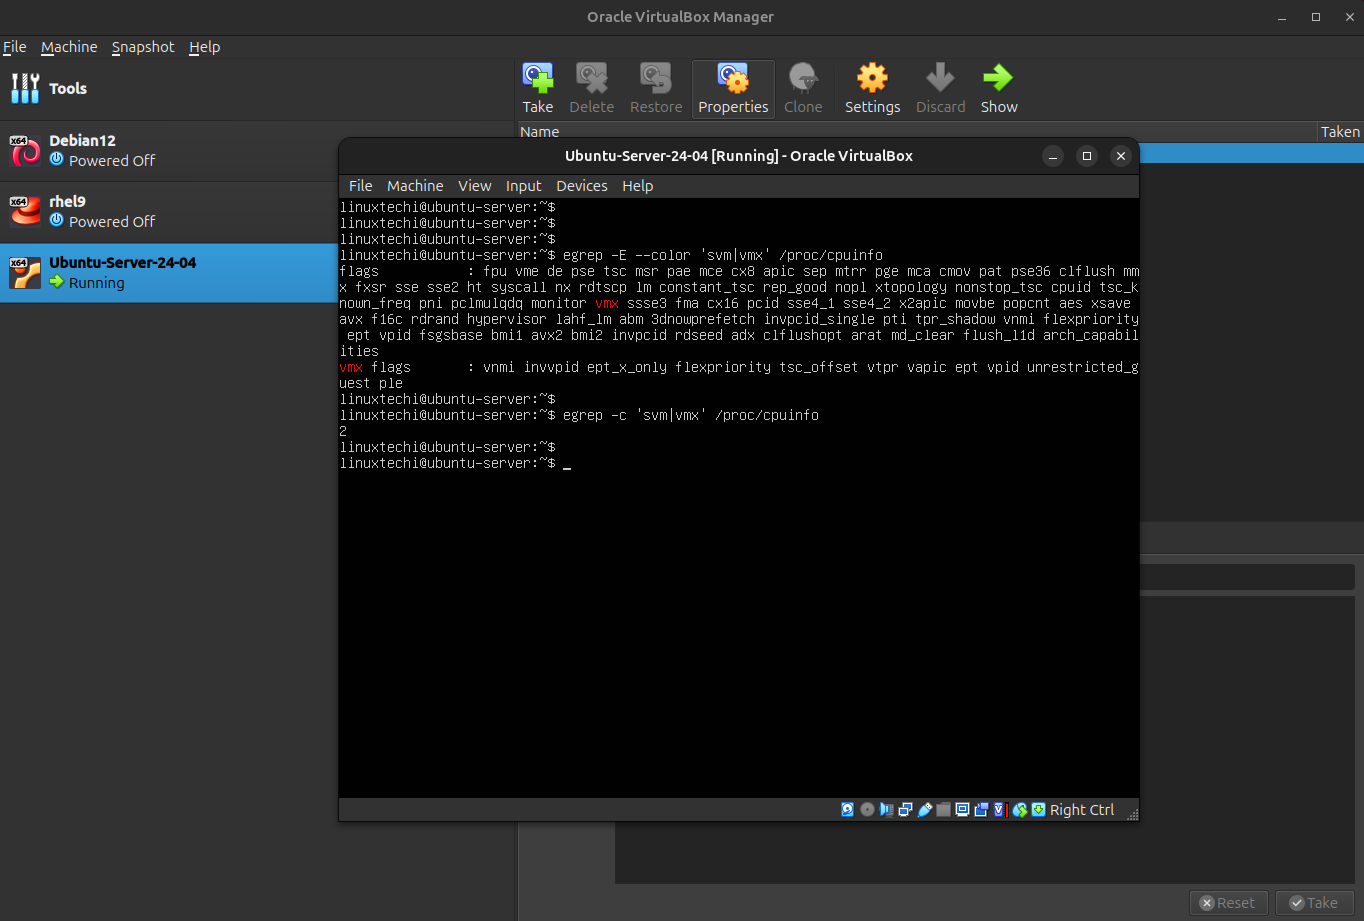
The output of the above commands confirms that Virtualization has been successfully enabled on the Ubuntu Server VirtualBox VM.
That concludes this guide. I hope you found it informative and gained a clear understanding of how to enable the Nested VT-x/AMD-V feature on Oracle VM VirtualBox. Feel free to share your feedback and comments below!

Here is an official confirmation in VirtualBox doc: ‘https://www.virtualbox.org/manual/ch03.html’ Chapter 3.5.2. Processor Tab
Enable Nested VT-x/AMD-V: Enables nested virtualization, with passthrough of hardware virtualization functions to the guest VM.
This feature is available on host systems that use an AMD CPU. For Intel CPUs, the option is grayed out.
And I can confirm, it doesn’t work on Intel(R) Xeon(R) CPU E5540
Hello I tried enabling the nested virtualization but got an error: “Cannot enable nested VT-x/AMD-V without nested-paging and unrestricted guest execution! (VERR_CPUM_INVALID_HWVIRT_CONFIG). Result Code: NS_ERROR_FAILURE (0x80004005) Component: ConsoleWrap Interface: IConsole {etc…}. Tried executing command you wrote with sudo and still it won’t open in VB. Any ideas? Thanks
Perhaps this will solve your problem too.
My host OS was Windows 10 (build 2004 – April 2020) that I was running VirtualBox on (as opposed to a Linux host in the article). I had this same error, “Cannot enable nested VT-x/AMD-V without nested-paging and unresricted guest execution!”.
Then I found this thread: ‘https://nullrend.com/11909/verr_cpum_invalid_hwvirt_config/’
The problem I was having was that Windows Hyper-V was interfering with VirtualBox. Perhaps this can happen on other host OSes too where another hypervisor, like KVM, interferes with VirtualBox.
My problem was fixed once I executed the following command and rebooted my Windows 10 host:
Disable-WindowsOptionalFeature -online -FeatureName VirtualMachinePlatform
i create vm in vbox to running docker, but its containers can’t ping outsite the world. i think it cause nested is disabled. but after i enable i have same problem