In this guide, we will explain how to use Jinja2 template in Ansible playbook.
Jinja2 is a powerful and easy to use python-based templating engine that comes in handy in an IT environment with multiple servers where configurations vary every other time. Creating static configuration files for each of these nodes is tedious and may not be a viable option since it will consume more time and energy. And this is where templating comes in.
Jinja2 templates are simple template files that store variables that can change from time to time. When Playbooks are executed, these variables get replaced by actual values defined in Ansible Playbooks. This way, templating offers an efficient and flexible solution to create or alter configuration file with ease.
Jinja2 Template Architecture
A Jinja2 template file is a text file that contains variables that get evaluated and replaced by actual values upon runtime or code execution. In a Jinja2 template file, you will find the following tags:
- {{ }} : These double curly braces are the widely used tags in a template file and they are used for embedding variables and ultimately printing their value during code execution. For example, a simple syntax using the double curly braces is as shown: The {{ webserver }} is running on {{ nginx-version }}
- {% %} : These are mostly used for control statements such as loops and if-else statements.
- {# #} : These denote comments that describe a task.
In most cases, Jinja2 template files are used for creating files or replacing configuration files on servers. Apart from that, you can perform conditional statements such as loops and if-else statements, and transform the data using filters and so much more.
Template files bear the .j2 extension, implying that Jinja2 templating is in use.
Creating Jinja2 Template File
Here’s an example of a Jinja2 template file example_template.j2 which we shall use to create a new file with the variables shown
Hey guys!
Apache webserver {{ version_number }} is running on {{ server }}
Enjoy!
Here, the variables are {{ version_number }} & {{ server }
These variables are defined in a playbook and will be replaced by actual values in the playbook YAML file example1.yml below.
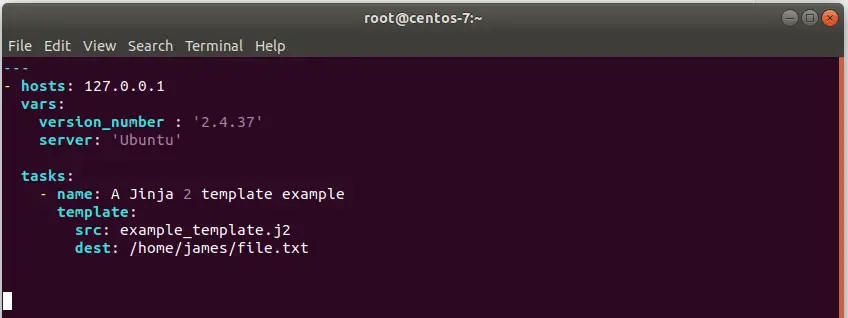
When the playbook is executed, the variables in the template file get replaced by the actual values and a new file is either created or replaces an already existing file.txt in the destination path.
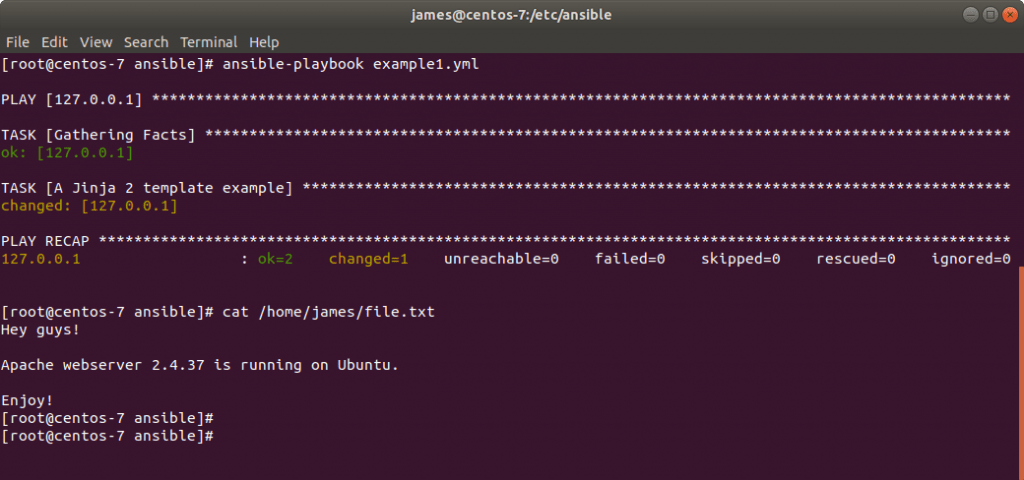
From the playbook execution, view the destination and notice that the variables have been replaced by the values defined in the Ansible playbook file.
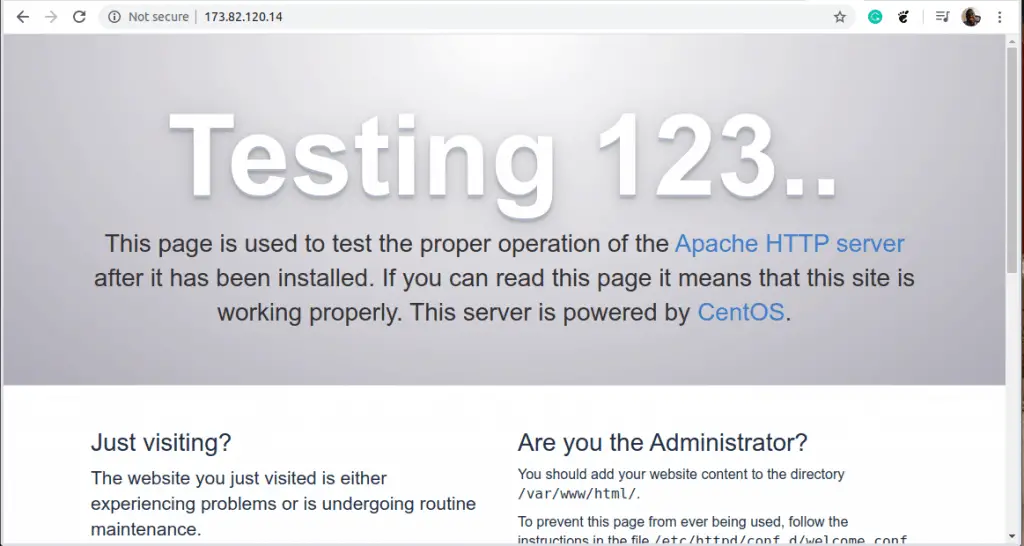
To get a better sense of how you can push configuration files, we are going to create a Jinja2 template that creates an index.html file in the web root or document directory /var/www/html on a CentOS 7 server. Apache is already running and is displaying the default welcome page as shown,
The template file, index.html.j2 appears as shown. Notice the presence of the ansible_hostname variable which is a built-in variable. When a playbook is executed, this will be replaced by the hostname of the webserver.
<html>
    <center><h1> The Apache webserver is running on {{ ansible_hostname }} </h1>
    </center>
</html>
The playbook file is shown below.

When the playbook is executed, a new index.html file is created and as you can see, the variable ansible_hostname has been replaced by the actual hostname of the server, in this case, Centos-7.

Jinja2 Template with Conditionals
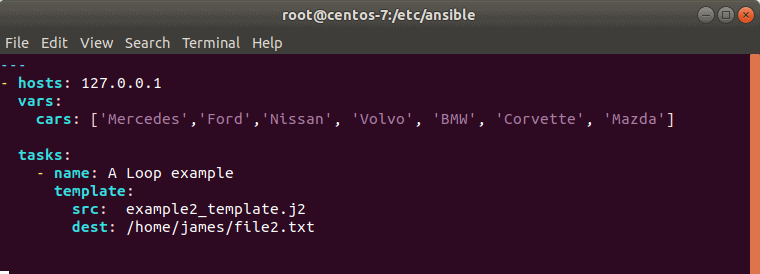
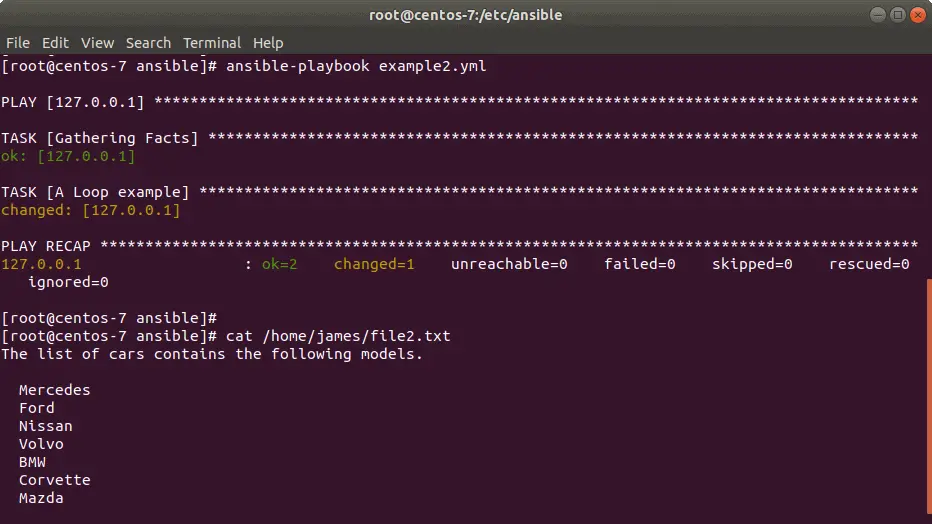
Jinja2 templating can also be used with conditional statements such as for loops to iterate over a list of items. Consider the Playbook example2.yml as shown in the pictorial below: We are going to create a template that will iterate over the list of car models called ‘cars’ and print the result in the file2.txt destination file.
The for loop in the Jinja2 template file – example2_template.j2 – is as shown

When the playbook is executed, the loop iterates over the car list, and prints out the car models in the destination file. You can use the cat command to examine the output and verify where the models exist in the file.
Jinja2 Template with Filters
Filters are used to alter the appearance of output or formatting data. This works by piping the variable name as shown:
{{ variable | argument }}
Let’s check out a few use cases:
a) Transform strings into either Uppercase or lowercase format
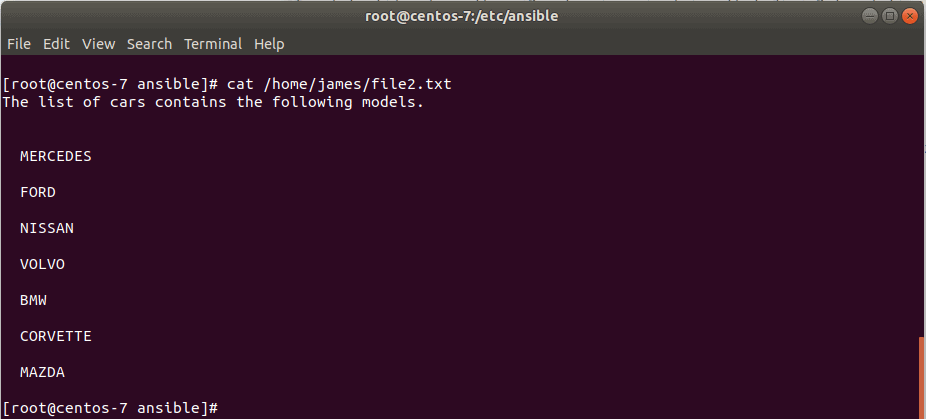
For example, to print the values in the previous list in uppercase characters using the template, pipe the variable item into the ‘UPPER’ argument as shown: {{ item | upper }}
When the playbook is executed, the values are transformed into uppercase
If the values are in lowercase from the start, use the ‘lower’ argument.
{{ item | lower }}
b) Use list filters to display maximum, & minimum values
If you are working with arrays or lists inside the template as shown, you can choose to print out your preferred values based on certain criteria.
For example, to print out the minimum value in a list, pass the whole list to the ‘min’ filter as shown.
{{ [ 100, 37, 45, 65, 60, 78 ] | min }} => 37
To get the maximum value, use the ‘max’ filter.
{{ [ 100, 37, 45, 65, 60, 78 ] | max }} => 100
You can obtain unique values from a list of duplicate values in an array using the unique filter as shown:
{{ [ 3, 4, 3, 3, 4, 2, 2 ] | unique }} => 3,4,2
c) Replacing a string value with another
Additionally, you can replace a string with a new one using the replace argument as shown
{{ ” Hello guys” | replace (“guys”, “world”) }} => Hello world
In the above example, the string guys will be replaced with world and now the statement will read:
Hello world
These are just a few filters. There are tons of builtin filters that you can use to manipulate the output of the Ansible Playbook execution.
The Jinja2 templating is an ideal solution when handling dynamic variables in configuration files. It’s a much efficient option than manually changing values which often takes a lot of time and can be quite tedious. Your feedback on this article is much welcome.
Also Read : How to Replace Strings and Lines with Ansible
Also Read : How to Create Ansible Roles and Use them in Playbook


good explanation for beginners like me..
Very good and useful article to introduce and clarify jinja2 basic concepts, thanks!
This is brilliant.
Condenses all that information into a 3 minute read.
No more trying to understand lengthy youtube videos.
Kudos!
every well explained with simple words